Ingredients
Equipment
Method
Preparing the Preferment (Levain)
- Your starter should look bubbly and be able to double in size within 4–6 hours. A strong starter is the key to getting a good rise and flavorful loaf. 4 to 12 hours before making your dough, prepare your preferment.
- In a small bowl, combine your bubbly, active gluten-free sourdough starter, brown rice flour, and purified water.120 g Active Gluten Free Sourdough Starter, 100 g Purified Water, 80 g Brown Rice Flour
- Stir well until fully mixed and then cover loosely with a clean towel.
- Let sit at room temperature until you're ready to mix the dough. (Anywhere from 4-12 hours.)
Mixing the Dough
- Make the psyllium gel: In a medium bowl, whisk together psyllium husk and warm water. Let it sit for 5 minutes to form a thick gel.20 g Psyllium Husk, 300 g Warm Water
- Measure the dry ingredients: While the psyllium gels, weigh and whisk together all the flours and salt in a large mixing bowl or the bowl of a stand mixer.100 g Potato Starch, 100 g Tapioca Starch, 60 g Sorghum Flour, 60 g Brown Rice Flour, 12 g Salt
- Combine wet ingredients: Add the preferment to the psyllium gel and whisk until smooth.
- Then stir in the oil, maple syrup (or honey), and apple cider vinegar until fully combined.15 g Maple Syrup, 14 g Oil, 2 g Apple Cider Vinegar
- Once you have mixed all the wet ingredients together, then add them to the dry ingredients in the large stand mixing bowl.
- Using a stand mixer with a dough hook attachment, mix for 7 minutes on speed 2. The dough should come together and be smooth.If it is too sticky to handle, let it sit for 5 more minutes to let the gluten-free flours fully hydrate.
Shaping & Proofing the Loaf
- Shape the dough by turning the dough out onto a clean surface and lightly dust it with rice flour.Gently shape it into a round by tucking the edges underneath to create surface tension on the top. To seal the bottom, cup your hands around the sides of the dough and move it in small circles while keeping the base in contact with the counter—this helps close any seams and form a smooth, even loaf.
Prepare the Banneton Basket
- Depending on the desired finished look of the loaf choose either:Dust a banneton generously with gluten-free flour (like rice or millet), ORLine the basket with a clean tea towel to avoid the spiral lines.
- Place the dough in the basket seam-side up (upside down), cover with plastic wrap, then lay a tea towel on top to help hold in moisture.
- Proof the dough: Set the basket on the counter for about for 4–6 hours. The ideal proofing temperature is 75 degrees F. See notes for proofing tips.
Baking the Loaf
- Preheat: Place your Dutch oven on the center rack and preheat the oven to 425°F for 45 minutes.Tip: If you often get a tough bottom crust, place a baking sheet on the rack below the Dutch oven to diffuse heat
- Transfer the dough. Once the oven is preheated, gently turn the dough out onto a sheet of parchment paper. Handle with care to avoid deflating it.
- Score the loaf: Use a sharp knife or bread lame to make a shallow (1/4 inch) slash across the top of the loaf.For a better "ear" and controlled rise, make a second pass at a 45° angle along the same cut. Scoring allows steam to escape in a specific area, preventing the crust from cracking unpredictably.
- If you'd like to add a decorative touch, this is the time—lightly dust the top of the loaf with brown rice flour to make your scoring design stand out beautifully.
- Bake covered: Carefully lower the dough (on parchment paper) into the hot Dutch oven. (You can also use a silicone sling for this step if desired.) Cover with a lid and bake for 50 minutes.
- Finish uncovered: Remove the lid and continue baking uncovered for 10 more minutes. This allows the crust to darken and crisp.
- Check internal temp: Use a thermometer to make sure the center of the loaf reaches at least 210°F (99°C). This ensures it’s fully baked and not gummy.
- The bottom of the loaf should sound hollow when tapped—it’s a good sign the bread is fully baked.
- If internal temperature is not 210 degrees Fahrenheit, bake for 5 minutes more and check again. Repeat until thermometer reads 210 degrees F.
- Remove the bread from the Dutch oven and place on a cooling rack.
- Let it cool completely (at least 3–4 hours) before slicing. Gluten-free bread needs this time to set the crumb properly.Cutting too early can cause a gummy or underdeveloped center. Patience is worth it for that perfect slice!
Nutrition
Video
Notes
Video:
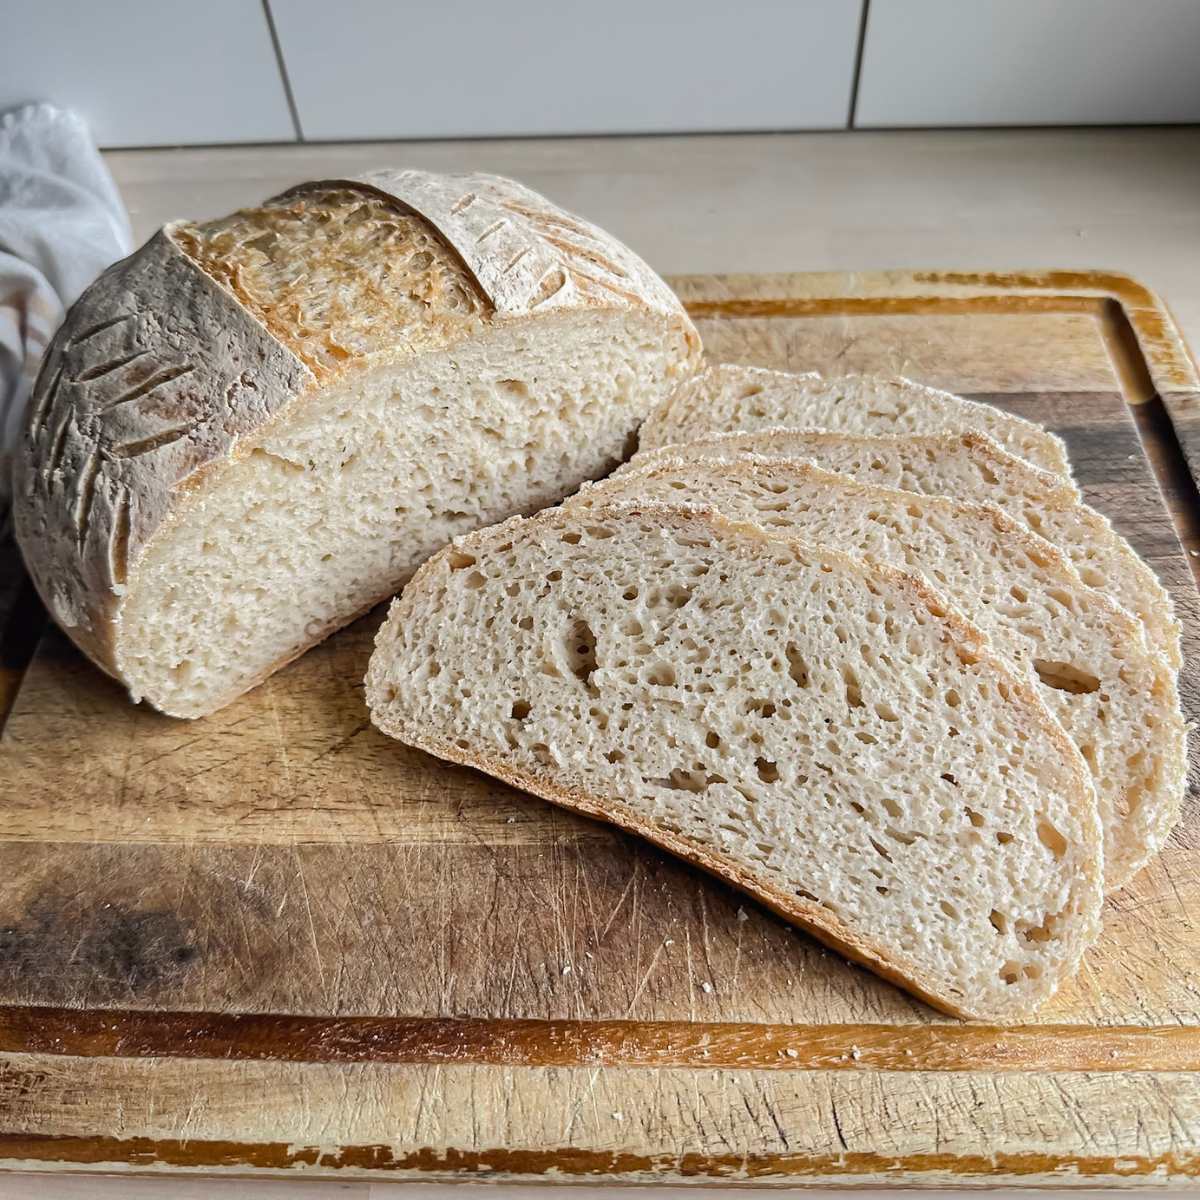
Visual walkthrough of mixing, shaping, scoring, and baking this gluten-free sourdough artisan loaf.Timing Tips (With Sample Schedule)
Here’s how a typical baking timeline might look if you want your fresh gluten-free sourdough bread ready by early afternoon the next day:-
- 5:00 PM (Day 1): Feed your gluten-free sourdough starter using a 1:1:1 ratio (equal parts starter, flour, and water).
-
- 9:00 PM (Day 1): Mix your preferment (also called a levain). Cover and let it rest at room temperature overnight.
-
- 7:00 AM (Day 2): The next day, follow the rest of the instructions from "mixing the dough".
-
- 7:30 AM – 11:30 AM: Bulk ferment the dough at room temperature (about 4 hours, though this may vary depending on your environment).
-
- 11:30 AM: Begin preheating your oven and Dutch oven to 450°F.
-
- 12:00 PM: Turn out the dough, score the top, and transfer it to the hot Dutch oven. Bake as directed.
-
- 12:45 PM: Bread is done! Let it cool on a wire rack for at least 3–4 hours.
-
- 4:00 PM: The loaf is fully cooled and ready to slice and enjoy.
Preferment Tips:
The preferment builds flavor, helps the dough rise, and creates a more digestible loaf.- Shorter ferment (4–6 hours): Mild flavor.
- Longer ferment (up to 12 hours): More tangy, complex flavor.
Proofing Tips
If your house is warm (especially in summer), use a shorter proofing time or refrigerate the dough overnight to slow fermentation. If your house is cool (especially in winter), set the basket on top of the fridge or above the dishwasher after a cycle. It may take longer to fully proof. Signs of overproofing to watch for:- Dough rises and then collapses or sinks.
- Wet or overly sticky surface after proofing step.
- Large bubbles around the edges.
- Strong alcohol smell.
How Warm Should The Water Be?
Use warm water that feels about the same temperature as a baby’s bath, comfortably warm to your wrist, but not hot or steaming. For those who want to know the exact ideal temperature, use a digital thermometer for 90 degrees Fahrenheit (32 degrees Celsius) which is optimal to gel the psyllium husk. It will then cool a few degrees by the time you add the gluten free sourdough starter which needs an optimal temperature of 75-85 degrees Farhrenheit to bloom. (24 degrees- 29 degrees Celsius)Trouble Shooting: Why Is My Loaf Gummy?
A gummy center is one of the most common challenges in gluten-free sourdough. Here are the most likely causes—and how to fix them: It wasn’t baked long enough.This is the #1 reason for gummy bread. Even if the crust looks done, the inside may still need time to fully set.
Fix: Keep baking until the internal temperature reaches at least 210°F (99°C). You can also lower the oven temperature slightly and extend the bake time to help the inside dry out without burning the crust. The dough had too much water.
Gluten-free flours absorb water differently, and even a small excess can throw off texture.
Fix: Next time, reduce the water slightly (start with 10–20g less) and take note of your dough’s consistency. You sliced too soon.
Gluten-free bread needs time to cool and finish setting internally.
Fix: Let your loaf cool completely, at least 2–3 hours, before slicing. I usually cool the loaf overnight. Cutting early traps steam inside and causes gumminess. You accidentally deflated the loaf.
Rough handling (like dropping it into the Dutch oven) can collapse air pockets and lead to dense, underbaked spots.
Fix: Be gentle when transferring! Use parchment to lower it in smoothly, and avoid bumping or shaking the dough.
The Crust Is Too Hard, What Should I Do?
It’s completely normal for the crust to feel hard right after baking, especially with gluten-free sourdough. As the loaf cools, the crust will naturally soften, so don’t worry if it feels tough at first. To check the internal temperature, insert your thermometer into a cut or scored section (where the bread lame sliced), since the crust can be too firm elsewhere. If the crust still feels too hard after cooling:Try adding 1–2 grams more oil to your dough next time. A little extra fat helps soften the crust and improves overall texture. Or you can spritz the outside with some oil/ apply some butter right away once you remove it from the oven.