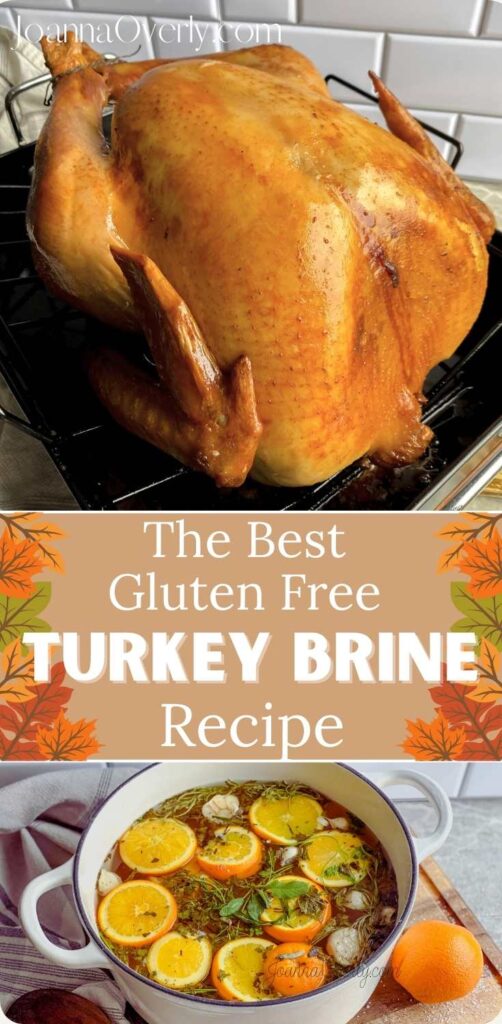
Turkey brine is the secret to a juicy, flavorful whole turkey or turkey breast. This gluten-free turkey brine is simple to make and sure to impress your holiday guests. With brown sugar, salt, citrus, and fresh herbs, it transforms an ordinary bird into a show stopping centerpiece for your Thanksgiving table.
Want more gluten free Autumn flavors? Check out my Easy Brown Sugar Caramel Sauce, Gluten Free Pumpkin Bars Recipe with Cream Cheese Frosting, or Homemade Chai Tea Latte Recipe.
Please note that this post may contain affiliate links. As an Amazon Associate, I may earn commissions from qualifying purchases, at no additional cost to you. Thank you for your support!
Why You’ll Love This Easy Turkey Brine Recipe
Recipe Ingredients
Note:
Below are the key ingredients you’ll need. You can find the complete list with measurements in the recipe card at the bottom of the post.
- Whole Turkey or Turkey Breast – Choose a fresh or thawed turkey that fits your brining bag or large stock pot. A 12–14 lb turkey is ideal for this brine recipe. Be sure to remove the giblets from the inside of the turkey before brining.
- Brining Bag – A sturdy, food-safe brining bag makes cleanup easy and ensures the brine mixture coats the turkey evenly. You can usually find them near the foil and plastic wrap in most grocery stores, or order them online.
- In a pinch, a Reynolds oven bag works too—it’s not as roomy but gets the job done.
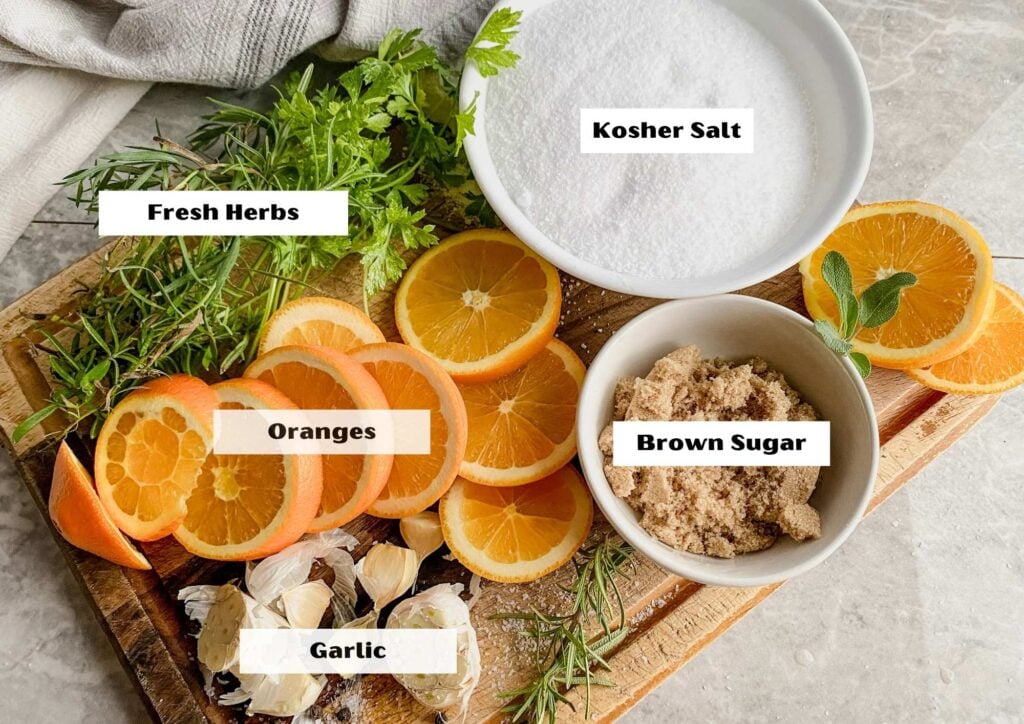
- Kosher Salt – This is the base of your brining solution. It draws moisture into the meat and enhances flavor. Look for it in the baking aisle. Avoid table salt, which is too fine and can make the brine overly salty.
- Brown Sugar – Adds a subtle sweetness that balances the salt. I prefer dark brown sugar for the added molasses, but you can use light brown sugar if that’s what you have on hand. For a refined sugar-free option, try coconut sugar or coconut palm sugar.
- Citrus – Fresh citrus brightens the flavor and adds acidity, which helps tenderize the meat. Use what you have on hand, mandarins, navel oranges, and lemons work great too.
- Garlic – Adds savory depth to the brine. Smash them gently to release more flavor.
- Bay Leaves – These add a subtle herbal note and pair well with turkey. Find them in the spice section.
- Fresh Herbs (Thyme, Rosemary, Sage, Parsley) – These give the turkey its classic holiday flavor. You can usually find poultry herb bundles in the produce section around Thanksgiving.
How to Make Gluten Free Turkey Brine: Step By Step Instructions
Here are some quick visual instructions for preparing a gluten free turkey brine. Full details and exact amounts can be found in the recipe card below!
Making the Brine Solution
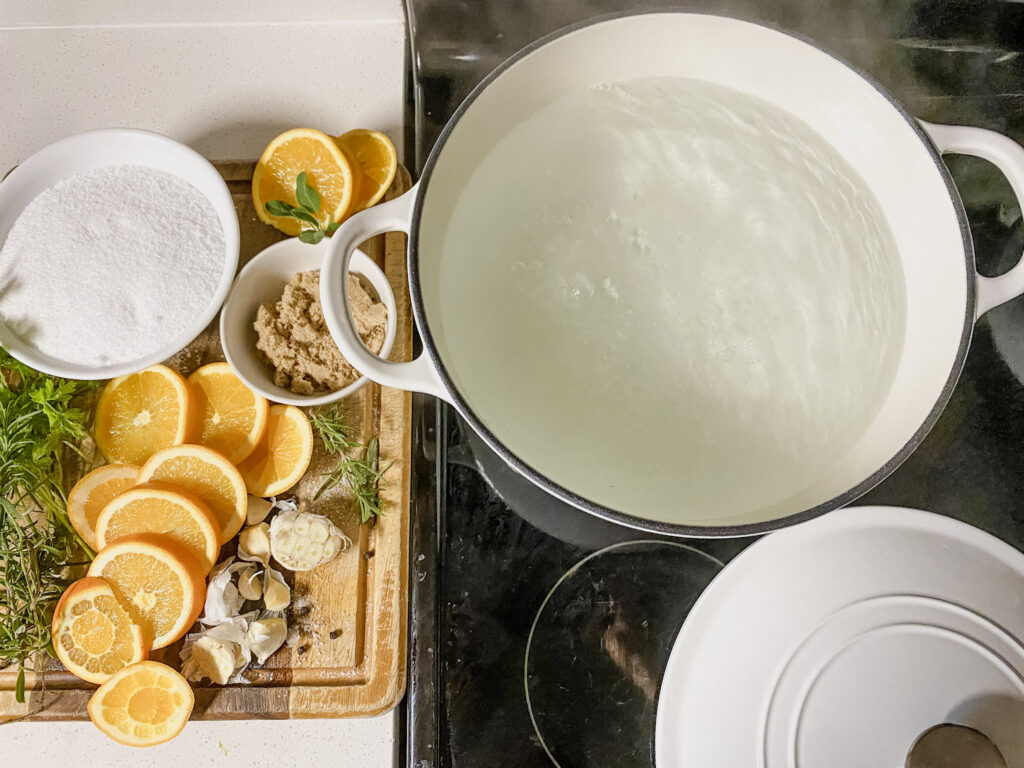
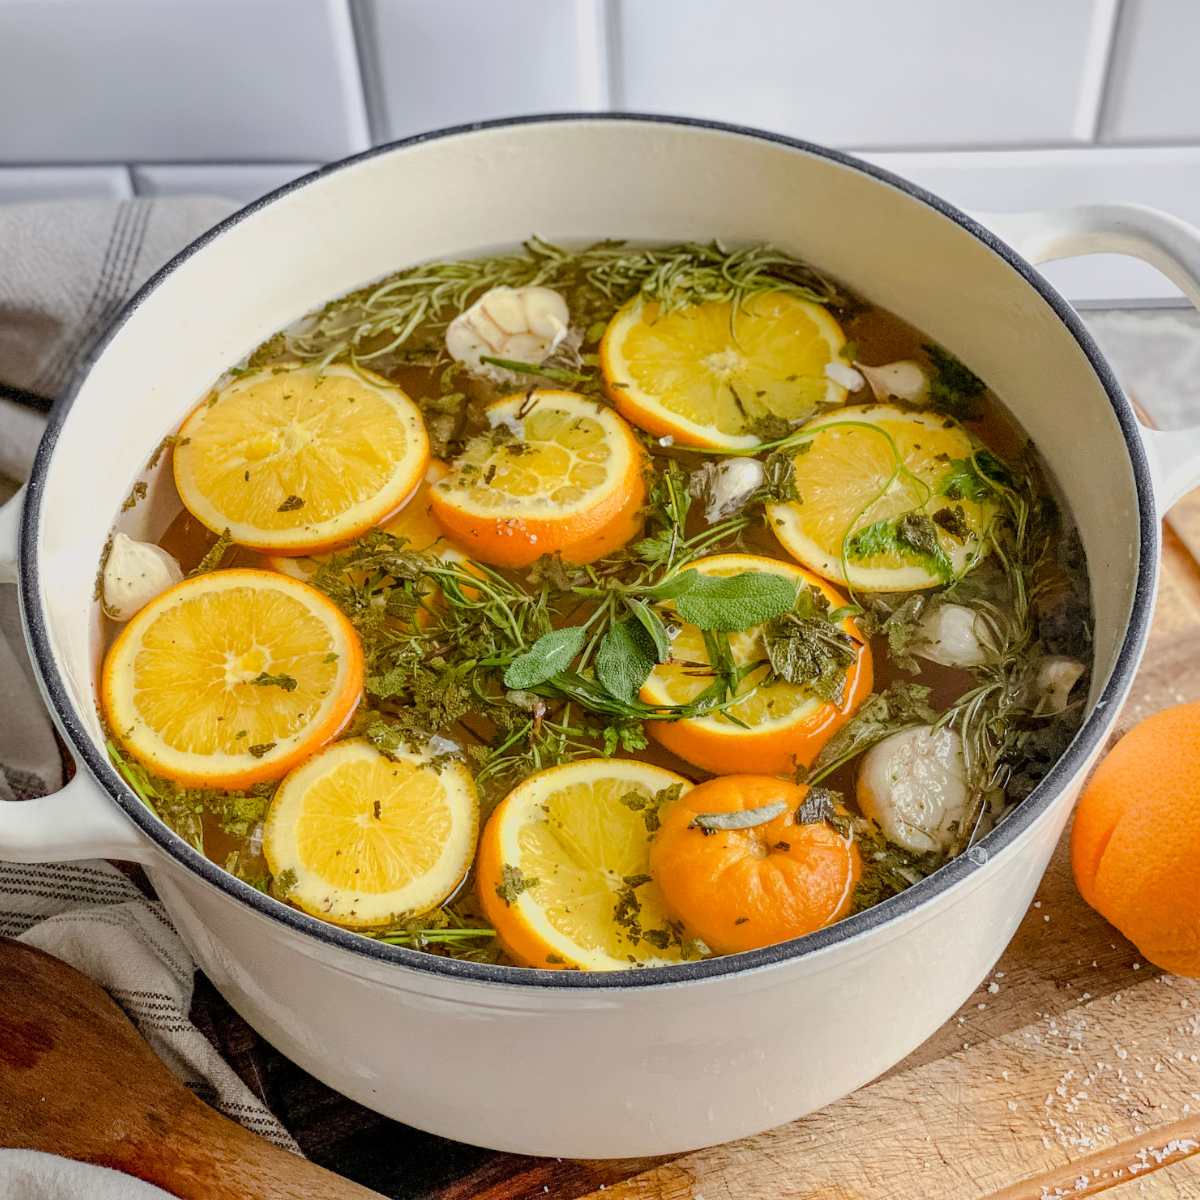
Step 1: In a large stock pot, bring 2 gallons of purified water to a boil over medium-high heat.
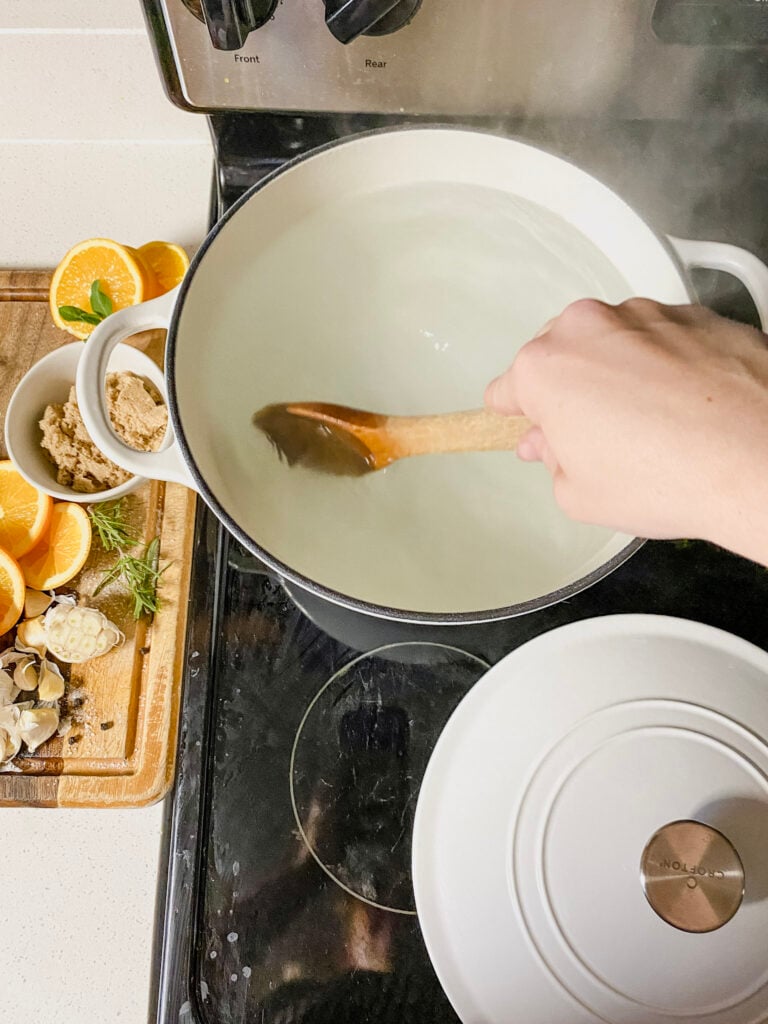
Step 2: Add 2 cups of kosher salt to the boiling water and stir until completely dissolved. This creates your salt solution and base for the brine.
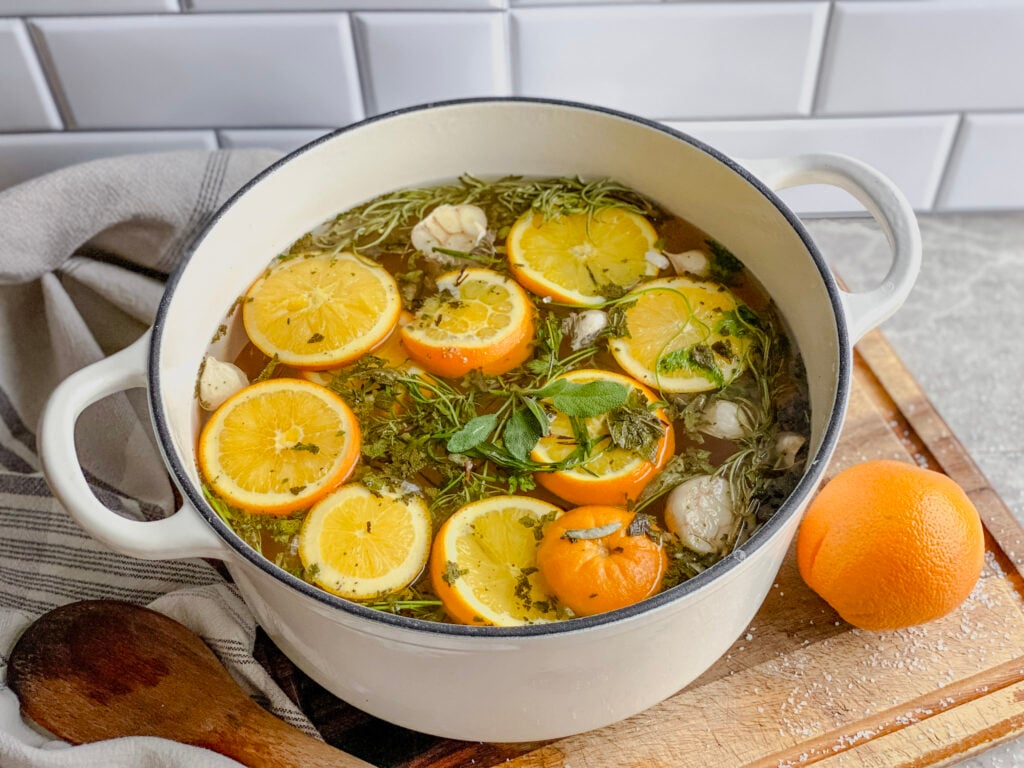
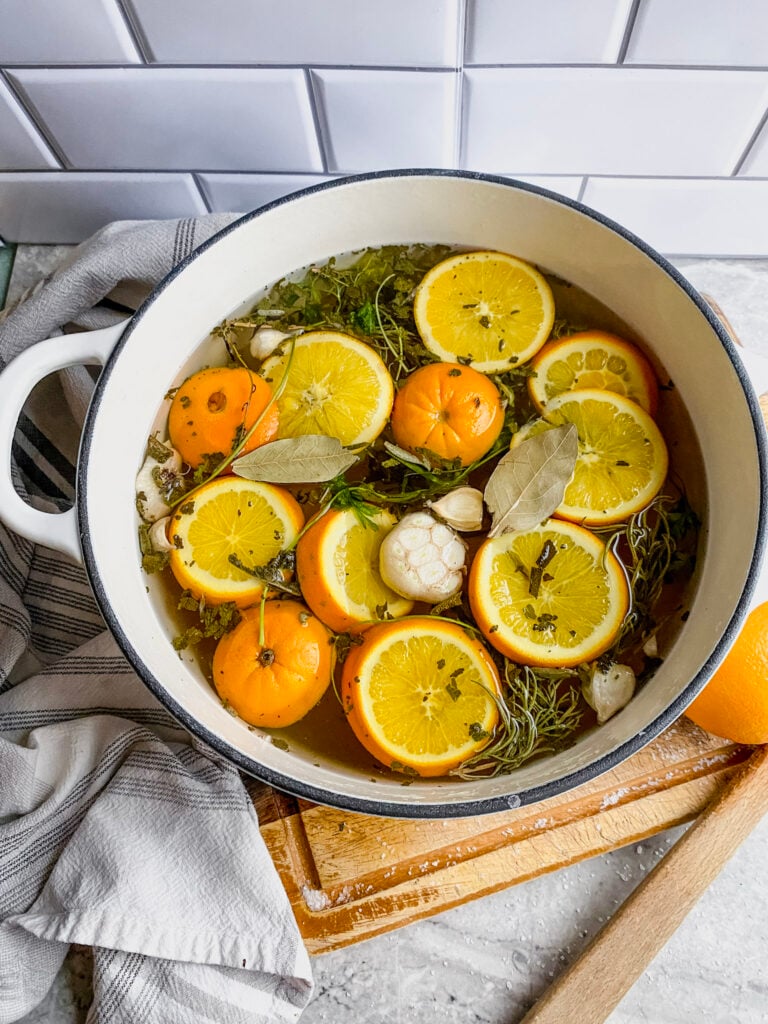
Step 3: Add the rest of the turkey brine ingredients: brown sugar, sliced citrus, 2 heads of garlic (cut in half crosswise), bay leaves, and a handful of fresh herbs like rosemary, thyme, sage, and parsley. Simmer for 5–10 minutes to let the flavors combine.
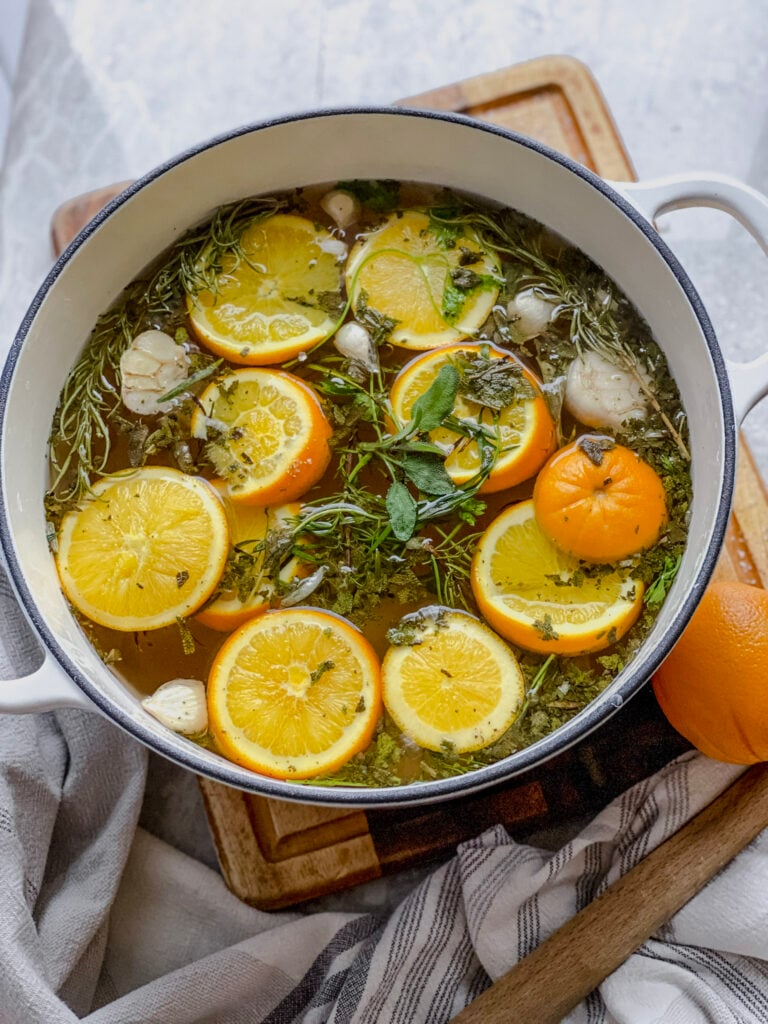
Step 4: Remove from heat and let the brine mixture cool to room temperature. You can speed this up by adding ice cubes or refrigerating it in a large bowl.
Brining Instructions
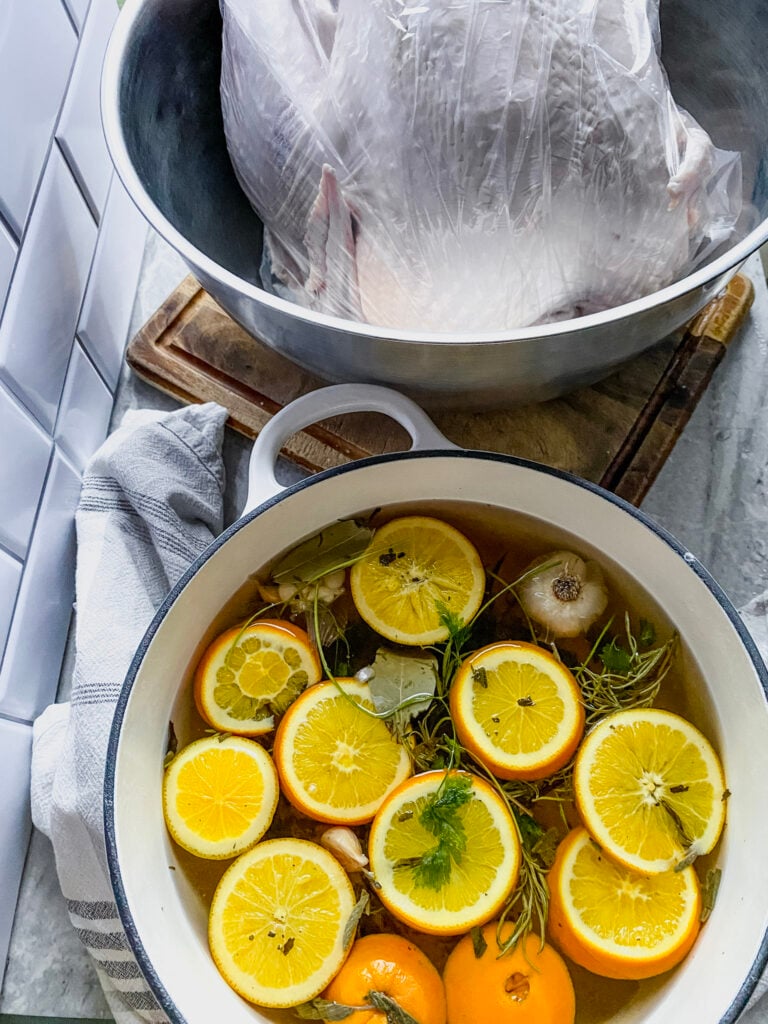
Step 5: Once the brine has cooled, prep your whole turkey or turkey breast. Remove the giblets and neck from the inside of the turkey, and place the bird into a brining bag (breast side down) set inside a 5-gallon bucket or large bowl that fits in your fridge.
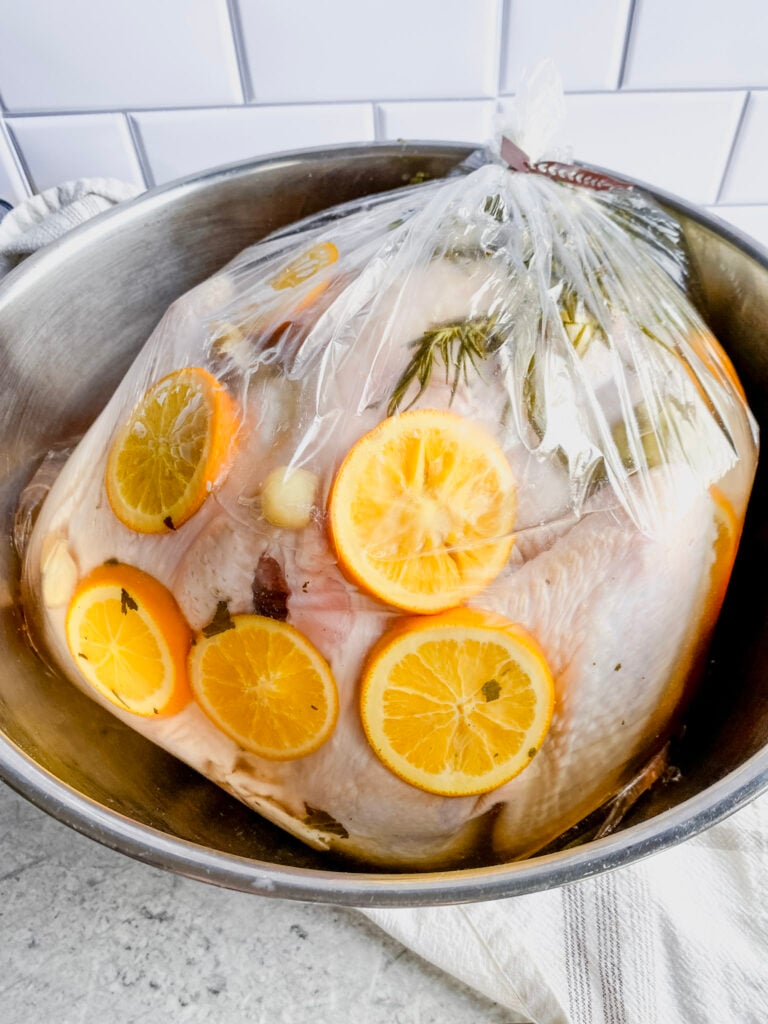
Step 6: Carefully pour the cooled brining solution over the turkey meat, making sure it’s fully submerged. Seal the brining bag tightly to keep the liquid around the bird. Place it in the refrigerator and brine for 12 to 24 hours, depending on the size of your turkey.
Step 7: On Thanksgiving Day or the day of cooking, remove the turkey from the brine. Rinse the bird under cold water to remove any excess salt from the turkey skin. Pat dry with paper towels. This helps the skin crisp up while roasting.
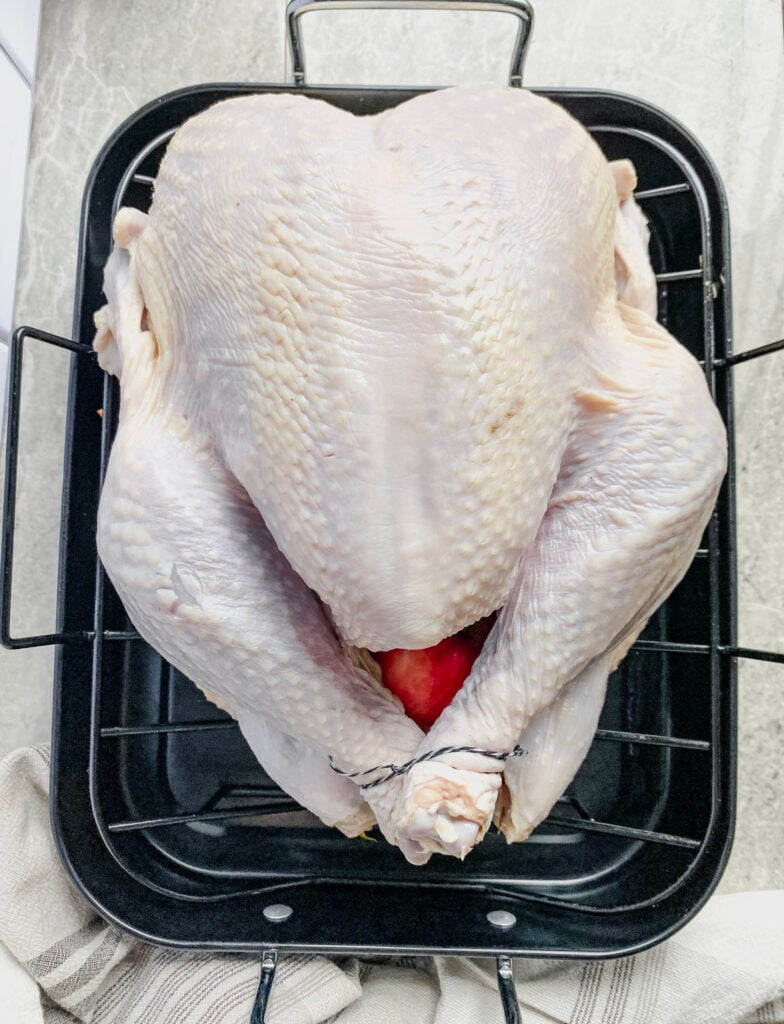
Optional: I like to stuff the inside of the turkey with quartered onions and an apple for extra flavor while it roasts.
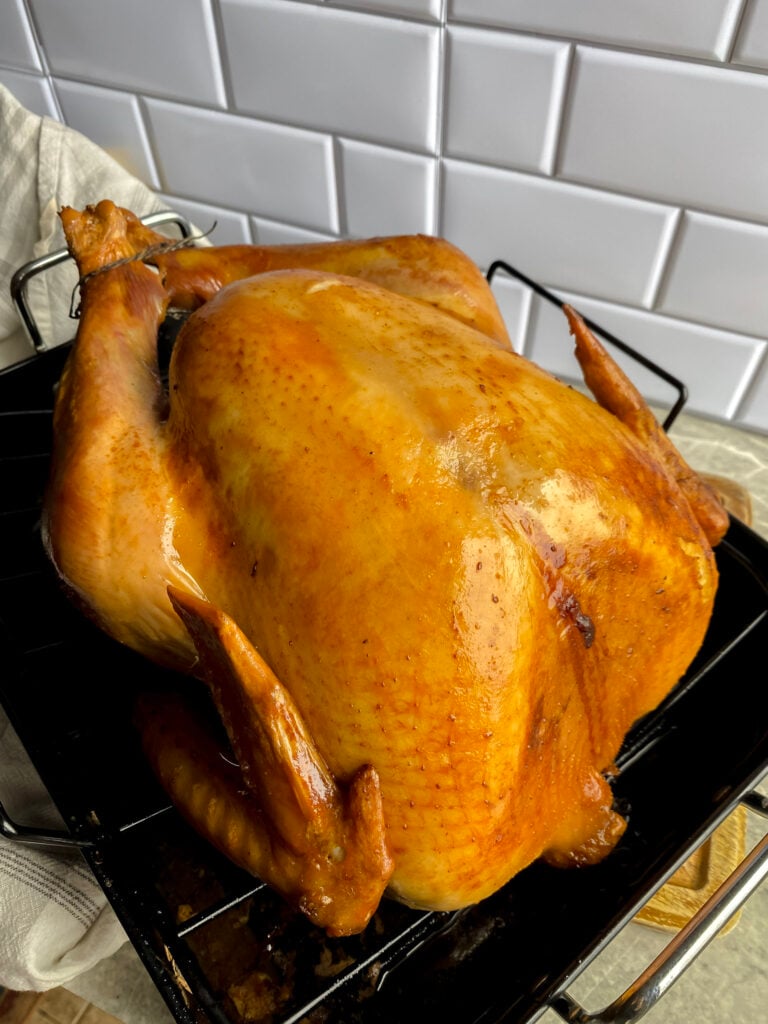
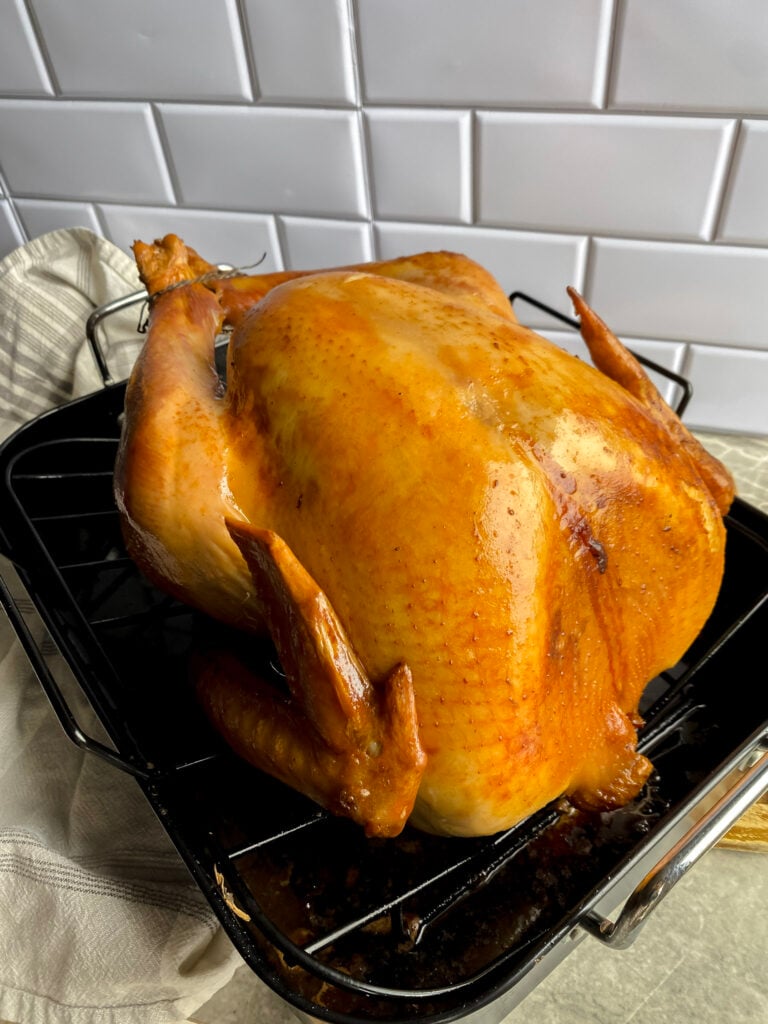
Step 8: Roast the turkey using a high-heat start for crispy skin, then lower the temperature to finish cooking evenly. I like to begin at 450°F for the first 30 minutes to help the turkey skin crisp up and lock in moisture. Then reduce the heat to 325°F and continue roasting until the internal temperature in the thickest part of the thigh reaches 165°F on an instant-read thermometer.
For a 12–14 lb turkey, total roasting time is typically 3 to 3½ hours, depending on your oven and the size of your turkey. Baste with melted butter or olive oil if desired, and cover loosely with aluminum foil if the skin starts to get too dark.
Helpful Tips for Brining the Best Turkey
- Give yourself enough fridge space.
- A 5-gallon bucket or brining bag takes up room, so make sure you have a spot cleared in your fridge—or use a cooler with ice cubes and keep it in a safe, cold spot if fridge space is tight.
- Don’t skip cooling the brine.
- Adding hot brine to raw turkey is a big food safety no-no. Always cool the brine mixture to room temperature (or colder) before pouring it over the bird.
- Use cold water to rinse.
- After brining, rinse the turkey with cold water to remove excess salt, especially from the turkey skin, so it doesn’t taste overly salty.
- Dry the skin for crispy results.
- Pat the turkey dry with paper towels after rinsing. You can even air-dry it uncovered in the fridge for a few hours before roasting to help get that crispy skin.
- Skip the salt in your rub or butter.
- Because the turkey has already soaked in a salt solution, there’s no need to add more salt before roasting—otherwise you’ll risk a too-salty bird.
- Use an instant-read thermometer.
- The best way to avoid under- or overcooking is to use a meat thermometer. Insert it into the thickest part of the thigh, avoiding the bone. Aim for 165°F.
How long to brine a turkey:
A Turkey should be brined for 12 to 24 hours for best results. Brining longer than 24 hours can lead to mushy meat.
A good rule of thumb is to brine for approximately one hour per pound of turkey.
Storage and Reheating Tips
Storing Leftover Turkey:
- After your turkey has rested and cooled, carve the turkey meat off the bone and store it in an airtight container or serving platter covered tightly with aluminum foil.
- Refrigerate leftovers within 2 hours of serving to keep them safe.
- Store in the refrigerator for up to 4 days, or freeze for up to 3 months in a freezer-safe bag or container.
Reheating Tips:
- For best results, reheat slices of turkey in a small bowl with a splash of broth, pan drippings, or melted butter to help keep the meat moist.
- Cover loosely with foil and warm in a 325°F degree oven until heated through (about 15–20 minutes).
- You can also reheat quickly in the microwave in 30-second bursts, but microwave-safe steamers help keep the meat from drying out.
Tools You’ll Need for This Turkey Brine
- Large Stock Pot – Used to heat and mix your brining solution. A pot that holds at least 8 quarts is ideal.
- Brining Bag – A heavy-duty, food-safe bag that holds the turkey and brine mixture. It helps coat the bird evenly and makes cleanup easier.
- 5-Gallon Bucket or Large Bowl – Place the brining bag inside one of these to support the weight of the turkey and catch any spills or leaks in the fridge.
- Paper Towels – Use these to pat the turkey skin dry after brining. This helps achieve crispy skin when roasting.
- Tongs or Heat-Safe Spoon – For stirring the brine mixture and handling hot ingredients safely.
- Instant-Read Thermometer – Make sure the thickest part of the thigh reaches 165°F to ensure safe cooking.
- Roasting Pan with Rack – Perfect for cooking your whole turkey and collecting flavorful pan drippings.
- Aluminum Foil – Use to tent the turkey if it browns too fast, and to cover leftovers for storage.
Frequently Asked Questions for How to Brine a Turkey
No, you’ll need to fully thaw your turkey before brining so the brining solution can soak into the turkey meat evenly. A frozen bird won’t absorb the flavors properly. Be sure to allow 2–3 days in the fridge to thaw a 12–14 lb turkey.
For best results, brine your whole turkey for 12 to 24 hours in the refrigerator. Less than 8 hours won’t give the brine time to penetrate, and over 24 hours may result in overly salty breast meat. Always keep the turkey submerged and cold in a brining bag placed inside a large bowl or 5-gallon bucket.
Yes, rinsing helps remove excess salt from the turkey skin, so it doesn’t come out too salty when roasted. Use cold water and pat dry thoroughly with paper towels to help the skin get crispy in the oven.
I hope you love this Gluten Free Turkey Brine Recipe as much my family does! If you try it, let me know in the comments below, I’d love to hear how it turned out for you!
Gluten Free Turkey Brine Recipe
Ingredients
Equipment
Method
- In a large stock pot, bring the water to a boil over medium high heat.2 Gallons Filtered Water
- Add the salt to the boiling water and stir until completely dissolved.2 Cups Kosher Salt
- Then add the remaining ingredients to the stockpot. Reduce the heat to medium and stir until the brown sugar is fully dissolved.1/4 Cup Dark Brown Sugar, 4 Oranges, 2 Bulbs of Garlic, 2 Bay Leaves, Fresh Herbs, 2 Tbsp Black Peppercorns
- Simmer for 10 minutes, stirring occasionally.
- Remove from heat and let the brine mixture cool to room temperature.
- Once the brine solution has cooled, prep your whole turkey by removing the giblets and neck from the inside of the turkey.
- Place the whole bird breast side down, inside the bringing bag set inside of a large bowl or a 5 gallon bucket that fits inside your refrigerator.
- Carefully pour the cooled brining solution over the turkey, making sure that it is fully submerged.
- Place it into the refrigerator for 12-24 hours, depending on the size of your turkey. (See notes)
- On the day of cooking, remove the turkey from the brine and dispose the solution.
- Rinse the turkey in cold water to remove excess salt from the turkey's skin. Pat dry with paper towels.
- Season your turkey and roast it however you like, oven, smoker, or roaster. Then slice, serve, and enjoy every flavorful bite!
Nutrition
Notes
Ingredient Notes
The 4 orange slices can easily be swapped with a mix of lemon, grapefruit, or mandarin.How long to brine a turkey:
A Turkey should be brined for 12 to 24 hours for best results. Brining longer than 24 hours can lead to mushy meat.A good rule of thumb is to brine for approximately one hour per pound of turkey.
FAQ
Can I brine a frozen turkey? No, you’ll need to fully thaw your turkey before brining so the brining solution can soak into the turkey meat evenly. A frozen bird won’t absorb the flavors properly. Be sure to allow 2–3 days in the fridge to thaw a 12–14 lb turkey. How long should I brine my turkey? For best results, brine your whole turkey for 12 to 24 hours in the refrigerator. Less than 8 hours won’t give the brine time to penetrate, and over 24 hours may result in overly salty breast meat. Always keep the turkey submerged and cold in a brining bag placed inside a large bowl or 5-gallon bucket. Do I need to rinse the turkey after brining? Yes, rinsing helps remove excess salt from the turkey skin, so it doesn’t come out too salty when roasted. Use cold water and pat dry thoroughly with paper towels to help the skin get crispy in the oven.Tried this recipe?
Let us know how it was!Be Sure to Always Double Check Ingredient Labels
It is always best practice to double-check your ingredient labels for hidden sources of allergens.
Also, please note the nutrition information is automatically calculated and should only be used as an approximation. It may vary based on ingredient brands, portion sizes, and preparation methods. For specific dietary or medical needs, consult a healthcare professional or registered dietitian.
Pin It for Later