Ingredients
Equipment
Method
Day 1
- Turn on your kitchen scale to grams and place your pint sized jar on the kitchen scale, then hit "TARE" to zero out the weight of the jar.
- Into the jar add 25 grams of brown rice flour and 25 grams of purified water.
- Stir to combine right inside of the jar. The consistency should be smooth and not lumpy. You can add a touch more water if necessary to make it more smooth.
- Please note, always add the minimum amount of water listed to start, but the starter should not be chunky with dry spots through out it. If necessary, add a little more water at time, stirring it well after each additional amount until you get a smooth, mostly lump free mixture.
- Using a small spatula, scrape down the sides of the jar so all of the starter is collected at the bottom and no excess remains on the sides.
- Cover the jar opening with a paper towel and secure it in place with a rubber band. Do not seal the jar with a lid. You want your starter to be able to breath and capture wild yeast but keep dust and pests out.
- Let sit for 24 hours in a warm place away from direct sunlight or cold drafts.
Day 2
- Place your jar with starter mixture on your kitchen scale again and "TARE" it out to show 0 grams.
- Then add 50 grams of brown rice flour and 50 grams of purified, room temperature water. Again, if it is dry and lumpy, add more water until it is a smooth, lump free texture.
- Stir to combine right inside of the jar. The consistency should be smooth and not lumpy. You can add a touch more water if necessary but it should have a slow fall when pouring it.
- Changing Jars: After feeding the starter, transfer it to a clean jar. Pour the freshly fed starter into the new jar, keeping the sides clean and leveling the surface so the starter sits evenly at the bottom.
- Cover the jar opening with a paper towel and secure it in place with a rubber band. Do not seal the jar with a lid.
- Let sit for 12 hours in a warm place away from direct sunlight or cold drafts.
Day 2 Second Feeding
- This will be your first discard. Place an empty pint-size jar on your kitchen scale and press "TARE" to zero it out. Then place the jar holding your starter on the scale to see how much starter you currently have.
- With a spoon, remove all but 50 grams of starter and throw it away. (See notes)
- Add add 50 grams of brown rice flour and 50 grams of purified, room temperature water.
- Stir to combine right inside of the jar. The consistency should be smooth and not lumpy. You can add a touch more water if necessary but it should have a slow fall when pouring it.
- Changing Jars: After feeding the starter, transfer it to a clean jar. Pour the freshly fed starter into the new jar, keeping the sides clean and leveling the surface so the starter sits evenly at the bottom.
- Cover the jar opening with a paper towel and secure it in place with a rubber band. Do not seal the jar with a lid.
- Let sit for 12 hours in a warm place away from direct sunlight or cold drafts.
Day 3 Repeat 12 hour Feedings and Discards
- Place an empty pint-size jar on your kitchen scale and press "TARE" to zero it out. Then place the jar holding your starter on the scale to see how much starter you currently have.
- With a spoon, remove all but 50 grams of starter and throw it away. (See notes)
- Add add 50 grams of brown rice flour and 50 grams of purified, room temperature water.
- Stir to combine right inside of the jar. The consistency should be smooth and not lumpy. You can add a touch more water if necessary but it should have a slow fall when pouring it.
- Changing Jars: After feeding the starter, transfer it to a clean jar. Pour the freshly fed starter into the new jar, keeping the sides clean and leveling the surface so the starter sits evenly at the bottom.
- Cover the jar opening with a paper towel and secure it in place with a rubber band. Do not seal the jar with a lid.
- Let sit for 12 hours in a warm place away from direct sunlight or cold drafts.
Day 3 Last 12 hour Feeding
- Repeat steps again of removing all but 50 grams starter and tossing the discard.
- Feed it with the same 1:1:1 ratio. You have 50 grams starter so feed it 50 grams brown rice flour and 50 grams purified water. Stir to combine well and then change jars and cover again.
- Let sit for 24 hours. (You are now done with 12 hour feedings). Things will look like they are slowing down after this but don't worry, it's still active.
Day 4- Day 7 Read Notes For Helpful Tips
- Continue to discard all but 50 grams of your starter every 24 hours and feed it in the 1:1:1 ratio, mixing well after every feeding to incorporate air
- Always change jars after feeding your starter. Don't get lazy now, this is very important to keep mold away!
- You can track your starter’s rise by placing a rubber band around the jar at the level of the starter right after mixing. This makes it easy to see how much the starter rises and falls between feedings.
- Cover the jar opening with a paper towel and secure it in place with a rubber band. Do not seal the jar with a lid.
- Let sit for 24 hours in a warm place, away from drafts and direct sunlight.
Day 8-14 Use the Discard
- You will continue to repeat the same steps of discarding, feeding 50 grams brown rice flour and 50 grams purified water and changing jars every 24 hours.
- But, now you can save and use the discard for discard recipes.
- Simply remove the discard and place it in a different jar till you have enough to make a recipe of your choice.
- I highly recommend saving some of the discard in a closed container and storing it in the refrigerator. This serves as a back up in case your current starter gets moldy or has some other issues, you won't have to start over on Day 1. (Just make sure to feed the discard once a week.)
- By the end of day 14 you should have used all or more of the brown rice flour and water called for in this recipe.2 Pounds Brown Rice Flour, 800 grams Water
Day 15 Evaluate Your Starter
- Once your starter is consistently rising within 3–6 hours after feeding for three days in a row, it’s ready to use for baking.
- You now have healthy gluten free sourdough starter and have graduated to maintenance mode! You can continue feeding the 1:1:1 ratios or increase up to a bulk feed of 1:3:3, or three times the amount of starter plus 3 times the amount of starter to brown rice flour and purified water.
- I recommend keeping your gluten-free sourdough starter at room temperature and feeding it daily for as long as possible while it matures. Regular, consistent feedings help strengthen the starter and build a healthy fermentation cycle.A truly mature and robust gluten-free starter is typically at least 3 months old with steady daily feedings. As your starter matures, you’ll notice better performance in your baking: stronger rise, improved crumb structure, and better overall flavor.
- Please read the notes about when and how to use a refrigerator to reduce daily feedings.
Video
Notes
You may find it helpful to print the free 15-Day Starter Tracker before beginning. You can find it in the blog post above the recipe card. It makes it easier to record daily feedings and monitor progress as your starter matures.
Don’t Skip This Step: Why We Discard
During the first 7 days, your gluten-free sourdough starter is still developing its balance of wild yeast and bacteria. Discarding helps dilute early, unstable microbes and excess acidity so the strong, beneficial yeast can establish and grow properly. This leads to a healthier, more reliable starter.
Hydration Notes
Every kitchen is different. Temperature, humidity, and elevation all affect how your gluten-free sourdough starter behaves. Start with the listed ratios, then adjust slightly based on texture.
Too thick:
If your starter is hard to stir, dry, or lumpy, add a small splash of water. Brown rice flour absorbs a lot of moisture and may need slightly more hydration. Too thin:
If water separates on top shortly after feeding, reduce the water slightly at the next feeding. Goal texture:
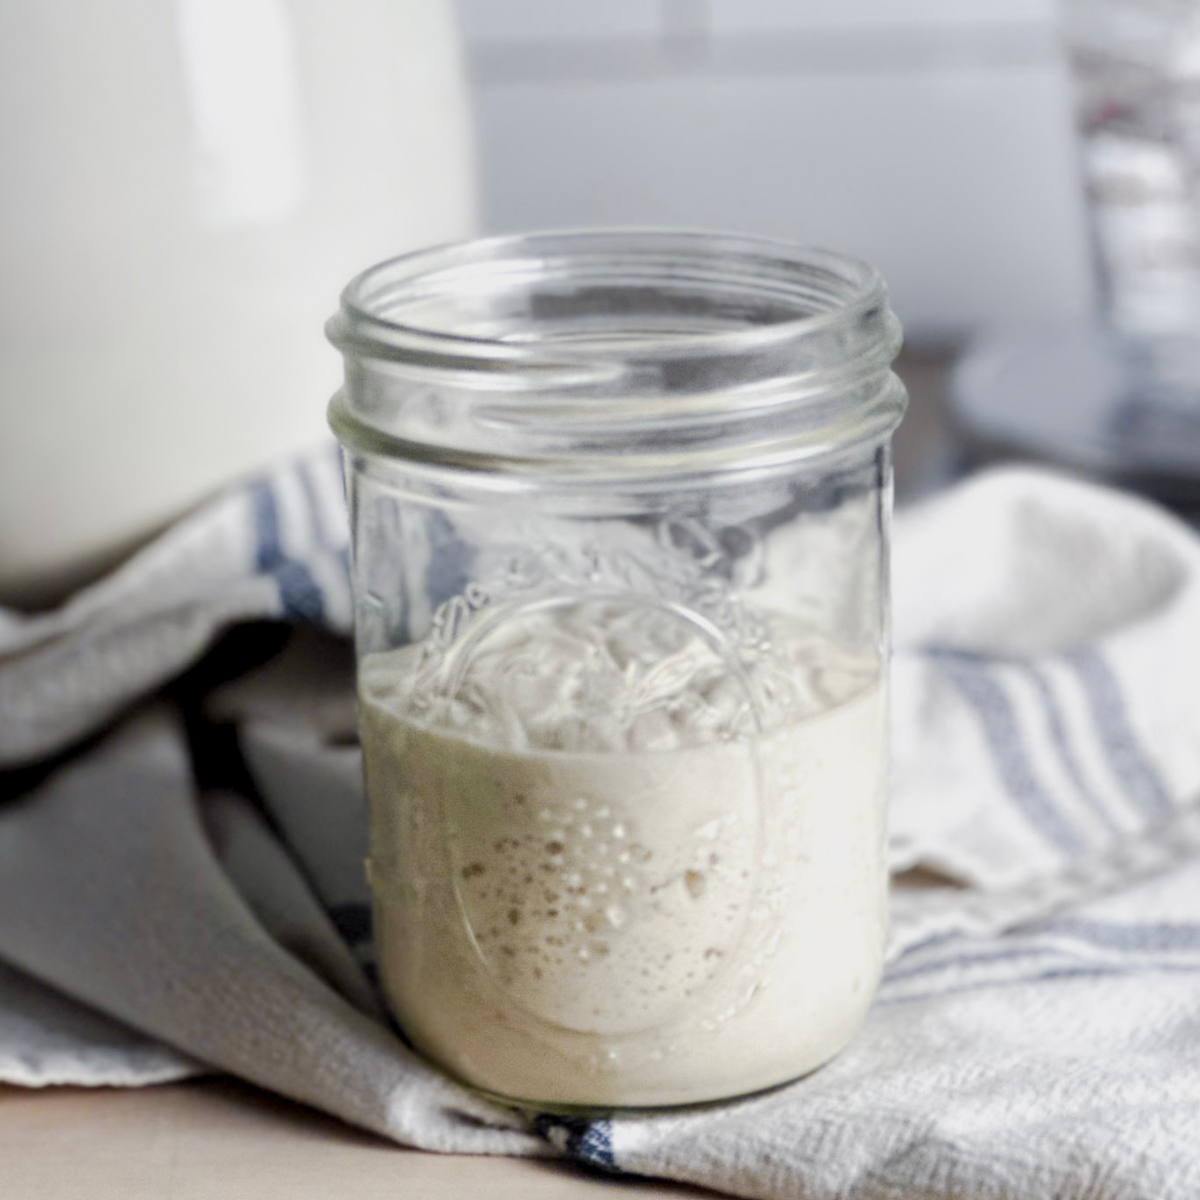
Smooth, easily stirred, no dry patches, and no standing water. Signs Your Starter Is Active As your starter develops, look for:
If your starter is hard to stir, dry, or lumpy, add a small splash of water. Brown rice flour absorbs a lot of moisture and may need slightly more hydration. Too thin:
If water separates on top shortly after feeding, reduce the water slightly at the next feeding. Goal texture:
Smooth, easily stirred, no dry patches, and no standing water. Signs Your Starter Is Active As your starter develops, look for:
- Small bubbles throughout
- A gentle daily rise and fall (gluten-free starters usually rise 50–75%, not always doubling)
- A mild tangy, yeasty smell
- Feed as normal
- Cover with a solid lid
- Place in the fridge well-fed