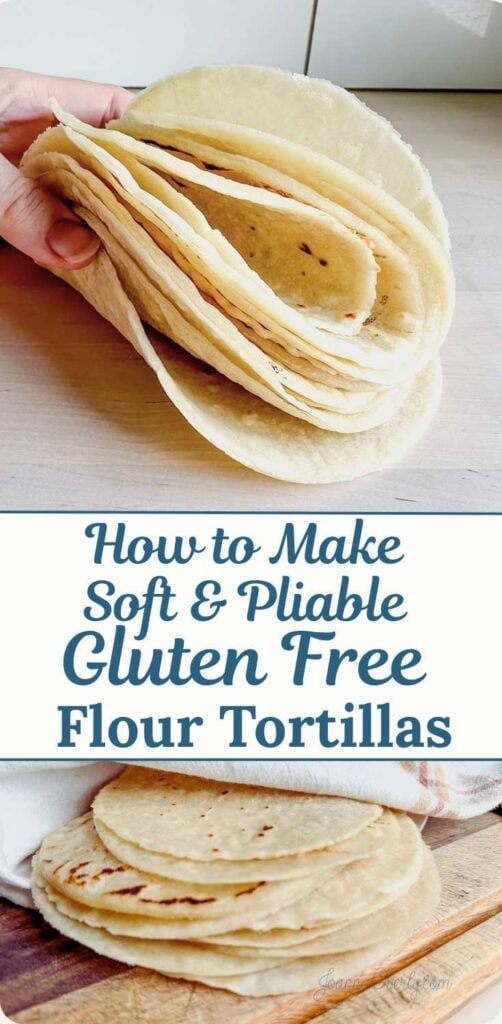
Gluten-free flour tortillas are so delicious when homemade and fresh! If this is your first time making homemade tortillas, don’t worry, this is a super-easy recipe with lots of helpful tips.
These gluten-free tortillas use simple ingredients and come together with very little effort. Perfect for busy weeknights or weekend meal prep. After lots of trial and error, I am happy to share this recipe with you! They’re soft, flexible, and hold up to all your favorite fillings.
No gluten, no dairy, and vegan. Whether you’re new to gluten-free cooking or a seasoned pro, these tortillas will quickly become a staple.
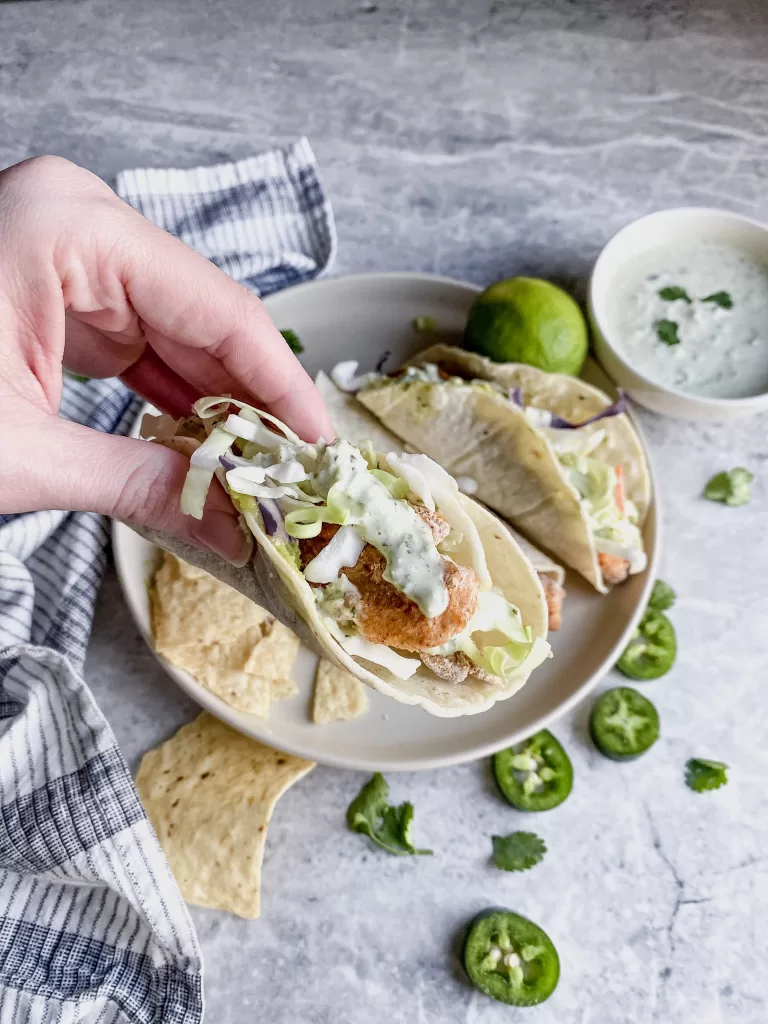
Looking for more Gluten Free Mexican flavors? Try out Mexican Picadillo Recipe with Ground Meat and Potatoes, Gluten Free: Easy Green Chicken Enchilada Casserole and Fried Gluten Free Fish Tacos with Cilantro Lime Crema Sauce
Please note that this post may contain affiliate links. As an Amazon Associate, I may earn commissions from qualifying purchases, at no additional cost to you. Thank you for your support!
Why You’ll Love This Recipe
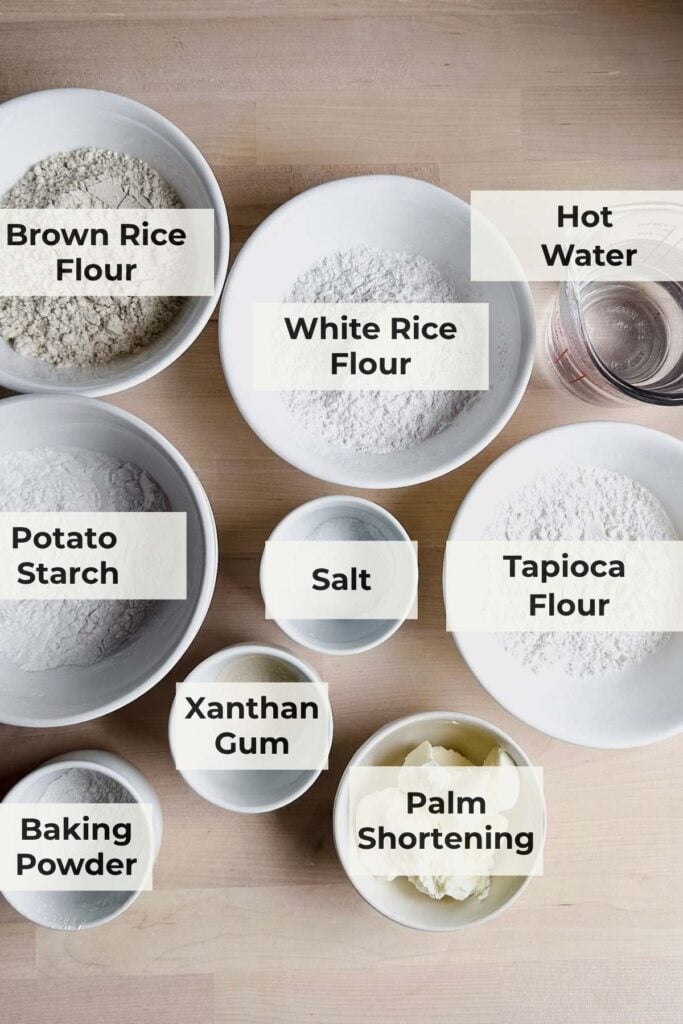
Recipe Ingredients For Gluten Free Flour Tortillas
Note:
Below are the key ingredients you’ll need. You can find the complete list with measurements in the recipe card at the bottom of the post.
- White Rice Flour: A light, neutral flour that adds bulk without a strong flavor. It helps create a soft, smooth texture.
- Brown Rice Flour: Adds a bit more flavor and nutrition than white rice flour. It also brings a touch of heartiness and structure.
- Tapioca Starch: Essential for stretch and chew. This is what gives your tortillas that flexible, non-crumbly texture.
- Potato Starch: Helps with softness and moisture retention. It also improves the overall elasticity of the dough.
- Xanthan Gum: Acts like gluten would in regular dough. It binds everything together, giving the tortillas strength and stretch.
- Palm Oil Shortening : Adds fat for tenderness and a soft bite. It also makes the dough easier to work with and helps the tortillas puff slightly when cooked.
- I prefer this option to keep the homemade gluten free tortillas vegan friendly.
Ingredient Notes and Substitutions
Ingredients for Gluten Free Homemade Tortillas
- Palm Oil Shortening Substitutions: Sunflower Oil, Avocado Oil, Lard, Crisco (or other vegetable shortening) or Coconut Oil also work well.
- Using a Store-Bought Gluten-Free Flour Blend:
- This recipe was tested with specific gluten-free flours for best results.
- If using a gluten free blend, I recommend Bob’s Red Mill 1:1 for this recipe, as it gave the best results during testing.
- King Arthur’s Measure for Measure or Gluten-Free Bread Flour, gave fair results but were more dense.
- To use a blend, use the total amount plus Xanthan gum which would be 268 grams. Do not add any more xanthan gum, since those blends already include it.
How to Make Gluten Free Flour Tortillas: Step By Step Instructions
Here are some quick visual instructions. Remember that full instructions with exact ingredients will be in the recipe card below!
Preparing the Gluten Free Tortilla Dough
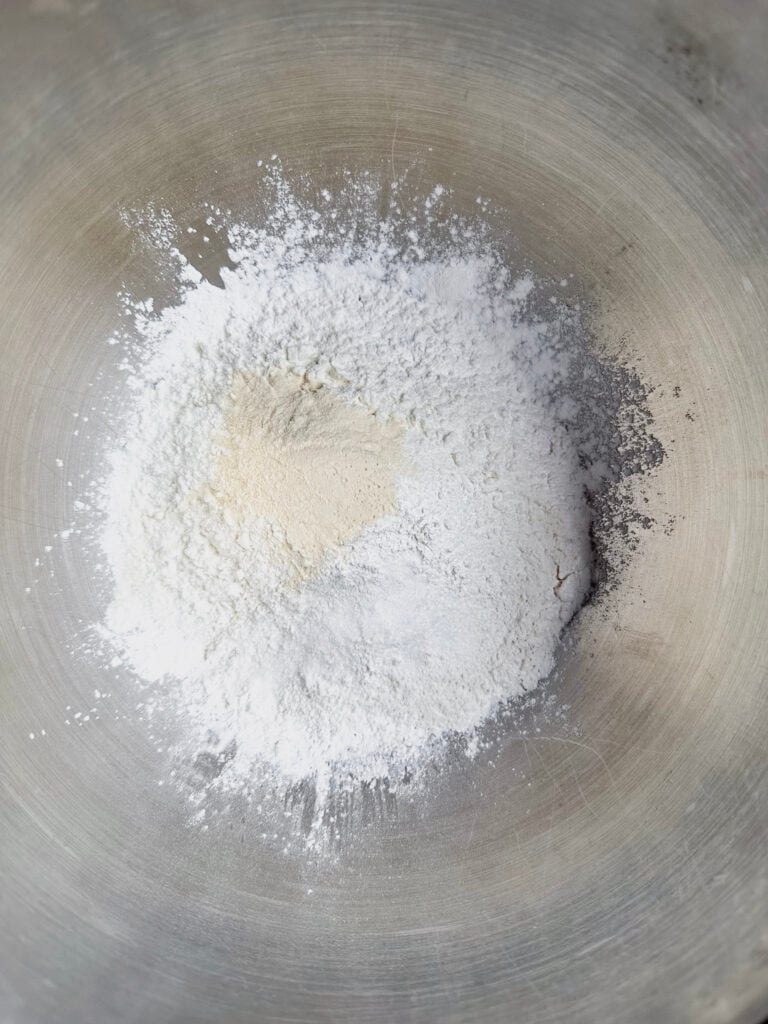
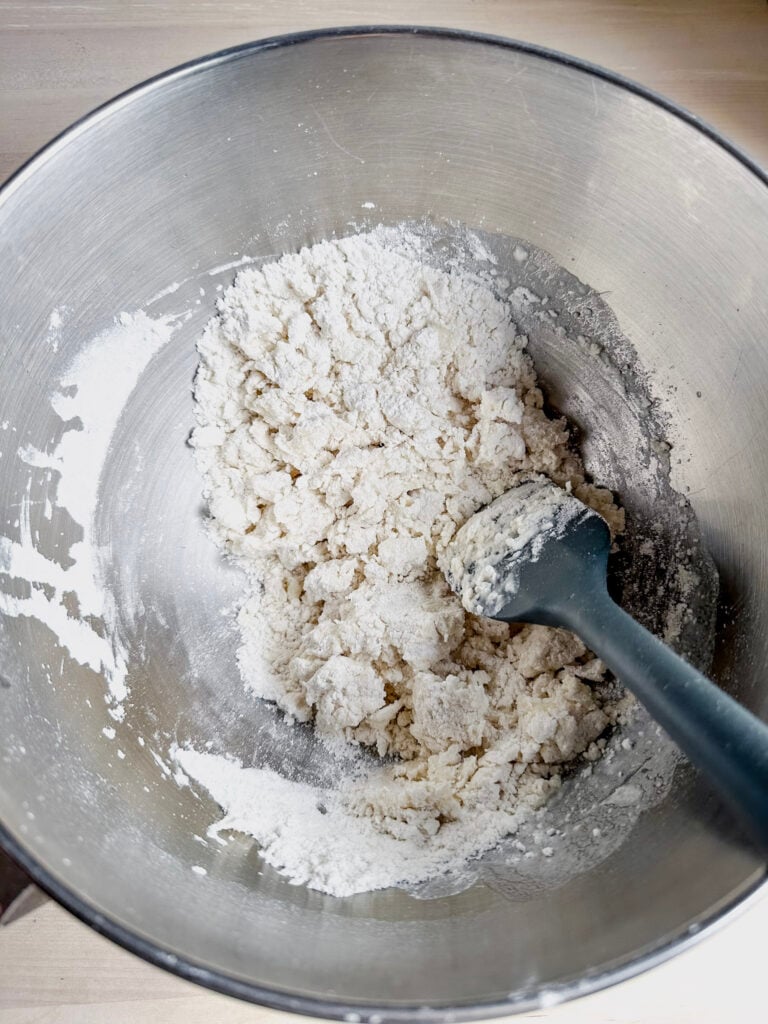
Step 1: Combine all gluten free flours and dry ingredients into a large mixing bowl.
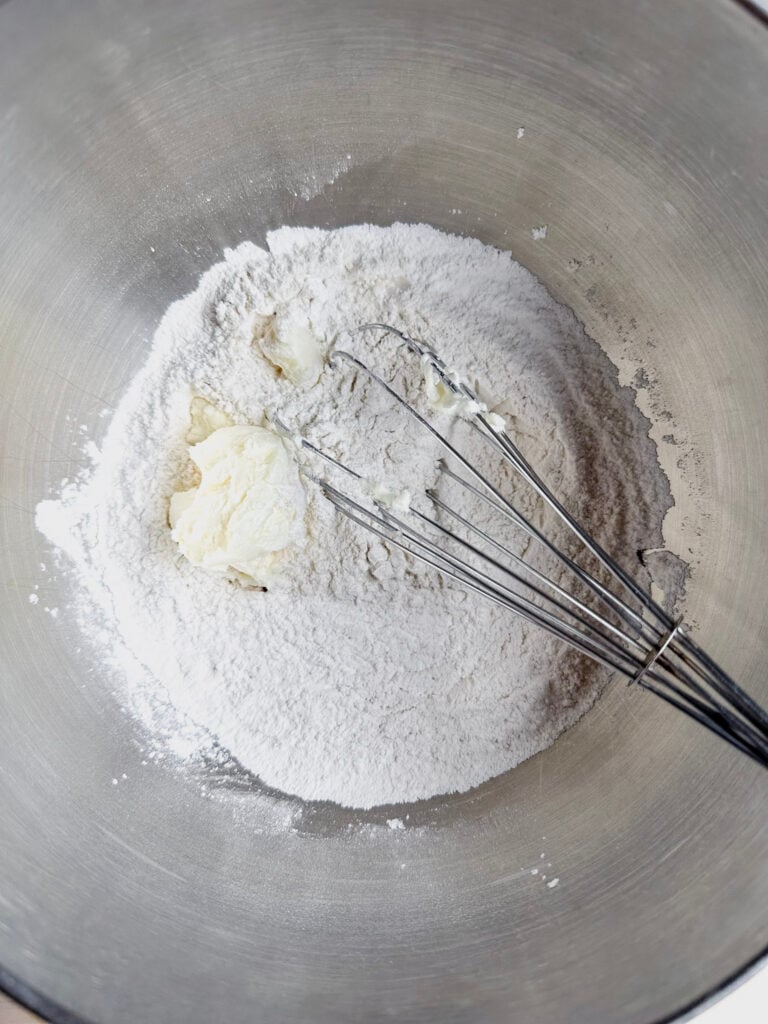
Step 2: Use a whisk to cut the palm shortening into the flour, (or to blend in the oil if using that instead) until the mixture resembles coarse crumbs with small, even pieces.
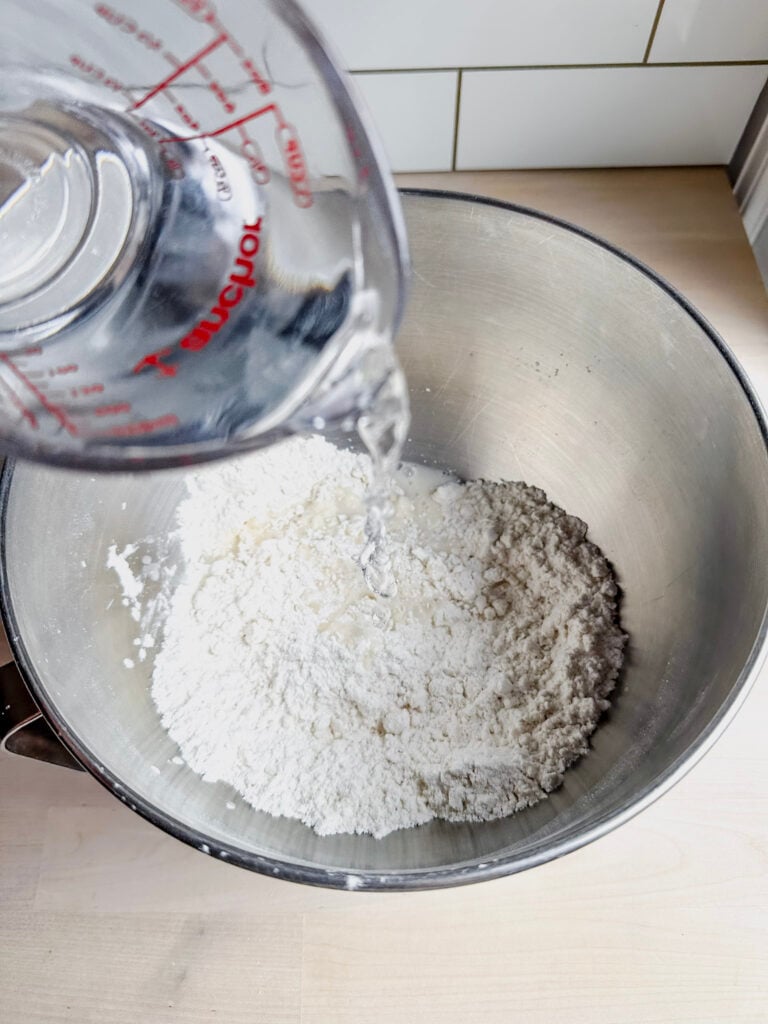
3rd Step: Pour about 2/3’s of the hot/ warm water into the flour mixture.
Step 4: Stir the dough with a spoon or spatula until it starts to come together.
Step 5:
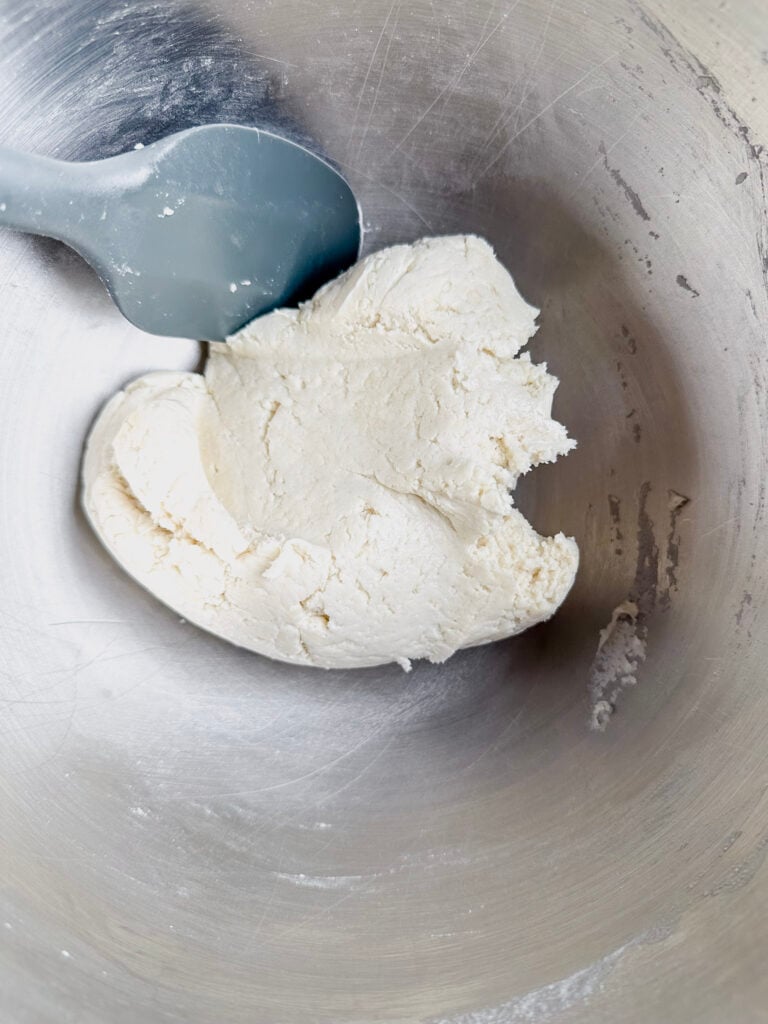
Gradually add the remaining water, a little at a time, until the dough is fully hydrated and forms a soft, cohesive ball. It should look like a smooth dough.
- You may not need as much water, or you might need a little water; every gluten-free flour absorbs moisture differently.
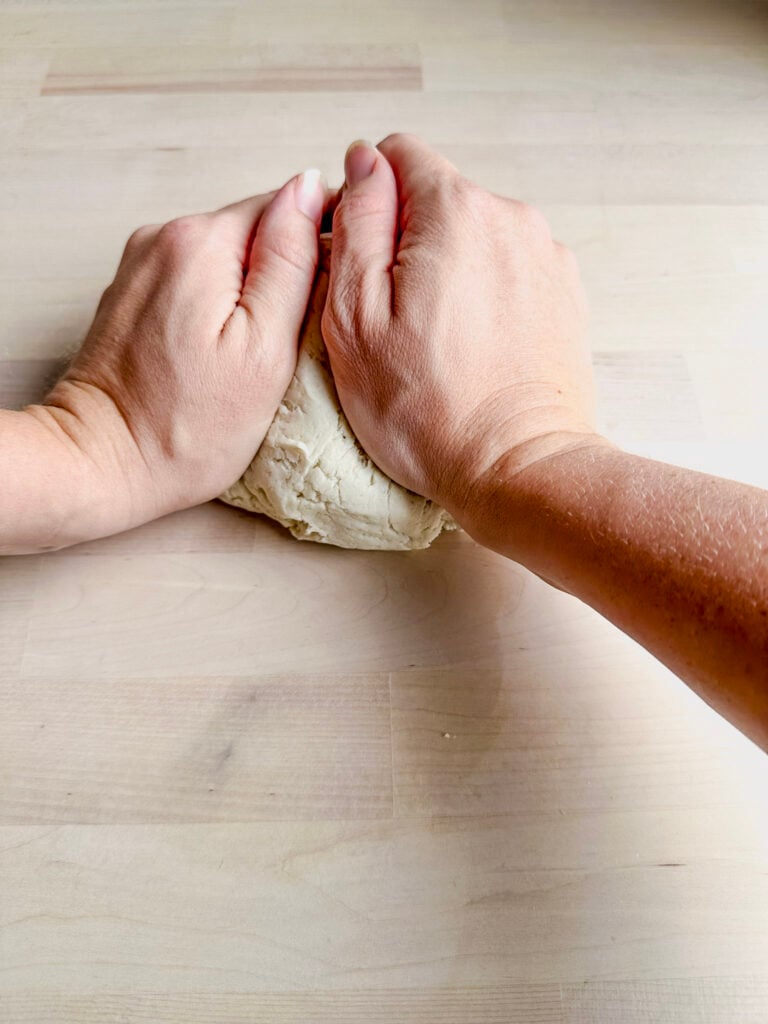
6th Step: Transfer the dough to a clean surface and knead it for 1–2 minutes to ensure all the flours are fully hydrated and evenly mixed.
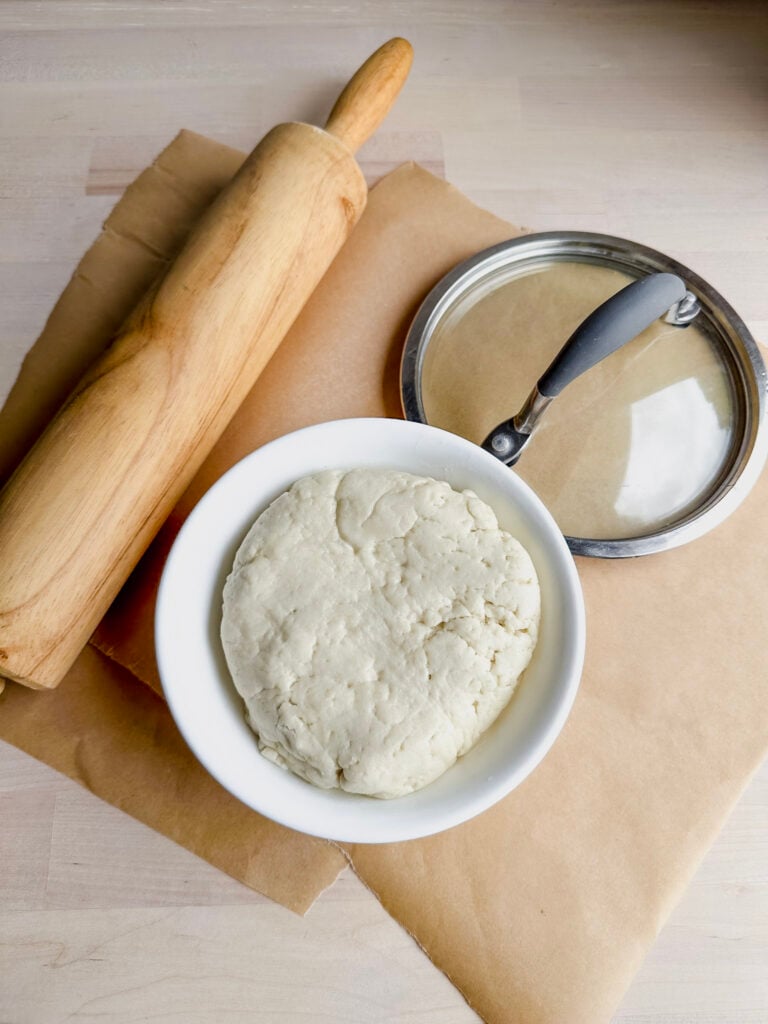
- Transfer the gluten free tortilla dough into a bowl and cover with a tea towel or plastic wrap. Let it sit for 20 minutes to let the dough rest and fully hydrate. This resting time helps soften the flours and removes any unwanted grainy texture, making the tortillas more pliable and easier to roll.
How to Roll Out Gluten Free Flour Tortillas

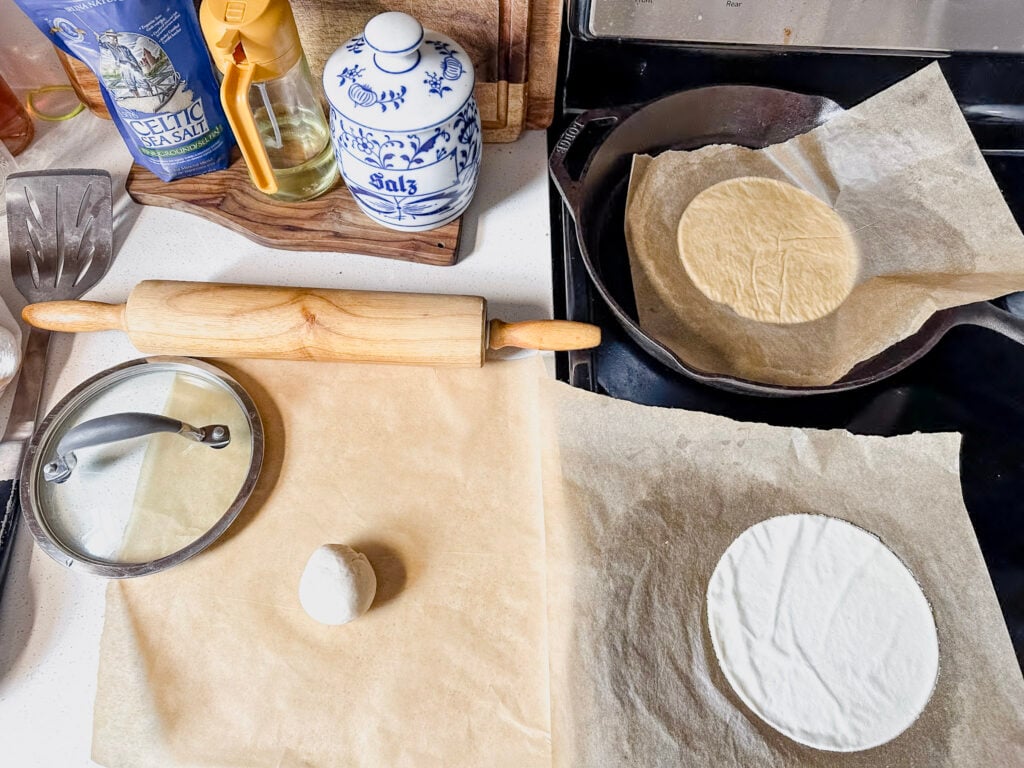
Step 1: Cut 2–3 large squares of parchment paper, making sure each piece is larger than the size of tortilla you want to make. This gives you room to roll the dough without sticking.
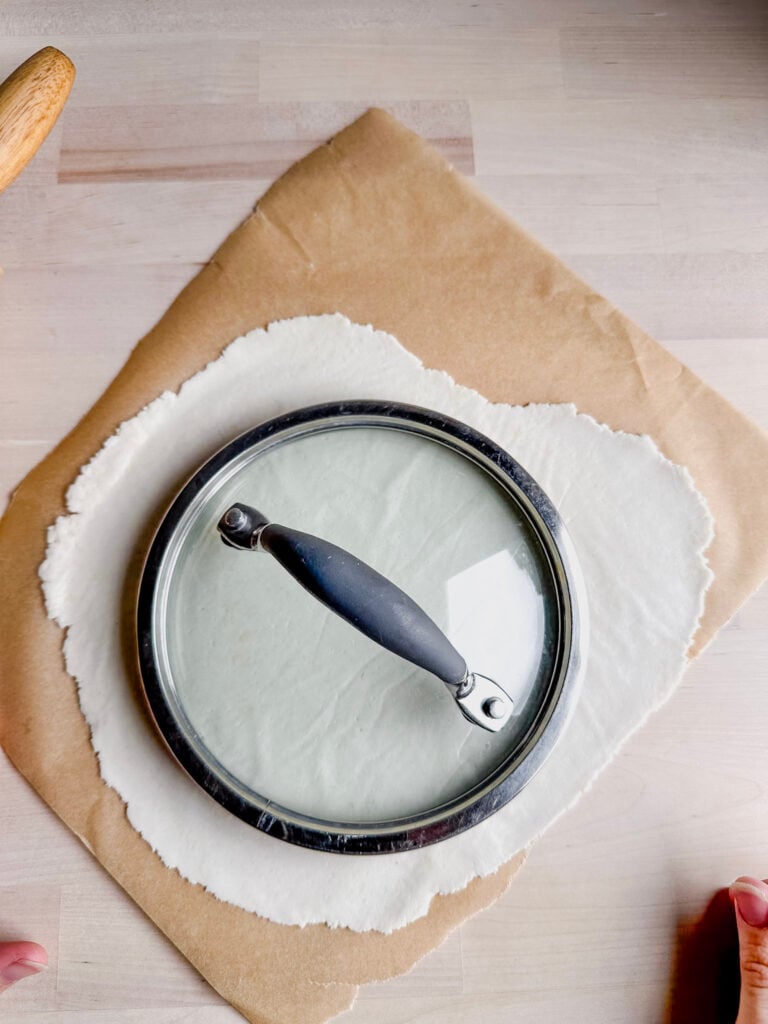
If you want clean, round tortillas, grab a saucepan lid or a bowl that’s the size you need. You’ll use it to press into the dough like a cookie cutter to cut perfect circles. I use a small lid for taco-size tortillas, but larger lids work well for burritos or wraps.
Step 2: Break off a piece of dough (amount depends on how big you want your tortilla) and roll it into a rough dough ball. Place it between two pieces of parchment paper.
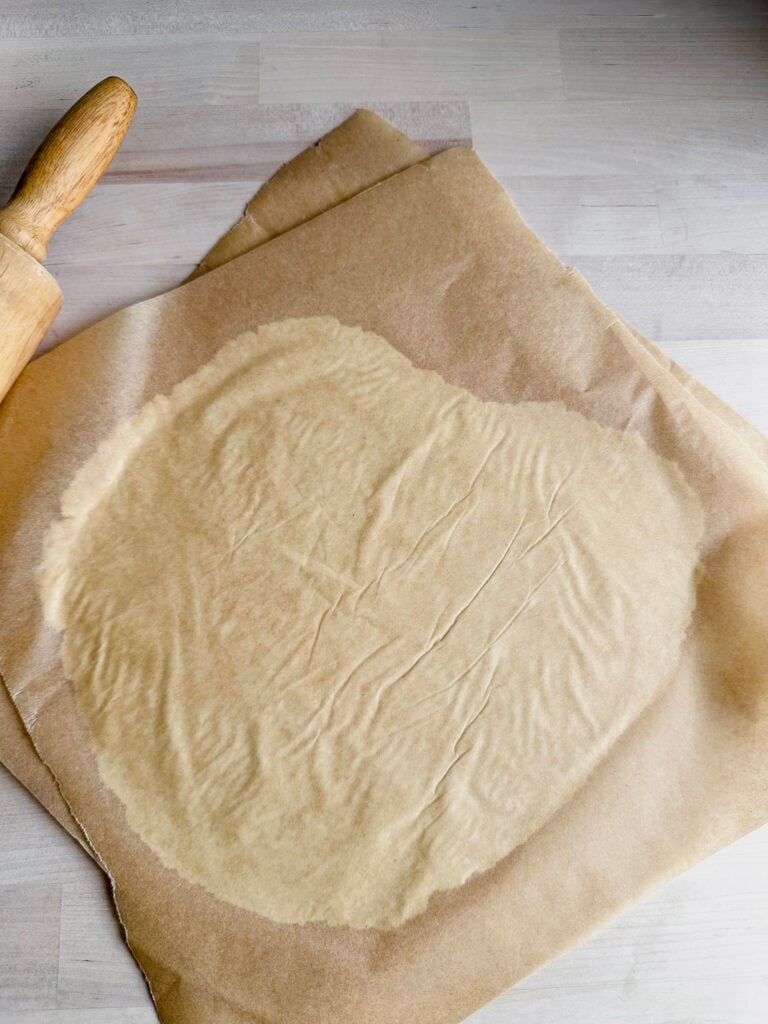
Step 3: Roll the dough out evenly and thin, about 1 millimeter thick. Make sure to get them thin, because if it’s too thick, the tortillas won’t be as soft or flexible.
Step 4: Carefully peel off the top layer of parchment. Next, press your lid or bowl into the dough like a cookie cutter to cut out a perfect circle. After that, remove the excess dough from around the edges. Alternatively, if you prefer a rustic look, you can skip the trimming and cook the tortillas as-is.
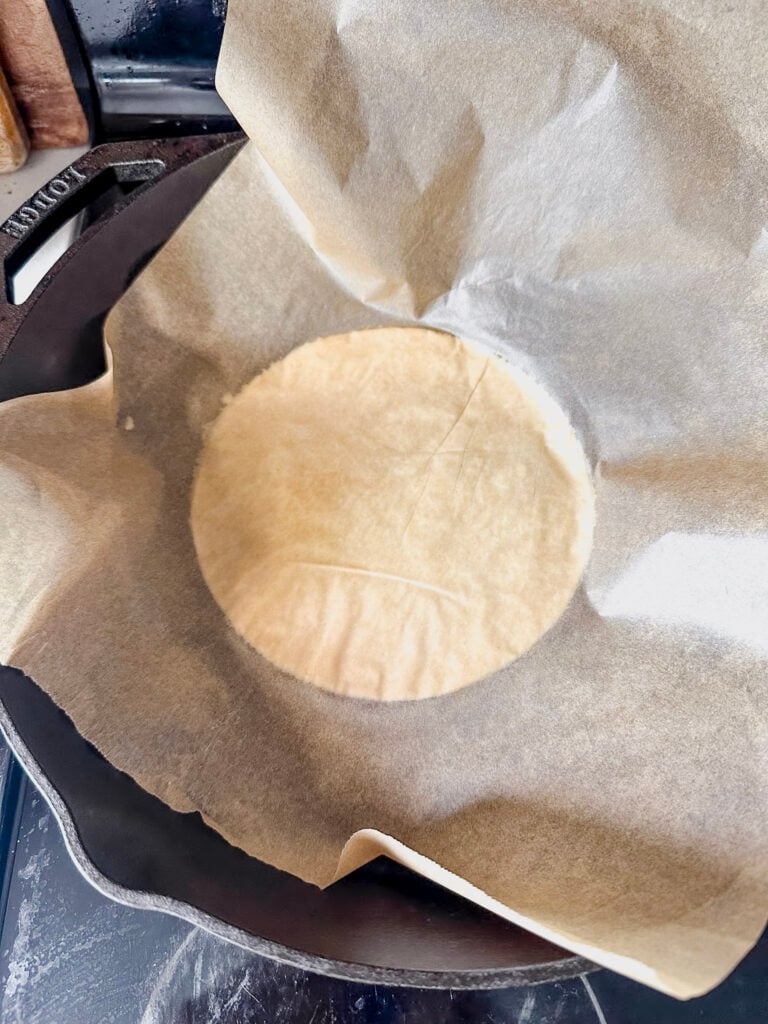
Step 5: Preheat a cast iron skillet over medium-high heat. It’s ready when a few drops of water sizzle and dance across the surface.
Then carefully flip one gluten free tortilla into the hot pan at a time. Let it sit with the parchment paper for 5-10 seconds. Once the tortilla starts to cook, the top piece of parchment paper is easy to remove and doesn’t stick/ tear the tortilla.
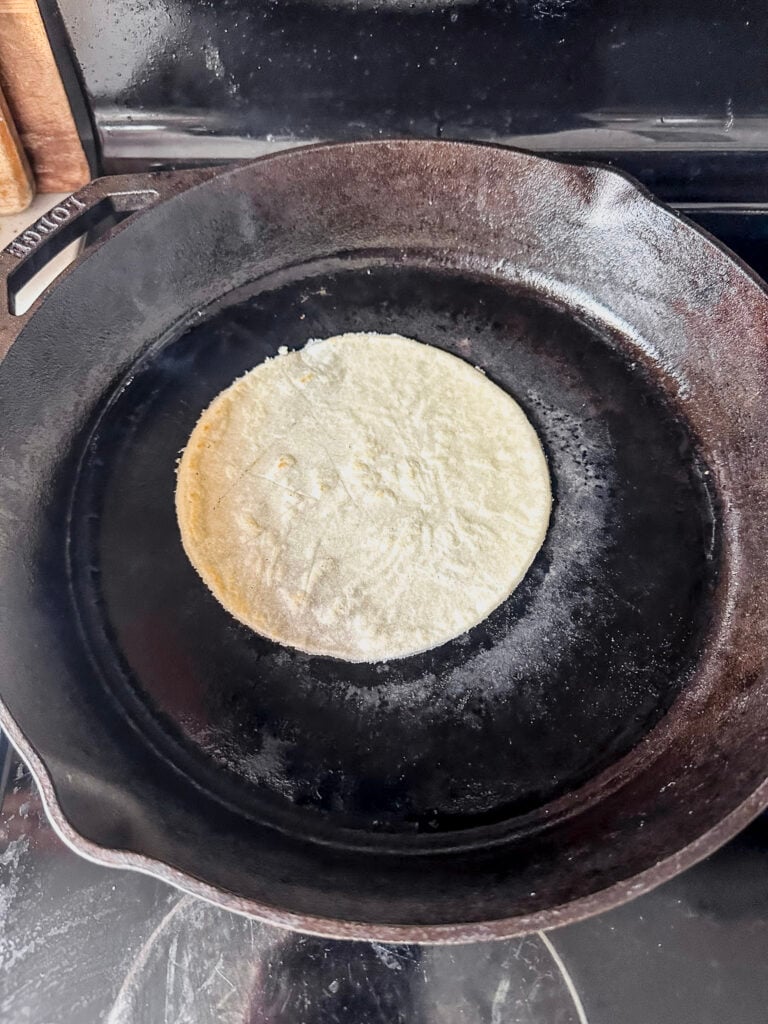
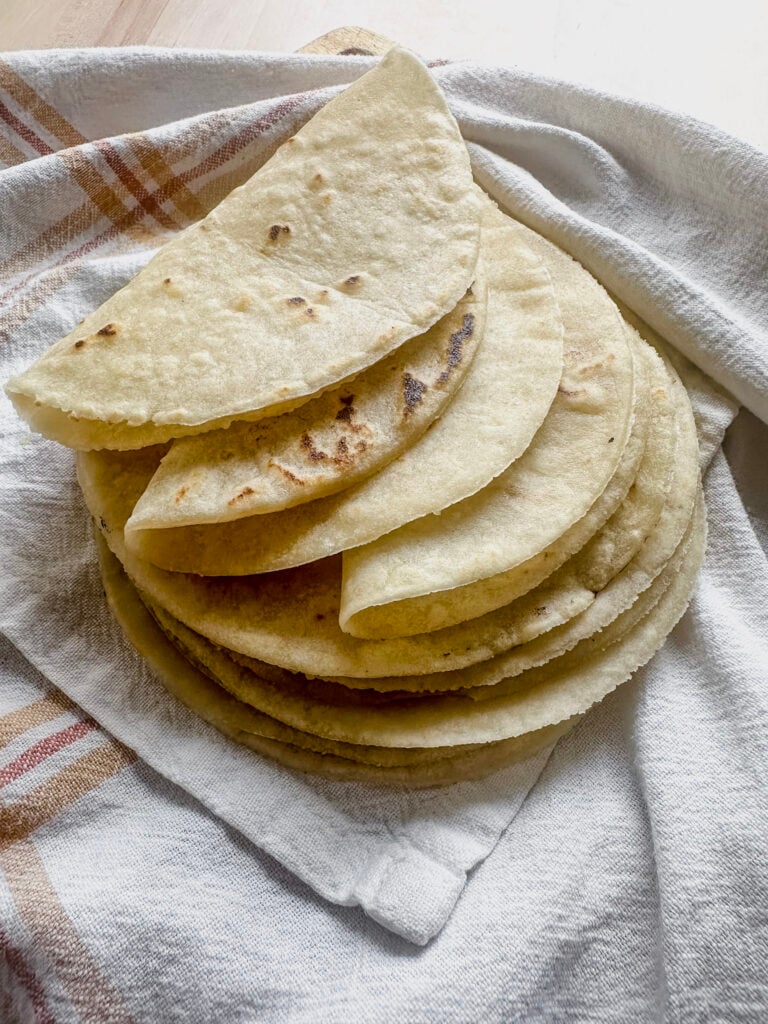
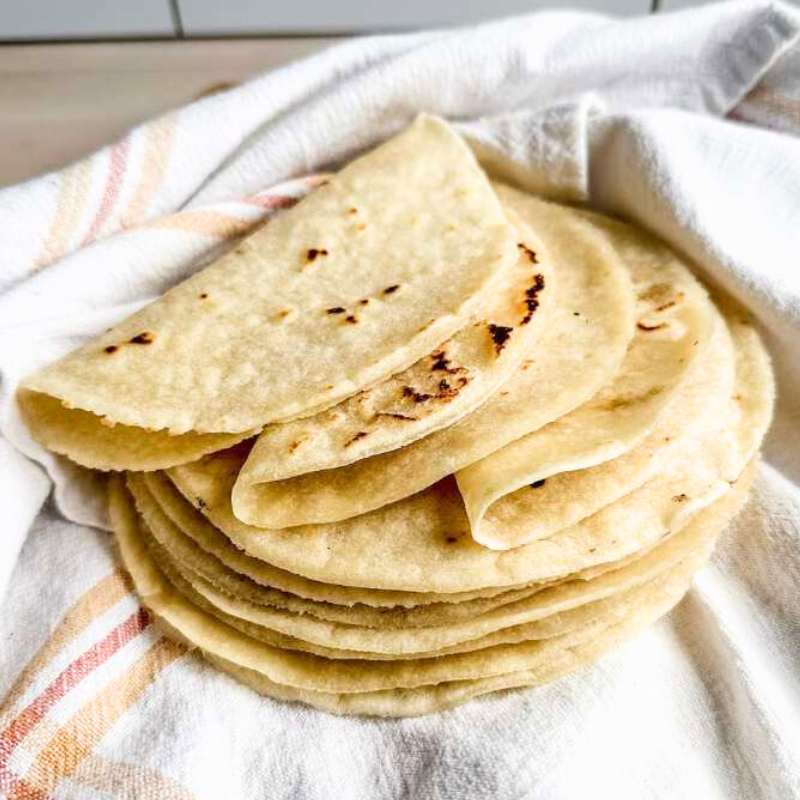
Step 6: Cook for about 30 seconds per side, just until light golden spots appear and the tortilla is cooked through.
Repeat this process until all gluten free tortillas have been cooked and all the dough is used up.
Your last tortilla may be smaller than the rest to finish up the dough, so just cook it less time.
Recipes Tips and Tricks
To keep things moving, roll out the next tortilla while one is cooking. It saves time and keeps the process smooth.
I like to use three pieces of parchment paper to make rolling and flipping easier:
- Roll your dough between two sheets.
- When it’s time to cook, flip the tortilla into the skillet, now the bottom sheet becomes the top.
- After a few seconds of heat, that top sheet peels off easily without tearing the dough.
- The third piece of parchment? That’s ready and waiting so you can roll the next one right away.
To keep the parchment from sliding around while you roll, let one edge hang off the counter and hold it in place with your hip, it works like a charm.
Joanna’s Top Tip
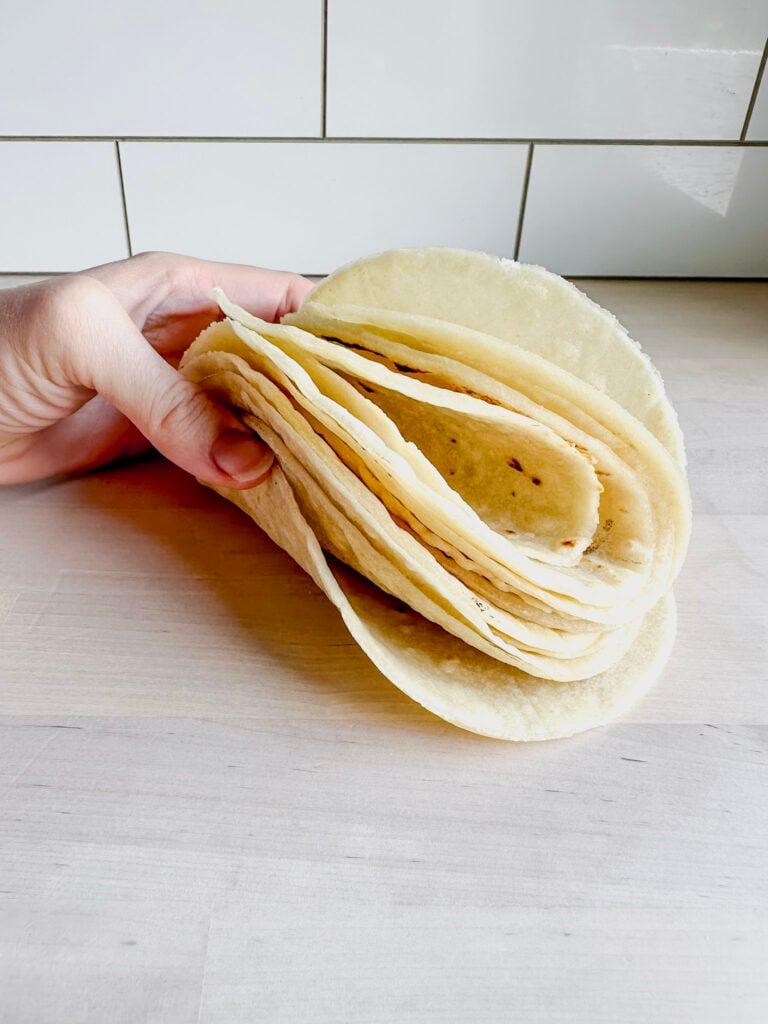
If your tortillas aren’t flexible enough after cooking, try rolling them thinner or using slightly more hot water in the dough. A soft, well-hydrated dough is the key to tortillas that bend without breaking.
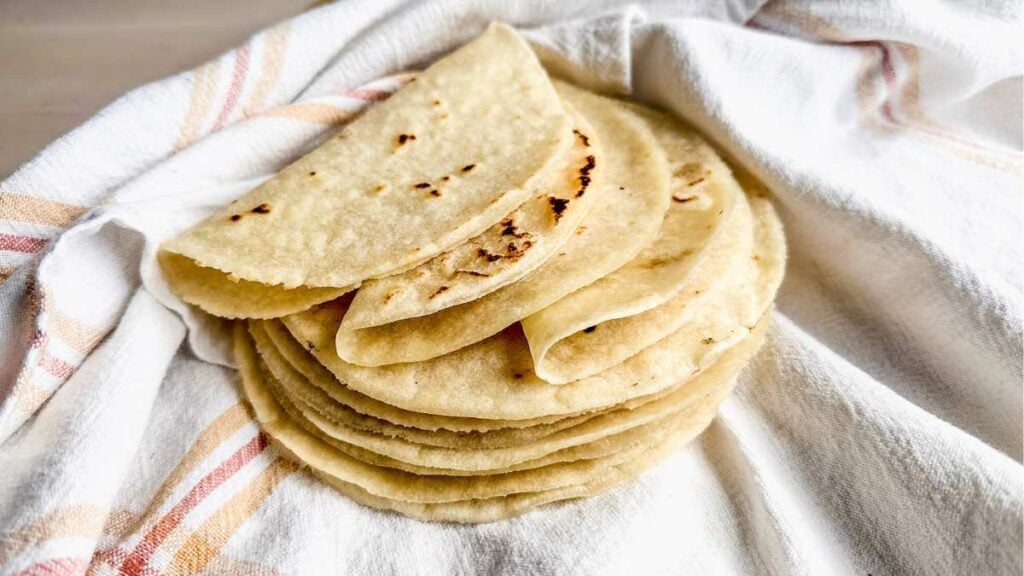
Storage and Reheating For Soft Gluten Flour Tortillas
Storage Instructions
Same Day:
- Keep cooked tortillas wrapped in a clean kitchen towel or inside a tortilla warmer.
- This keeps them soft and pliable until you’re ready to serve.
- If they cool and stiffen, reheat briefly to soften (see tips below).
Refrigerator:
- Let tortillas cool completely.
- Store in an airtight container or zip-lock bag with sheet of parchment paper between each one to prevent sticking.
- Use within 3–4 days for best texture.
Freezer:
- Once cooled, stack tortillas with parchment paper between each one.
- Place the stack in a freezer-safe bag or container.
- Freeze for up to 2 months.
- Thaw in the fridge overnight or on the counter for about 30 minutes.
How to Reheat Gluten-Free Tortillas
For best results, use dry heat to bring back their flexibility and softness:
Stovetop (Best Method):
- Heat a dry skillet over medium heat.
- Warm each tortilla for 10–15 seconds per side, just until soft and pliable.
Microwave (Quick Method):
- Wrap 1–2 tortillas in a damp paper towel.
- Microwave for 15–20 seconds.
- Check for softness; microwave a few seconds longer if needed.
Tools For This Recipe
This recipe is very simple. It doesn’t need any special equipment or tortilla press, but a rolling pin is vital.
Kitchen Scale: Using a kitchen scale is especially important in gluten-free baking to ensure accurate, consistent results.
Rolling Pin: Essential for getting the tortillas thin and even. A rolling pin helps you flatten the dough consistently, which is key for tortillas that cook evenly and stay soft and flexible.
Parchment Paper: Makes rolling out tortillas easier without needing extra gluten-free flour, which can dry them out.
Frequently Asked Questions
Yes, you can! While this recipe was developed using individual gluten-free flours for the best texture, Bob’s Red Mill 1:1 Gluten-Free Flour Blend gave the best results in testing. King Arthur’s Measure for Measure and Gluten-Free Bread Flour also worked, but the tortillas turned out a bit denser. If using a blend, measure out 268 grams total and do not add extra xanthan gum, since most blends already include it.
This usually comes down to thickness and hydration. Try rolling the dough thinner (about 1mm) and make sure your dough is soft, not dry or crumbly. Also, using hot water is key for activating the starches and helping the dough come together better.
Yes! You can mix the dough, cover it, and store it in the fridge for up to 24 hours. Let it sit at room temperature for about 5 minutes before rolling out to make it easier to work with.
Nope! A rolling pin and parchment paper work great. The dough is soft enough to roll by hand with a rolling pin and the parchment helps prevent sticking.
Yes, it is ideal for this recipe because it can handle high heat without warping or damaging the surface. It also holds and distributes heat evenly, helping your tortillas cook quickly with those perfect golden spots.
I hope you love these Gluten Free Flour Tortillas as much as I do. If you try it, let me know in the comments below, I’d love to hear how it turned out for you! And I hope you enjoy your amazing tortillas!
Gluten Free Flour Tortilla Recipe
Ingredients
Equipment
Method
- In a large mixing bowl, combine all gluten free flours and dry ingredients.80 grams White Rice Flour, 80 grams Brown Rice Flour, 70 grams Tapioca Starch, 34 grams Potato Starch, 4 grams Xanthan Gum, 5 grams Salt, 4 grams Baking Powder
- Use a whisk to cut in the palm shortening into the flour until the mixture resembles coarse crumbs with small, even pieces. If using oil, whisk till combined.50 grams Palm Shortening
- Pour about 2/3 of the hot water into the flour mixture and stir the dough with a spatula until it comes together.180 grams Hot Water
- Gradually add the remaining water depending on how the dough is responding. If it looks dry, add a little bit at a time until it comes together and is fairly smooth. If it looks too wet, let sit for 5 minutes and then reevaluate.
- Transfer the dough to a clean surface and knead it for 1–2 minutes to ensure all the flours are fully hydrated and evenly mixed.
- Transfer the dough into a bowl and cover with a damp tea towel or plastic wrap. Let it rest for 20 minutes. This resting time helps soften the flours and removes any unwanted grainy texture.
- Cut 2-3 large squares of parchment paper, making sure each piece is larger than the size of tortillas you want to make.
- If you desire perfectly round tortillas, use the lid from a saucepan or a bowl that is the size you want. You can use it like a cookie cutter to cut perfect circles.
- Break off a piece of dough, the amount will depend on what size you want your tortilla to be (Fajita, Taco, Burrito/ Wrap). Roll the dough into a rough dough ball and place it between two pieces of parchment paper.
- Roll the dough out evenly and thin, but not too thin. It should be about 1 millimeter thick. Too thin, and they will be crispy. Too thick and they won't be as pliable.
- Carefully peel off the top layer of parchment paper. Next, press your lid or bowl into the dough like a cookie cuter if you want a perfect circle. Scrap the excess and add it back into the bowl of gluten free tortilla dough. (You can also leave the edges untrimmed for a rustic look.)
- Preheat a cast iron skillet over medium-high heat. It's ready when a few drops of water sizzle and dance across the surface.
- Carefully flip one gluten free tortilla into the hot pan at a time. Leave the parchment paper on for about 5-10 seconds, and then it will remove easily once it starts to cook.
- Cook for about 30 seconds per side, just until light golden spots appear and the tortilla is cooked through.
- Remove from heat and stack on a plate with a tea towel to keep them warm as you finish cooking the rest. If the tortillas feel stiff right after cooking, this rest time will help them soften as the gluten free flours cool.
- Repeat this process until all the tortillas have been cooked and all the dough is used up.
Nutrition
Notes
Yield & Texture Notes
This recipe makes about 10 taco-sized tortillas. If you prefer larger tortillas for burritos or wraps, you’ll get fewer per batch—but the recipe doubles easily. The texture is soft and pliable, similar to Mission brand gluten-free tortillas.Ingredient Notes & Substitutions
This recipe was carefully tested to create the right balance of flours for soft, flexible gluten-free tortilla shells. For the best texture, I recommend sticking to the specific flours listed. However, if you prefer the convenience of a store-bought blend:- Bob’s Red Mill 1:1 Gluten-Free Flour Blend gave the best results during testing.
- King Arthur’s Measure for Measure and Gluten-Free Bread Flour worked but produced slightly denser tortillas.
- If using a blend, measure 268 grams total, including xanthan gum. Do not add extra xanthan gum, as most blends already contain it.
- Palm Oil Shortening Substitutions: Sunflower Oil, Avocado Oil, Lard, Crisco (or other vegetable shortening) or Coconut Oil also work well. Use something with a high smoke point.
Recipes Tips and Trick
To keep things moving, roll out the next tortilla while one is cooking. It saves time and keeps the process smooth. I like to use three pieces of parchment paper to make rolling and flipping easier:-
- Roll your dough between two sheets.
-
- When it’s time to cook, flip the tortilla into the skillet, now the bottom sheet becomes the top.
-
- After a few seconds of heat, that top sheet peels off easily without tearing the dough.
-
- The third piece of parchment? That’s ready and waiting so you can roll the next one right away.
-
- Keep cooked tortillas wrapped in a clean kitchen towel or inside a tortilla warmer.
-
- This keeps them soft and pliable until you’re ready to serve.
-
- If they cool and stiffen, reheat briefly to soften (see tips below).
-
- Let tortillas cool completely.
-
- Store in an airtight container or zip-lock bag with sheet of parchment paper between each one to prevent sticking.
-
- Use within 3–4 days for best texture.
-
- Once cooled, stack tortillas with parchment paper between each one.
-
- Place the stack in a freezer-safe bag or container.
-
- Freeze for up to 2 months.
-
- Thaw in the fridge overnight or on the counter for about 30 minutes.
How to Reheat Gluten-Free Tortillas
For best results, use dry heat to bring back their flexibility and softness: Stovetop (Best Method):-
- Heat a dry skillet over medium heat.
-
- Warm each tortilla for 10–15 seconds per side, just until soft and pliable.
-
- Wrap 1–2 tortillas in a damp paper towel.
-
- Microwave for 15–20 seconds.
-
- Check for softness; microwave a few seconds longer if needed.
Tried this recipe?
Let us know how it was!Be Sure to Always Double Check Ingredient Labels
It is always best practice to double-check your ingredient labels for hidden sources of allergens.
Also, please note the nutrition information is automatically calculated and should only be used as an approximation. It may vary based on ingredient brands, portion sizes, and preparation methods. For specific dietary or medical needs, consult a healthcare professional or registered dietitian.
Pin It for Later