
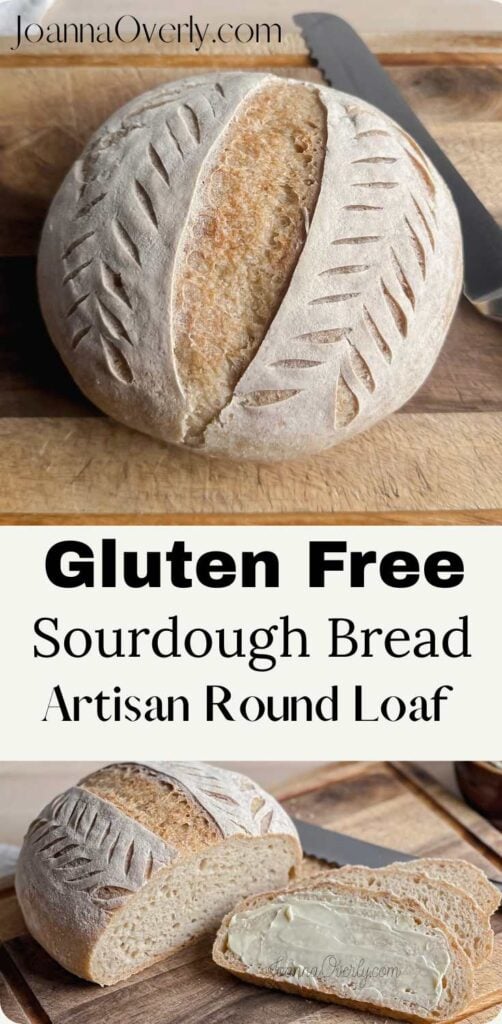
This gluten-free sourdough artisan bread recipe is the result of years of experimenting, learning, and refining, and I’m thrilled to finally share it with you! Think of this as the 2.0 version of my original, “How to Make Gluten Free Sourdough Bread with Recipe” post that was first published in April 2021.
This long ferment version is for those of you ready to dive deeper into the world of gluten-free sourdough, bakers who want to go beyond the basics. I’ll walk you through the “why” behind each ingredient and method so you can bake with more confidence and understand how to get the best texture and flavor from your loaf.
Some helpful articles for gluten free baking are Why Use Psyllium Husk in Gluten-Free Baking, and Gluten Free Flours: An In-Depth Guide for the Best Types.
Please note that this post may contain affiliate links. As an Amazon Associate, I may earn commissions from qualifying purchases, at no additional cost to you. Thank you for supporting our family in this way from my affiliate link.
As I mentioned, this gluten-free sourdough artisan bread recipe has been a long time coming. I got my very first jar of gluten-free sourdough starter when I met up with a few new friends for a Charlotte Mason book club. Our host was kind enough to share not only her starter but also a rough version of the recipe she used—and that’s what got me started.
My original How to Make Gluten Free Sourdough Bread with Recipe, the one that uses King Arthur’s Measure for Measure blend, came from that early experiment. Since then, I’ve learned so much more about gluten-free sourdough thanks to some amazing bakers who’ve generously shared their knowledge.
People like Bakerita, George Eats, and more recently, Gluten Free on a Shoestring have each deepened my understanding of how to build structure, flavor, and consistency in gluten-free bread. I highly recommend checking out their work if you want to dig even deeper.
Why You’ll Love This Recipe
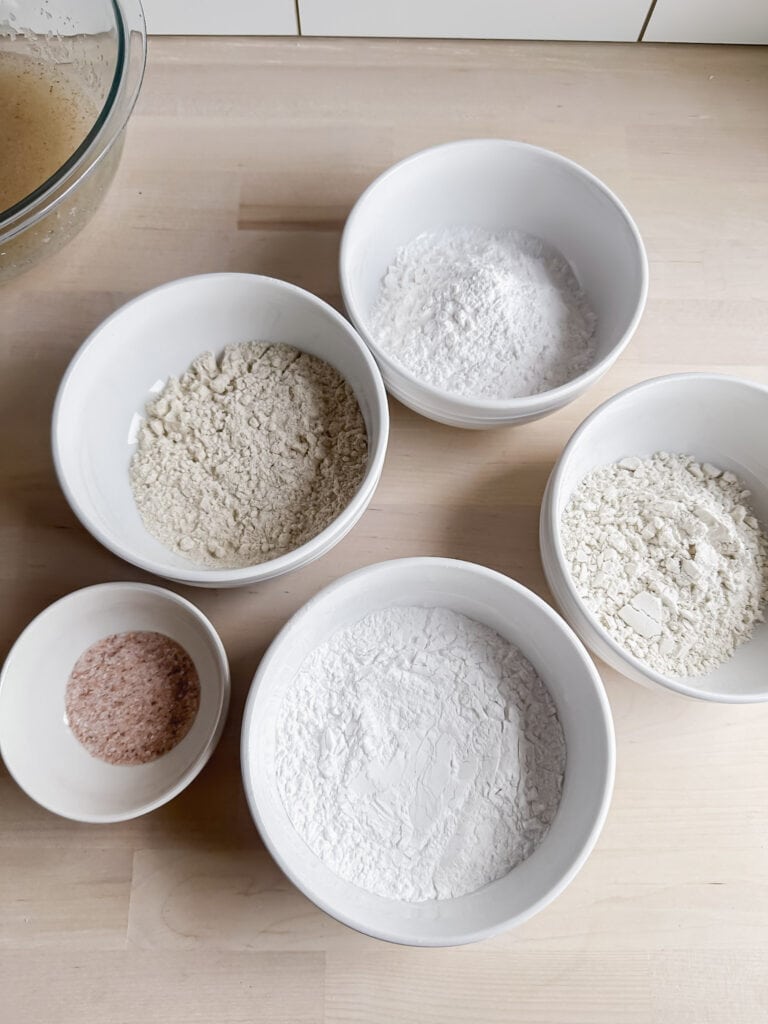
Recipe Ingredients
Below are the key ingredients you’ll need. You can find the complete list with measurements in the recipe card at the bottom of the post.
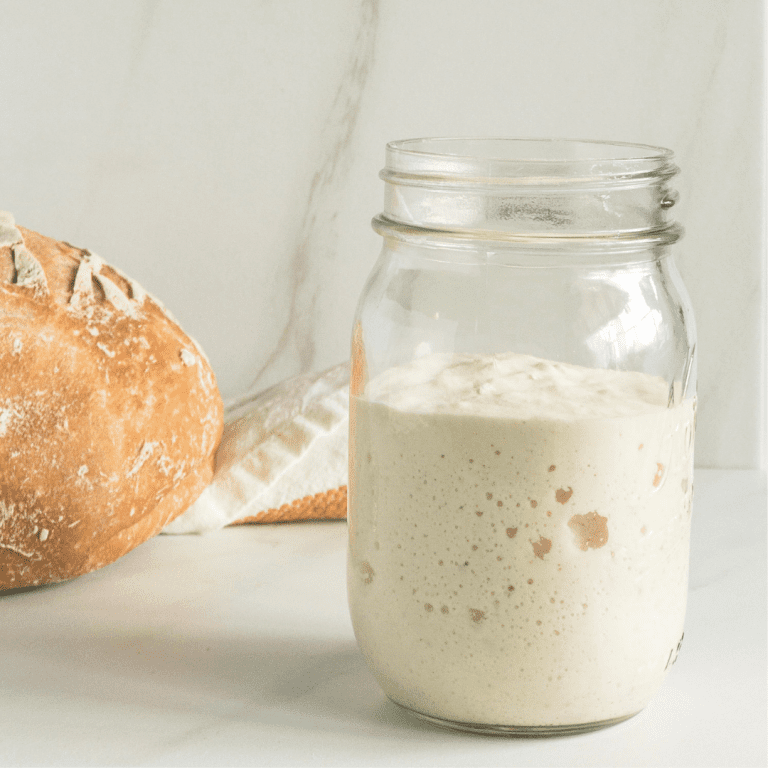
Gluten Free Sourdough Starter: Captures wild yeast and good bacteria to naturally leaven (rise) the bread and build flavor. Without it you would have no rise or fermentation—your bread will be dense and flat. Note: Use a mature, bubbly starter that doubles in 4–6 hours for best results.
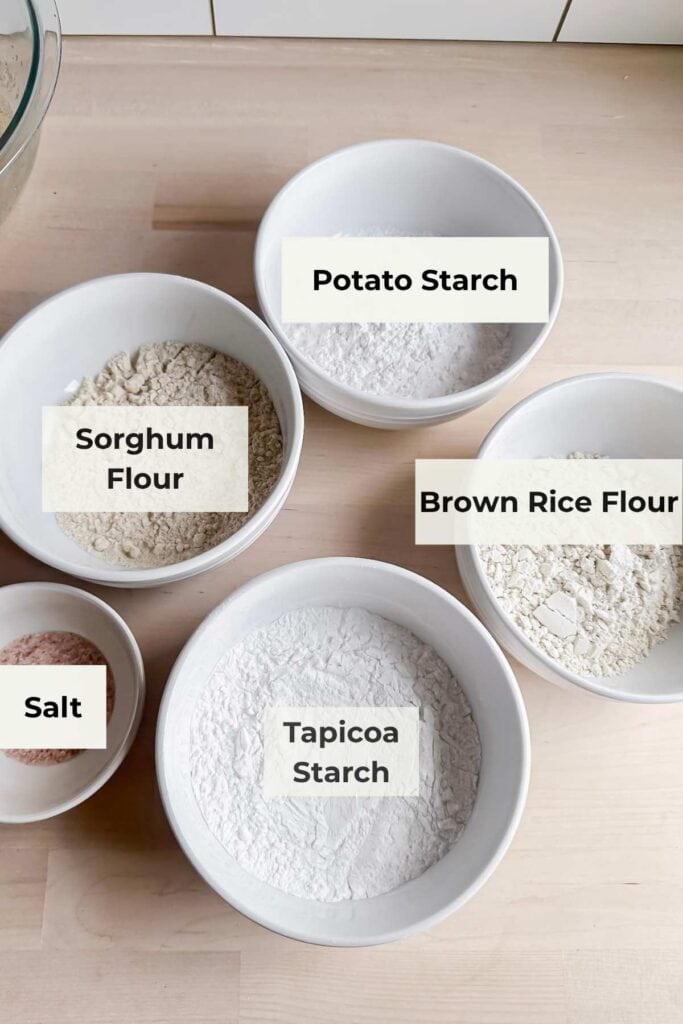
Gluten Free Flours: This recipe for Gluten Free Sourdough Artisan Bread uses about a 60/40 blend of starches and protein-rich flours to strike the perfect balance between softness and structure. The starches create a light, tender crumb while the heavier flours give the loaf stability and depth—essential for a non-gummy, sliceable gluten-free sourdough.
Purified Water: Purified water helps keep your sourdough starter healthy—tap water can contain chlorine or minerals that disrupt fermentation and weaken rise.
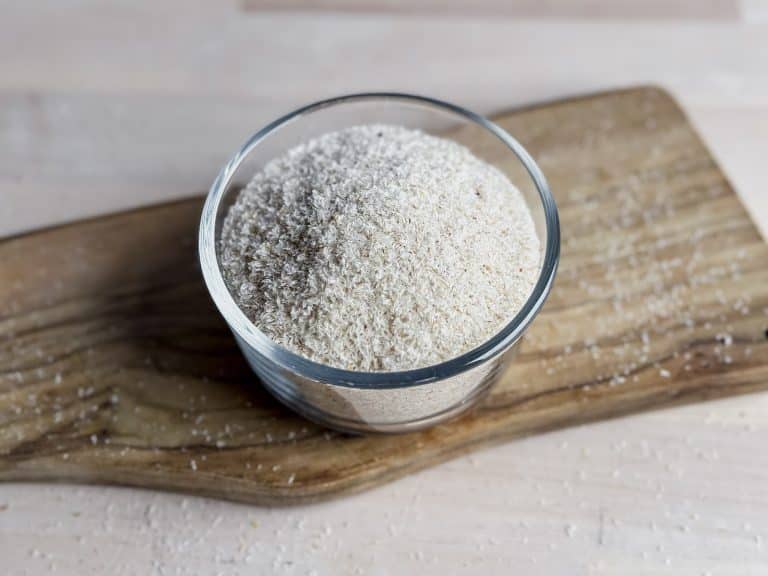
Whole Psyllium Husk: Acts like gluten in gluten-free baking—it forms a gel that binds the dough, adds elasticity, and traps gas for a better rise and structure.
Maple Syrup or Honey: It gives the wild yeast and beneficial bacteria a little boost, helping the dough rise better and develop flavor. Use maple syrup to keep it vegan.
Oil: Adds moisture and softness to the crumb and crust, helping the bread stay tender and sliceable instead of dry or crumbly. Use Olive oil or other neutral flavored oil.
Apple Cider Vinegar: Boosts acidity to strengthen the dough and balance flavor. It also supports the sourdough culture and helps with rise.
Tools For Gluten Free Sourdough Artisan Loaf
- Digital Kitchen Scale For precise measurements of flours, water, and starter, essential for consistent results.
- Mixing Bowls (small, medium, and large bowl) You’ll need at 3 bowls: one for the preferment, one for the psyllium mix and one for mixing the dough.
- Whisk or Danish Dough Whisk To combine the preferment and psyllium gel easily without overworking the dough.
- Stand Mixer fitted with Dough Hook (optional but helpful) Makes mixing the sticky dough much easier and more thorough.
- Banneton Basket (or small bowl with a tea towel) Helps the dough hold its shape and promotes even rising. Choose a size for 500–750g of dough.
- Parchment Paper To easily transfer your loaf into the Dutch oven and prevent sticking.
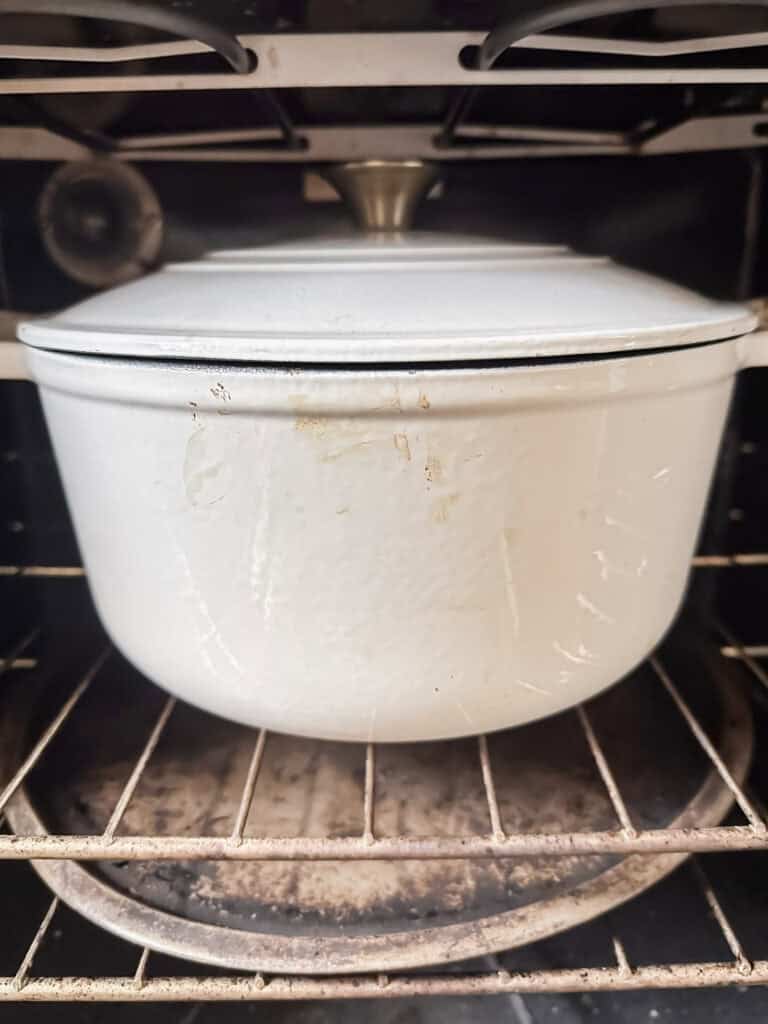
- Enamel Dutch Oven or Cast Iron Dutch Oven Creates steam and traps heat for a beautiful crust and proper oven spring.
- Bread Lame with Razor Blade or Sharp Knife Used for scoring the top of your loaf to control the rise and create decorative patterns.
- Instant Read Digital Thermometer To check that the internal temperature reaches 210°F—no more guessing if it’s baked through!
- Cooling Rack Allows air to circulate around the loaf as it cools, which helps prevent a gummy bottom.
- Plastic Wrap Used to keep the gluten free sourdough dough from drying out during the bulk fermentation process.
Timing Tips (With Sample Schedule)
Here’s how a typical baking timeline might look if you want your fresh gluten-free sourdough bread ready by early afternoon the next day:
- 5:00 PM (Day 1): Feed your gluten-free sourdough starter using a 1:1:1 ratio (equal parts starter, flour, and water).
- 9:00 PM (Day 1): Mix your preferment (also called a levain). Cover and let it rest at room temperature overnight.
- 7:00 AM (Day 2): The next day, follow the rest of the instructions from “mixing the dough”.
- 7:30 AM – 11:30 AM: Bulk ferment the dough at room temperature (about 4 hours, though this may vary depending on your environment).
- 11:30 AM: Begin preheating your oven and Dutch oven to 450°F.
- 12:00 PM: Turn out the dough, score the top, and transfer it to the hot Dutch oven. Bake as directed.
- 12:45 PM: Bread is done! Let it cool on a wire rack for at least 3–4 hours.
- 4:00 PM: The loaf is fully cooled and ready to slice and enjoy.
How to Make Gluten Free Sourdough Artisan Bread: Step By Step Instructions
Here are some quick visual instructions. Remember that full instructions with exact ingredients will be in the recipe card below!
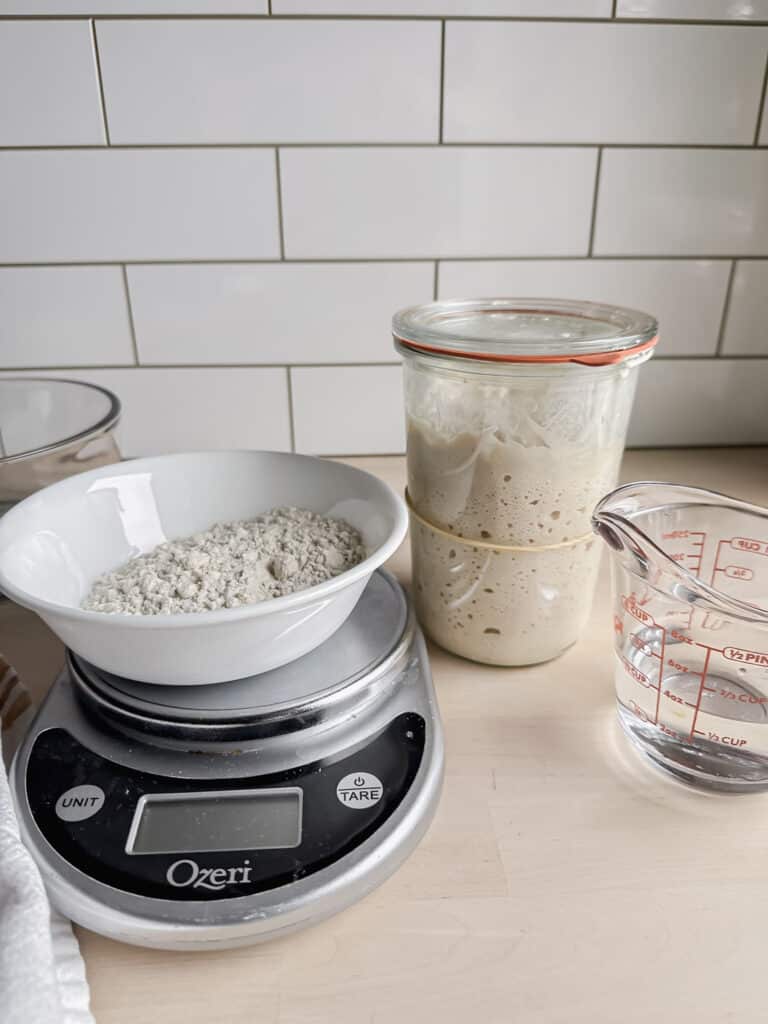
Active Gluten Free Sourdough Starter

For best results, start with a thick, active gluten-free sourdough starter. This means it should be recently fed with equal parts flour and water by weight (called a 1:1 feeding). Your starter should look bubbly and be able to double in size within 4–6 hours. A strong starter is the key to getting a good rise and a flavorful loaf.
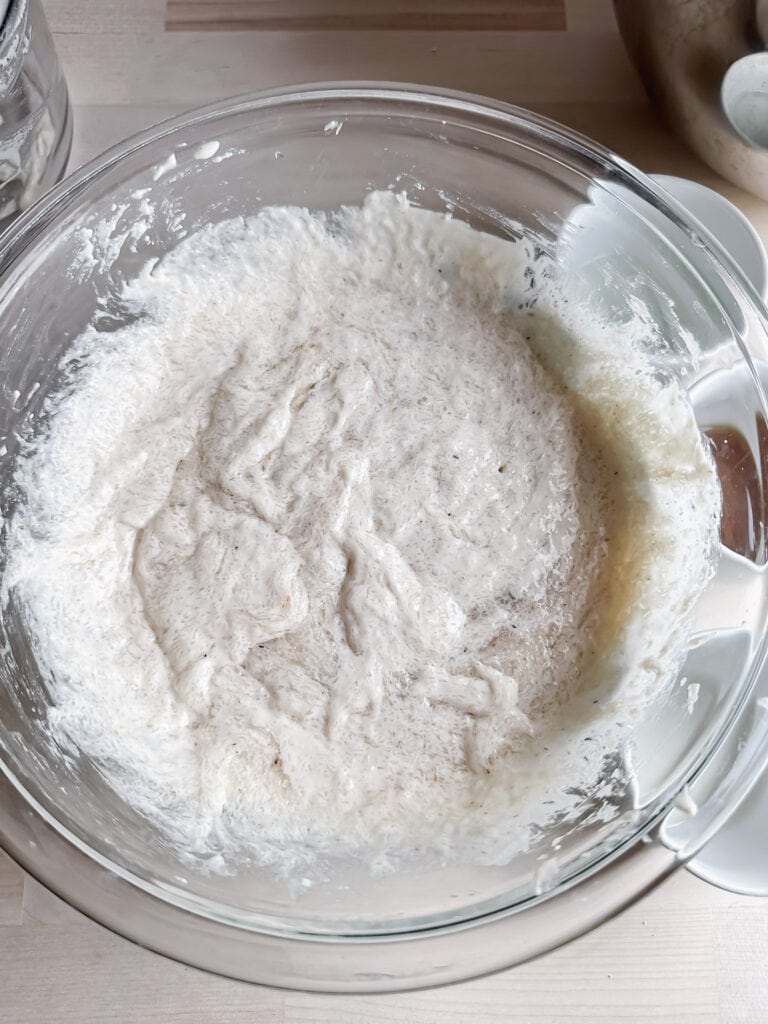
Preparing the Preferment (Levain)
Note: For best results, start with a thick, active gluten-free sourdough starter.
I usually mix my preferment the night before I want to bake.
This means it should be recently fed with equal parts flour and water by weight (called a 1:1:1 feeding).
Your starter should look bubbly and be able to double in size within 4–6 hours from the fermentation process. A strong starter is the key to getting a good rise and flavorful loaf. 4 to 12 hours before making your dough, prepare your preferment (also called a levain):
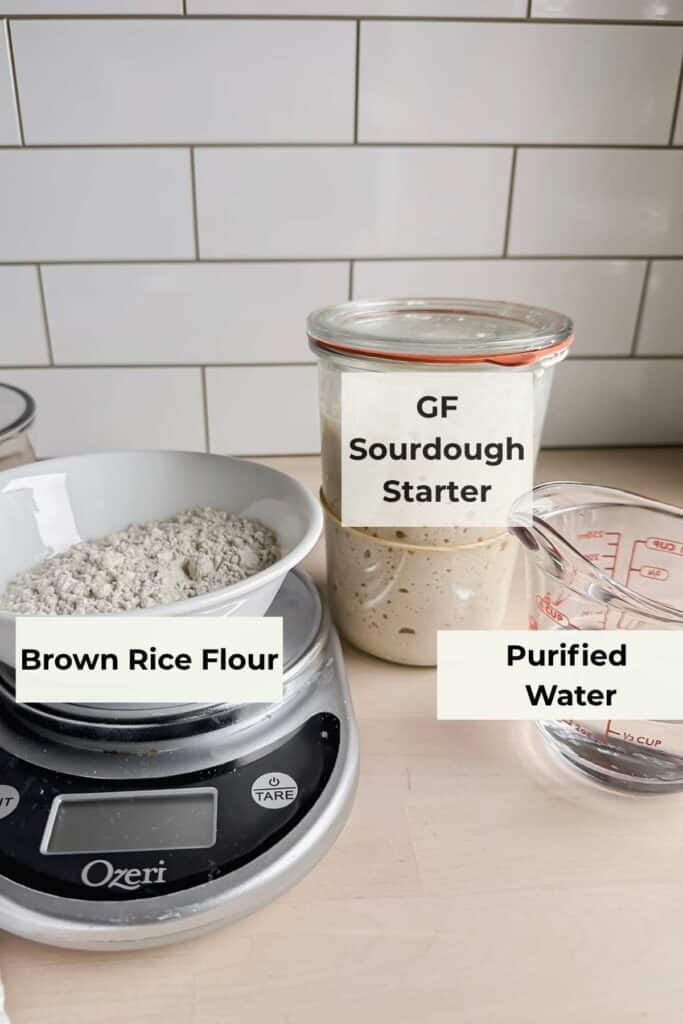
- In a small bowl, combine your bubbly, active gluten-free sourdough starter, brown rice flour, and purified water.
- Stir well until fully mixed.
- Cover loosely with a clean towel.
- Let sit at room temperature until you’re ready to mix your dough (anywhere from 4 to 12 hours).
This preferment builds flavor, helps the dough rise, and creates a more digestible loaf.
- Shorter ferment (4–6 hours): Mild flavor.
- Longer ferment (up to 12 hours): More tangy, complex flavor.
Mixing the Dough
I usually do these steps the next morning.
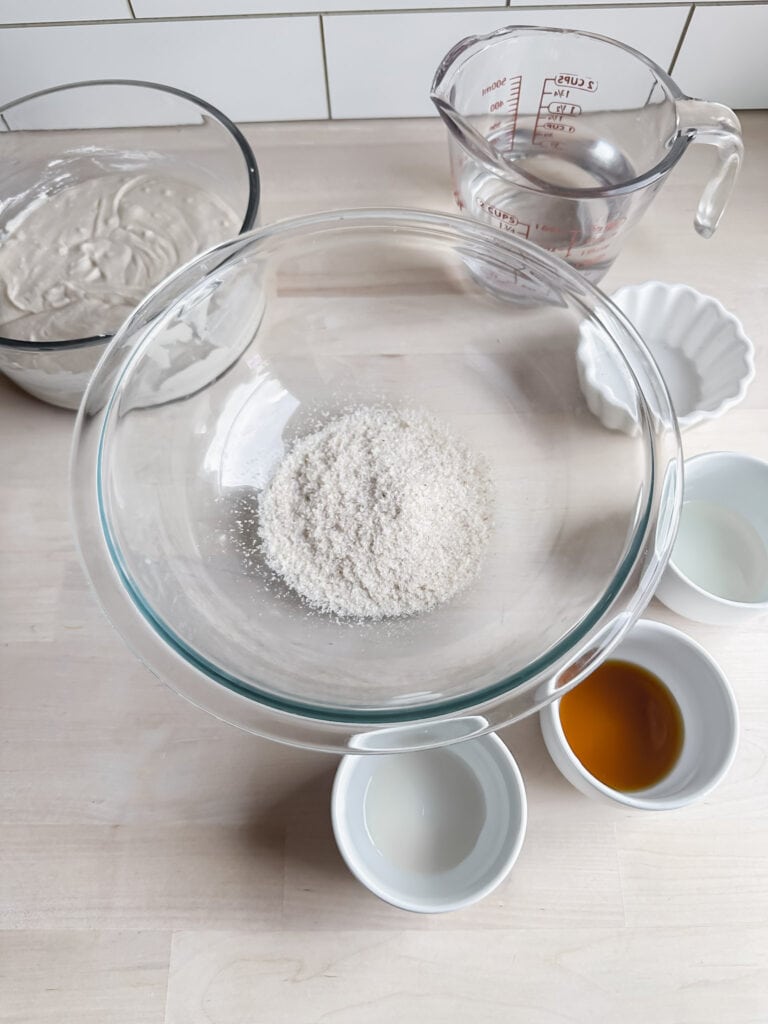
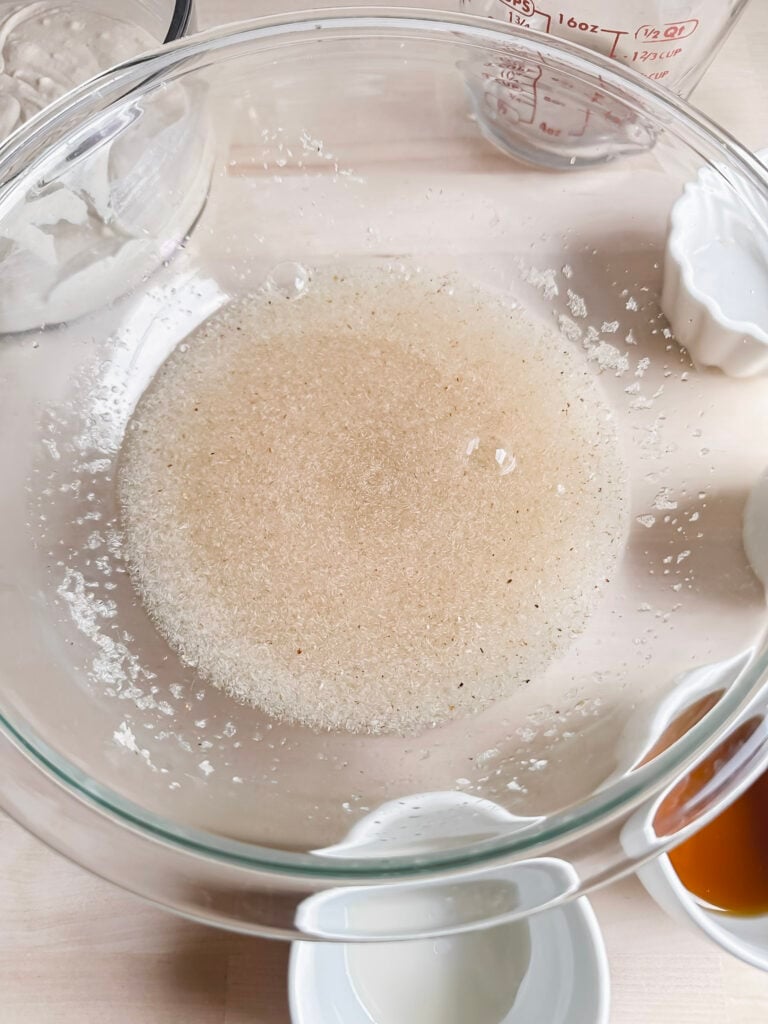
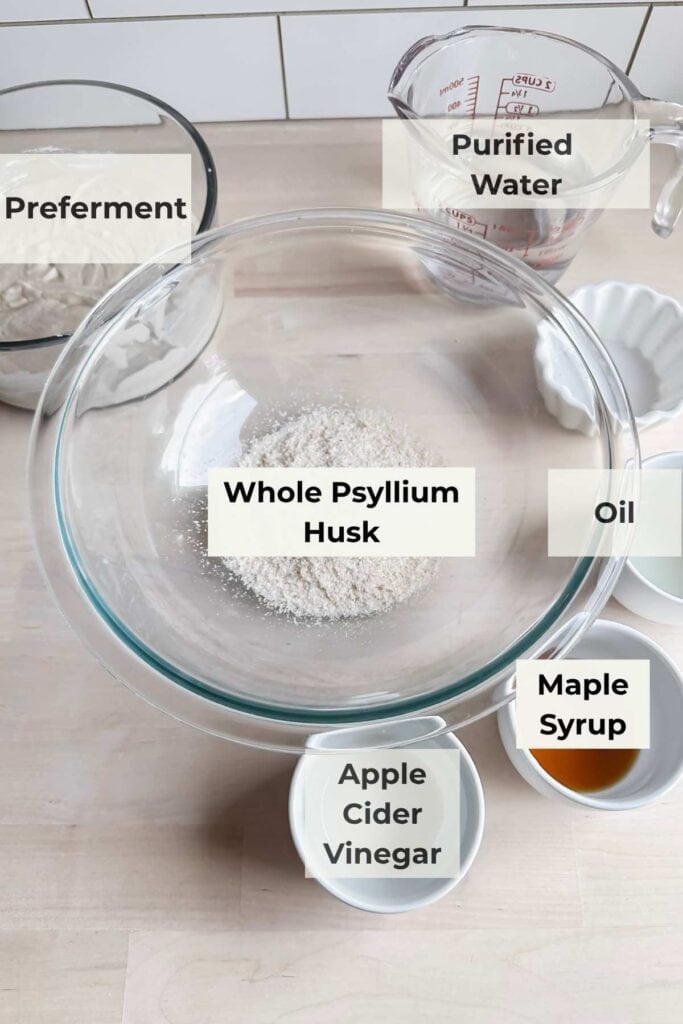
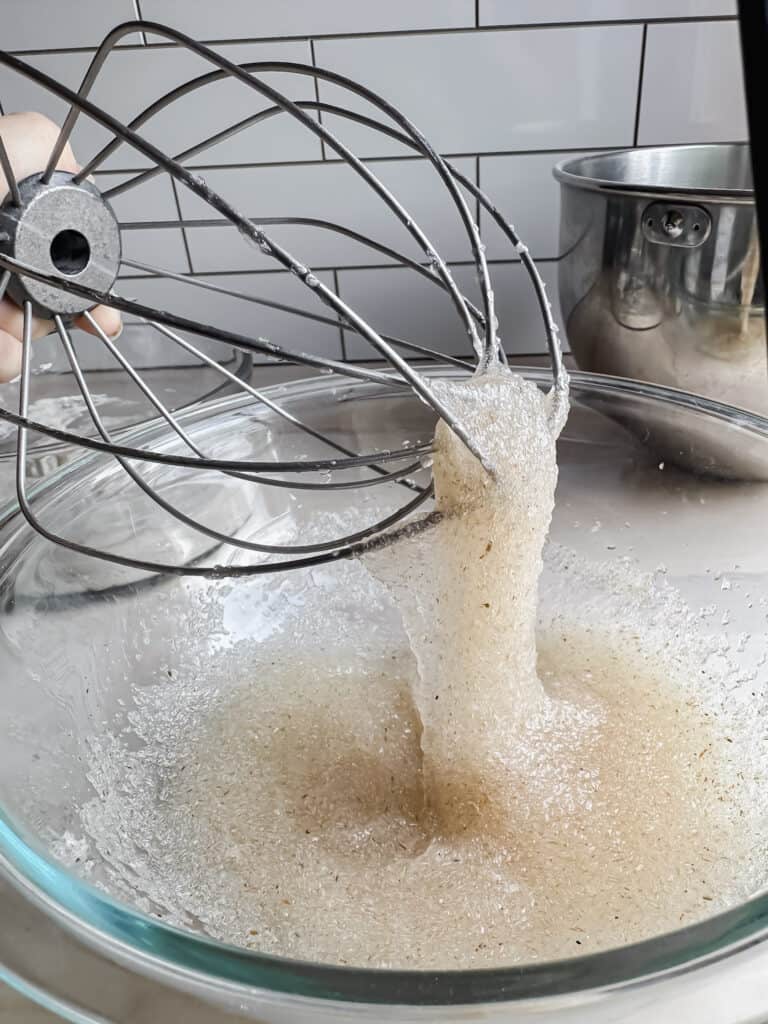
- Step 1: Make the psyllium gel: In a medium bowl, whisk together psyllium husk and water. Let it sit for 5 minutes to form a thick gel.
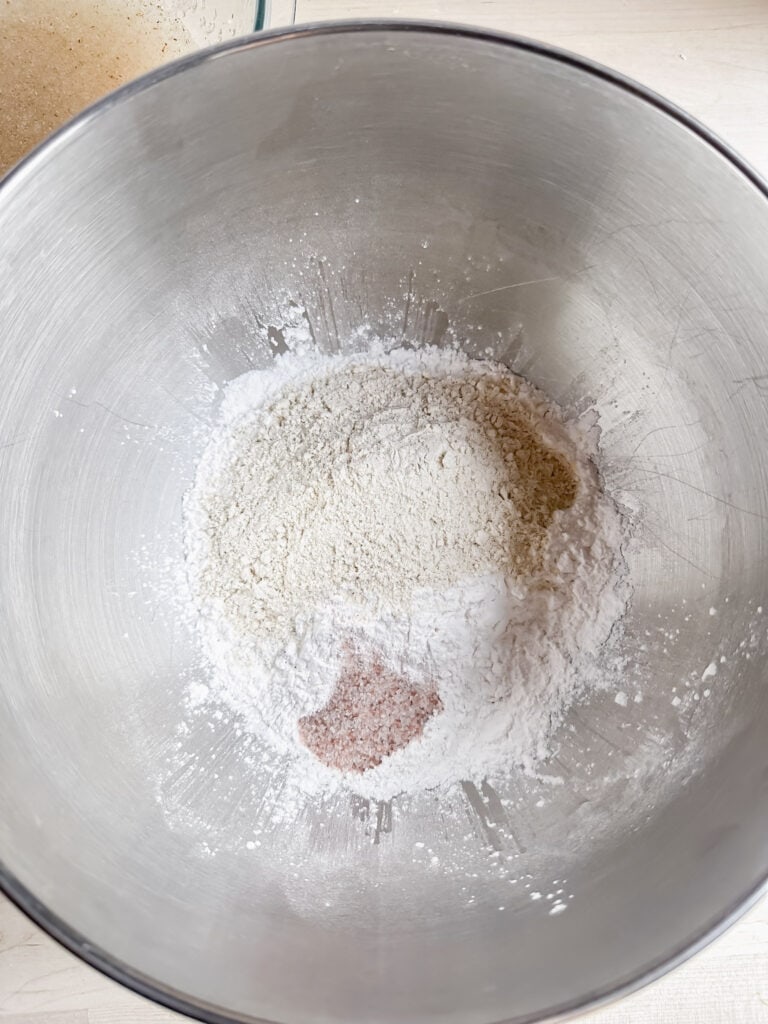
- Step 2: Measure the dry ingredients: While the psyllium gels, weigh and whisk together all the flours and salt in a large mixing bowl or the bowl of a stand mixer.
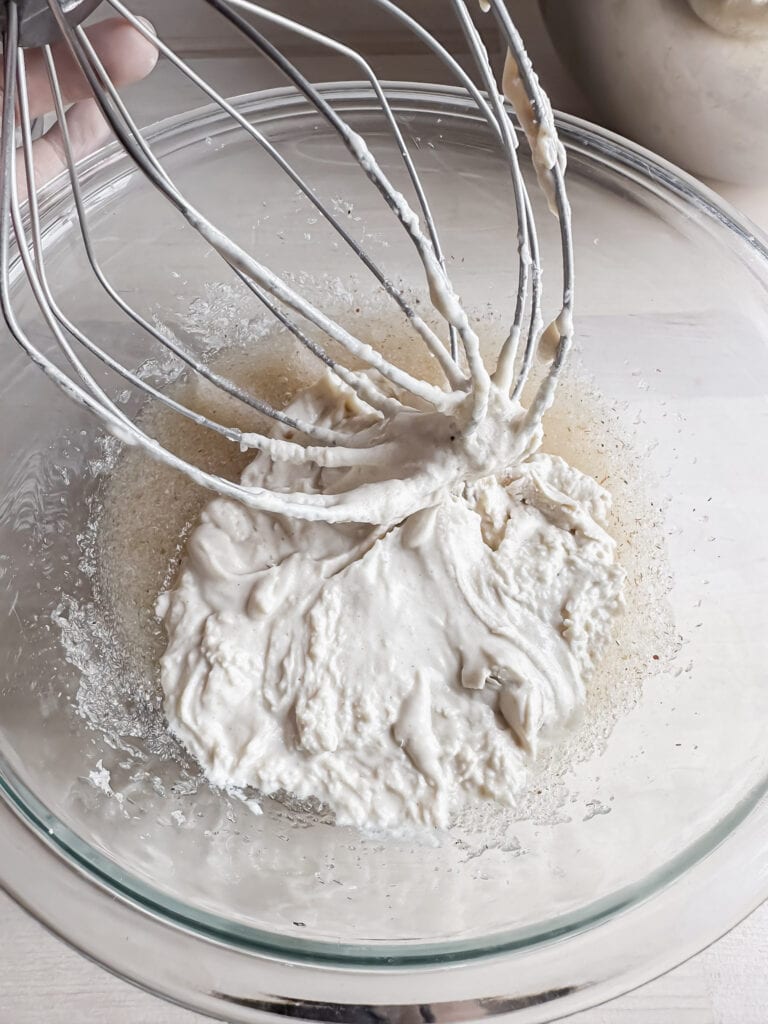
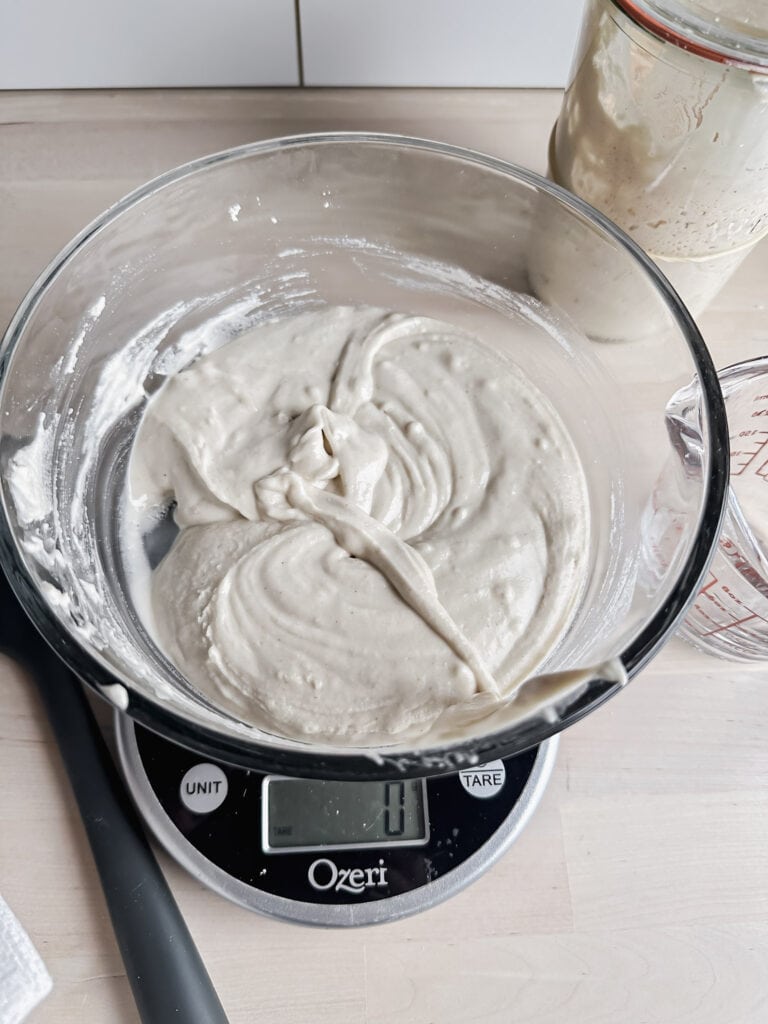
- Step 3: Combine wet ingredients: Add the preferment to the psyllium gel and whisk until smooth.
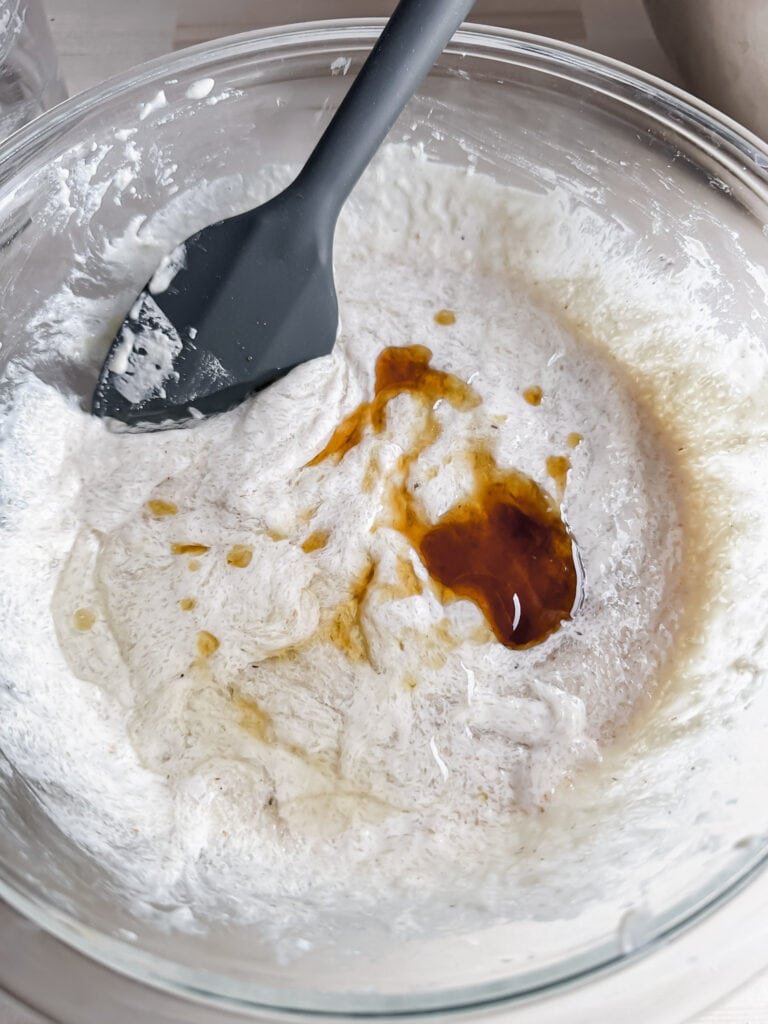
- Step 4: Then stir in the oil, maple syrup (or honey), and apple cider vinegar until fully combined.
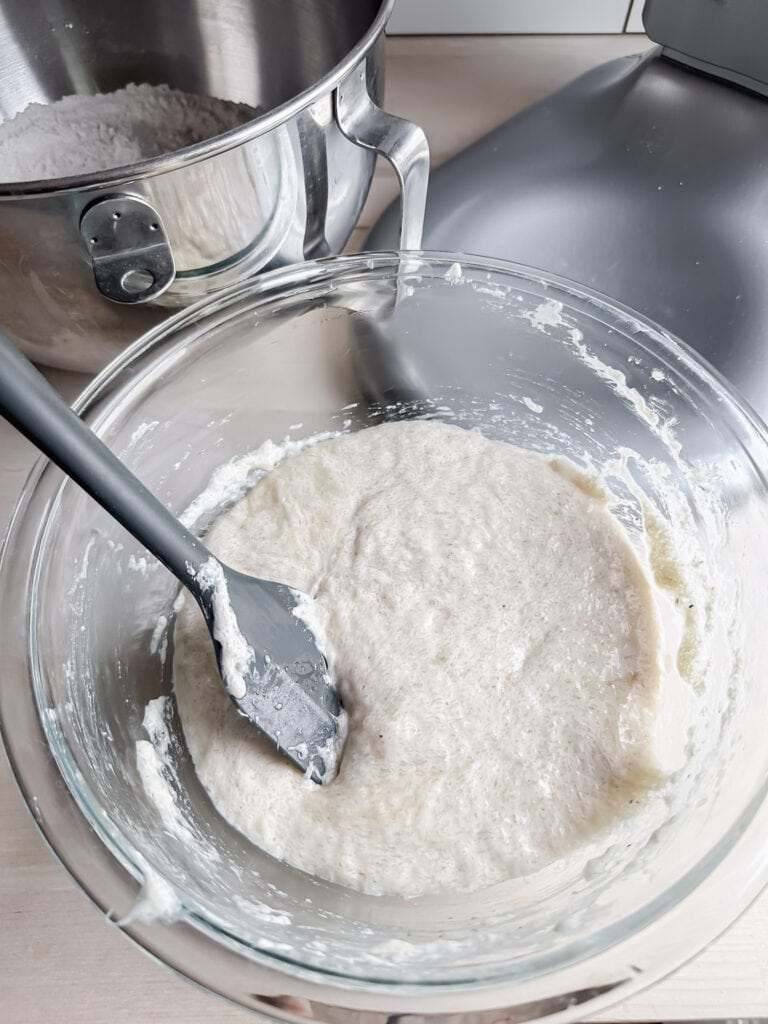
Step 5: Once you have mixed all the wet ingredients together, then add them to the dry ingredients in the large stand mixing bowl.
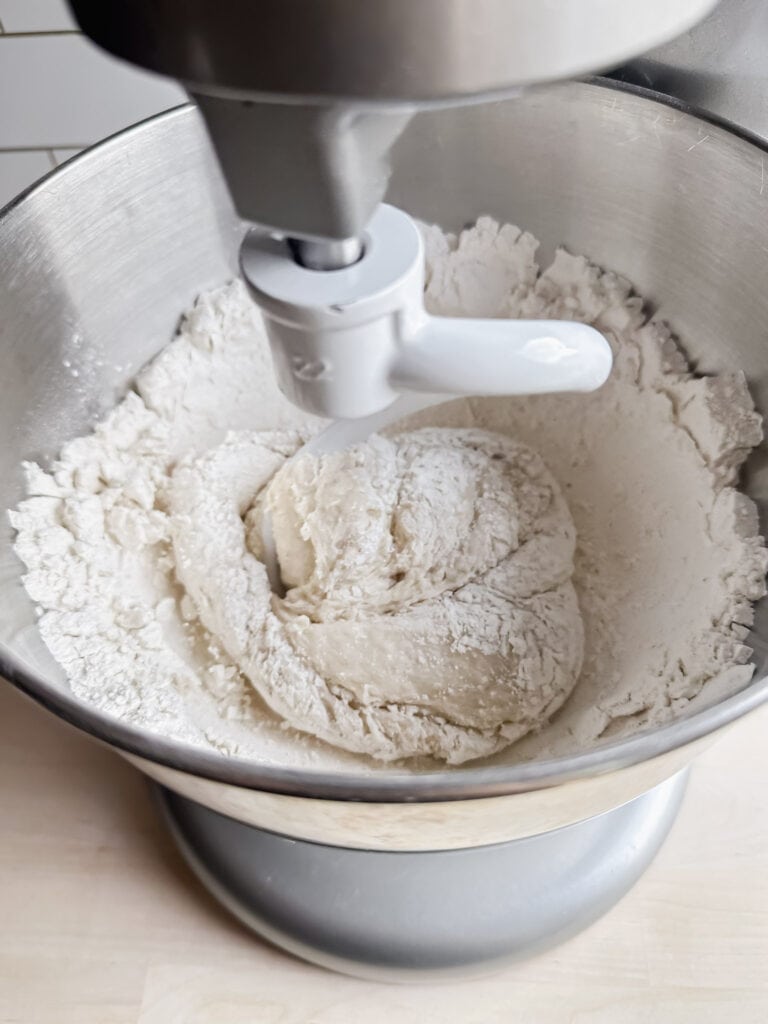
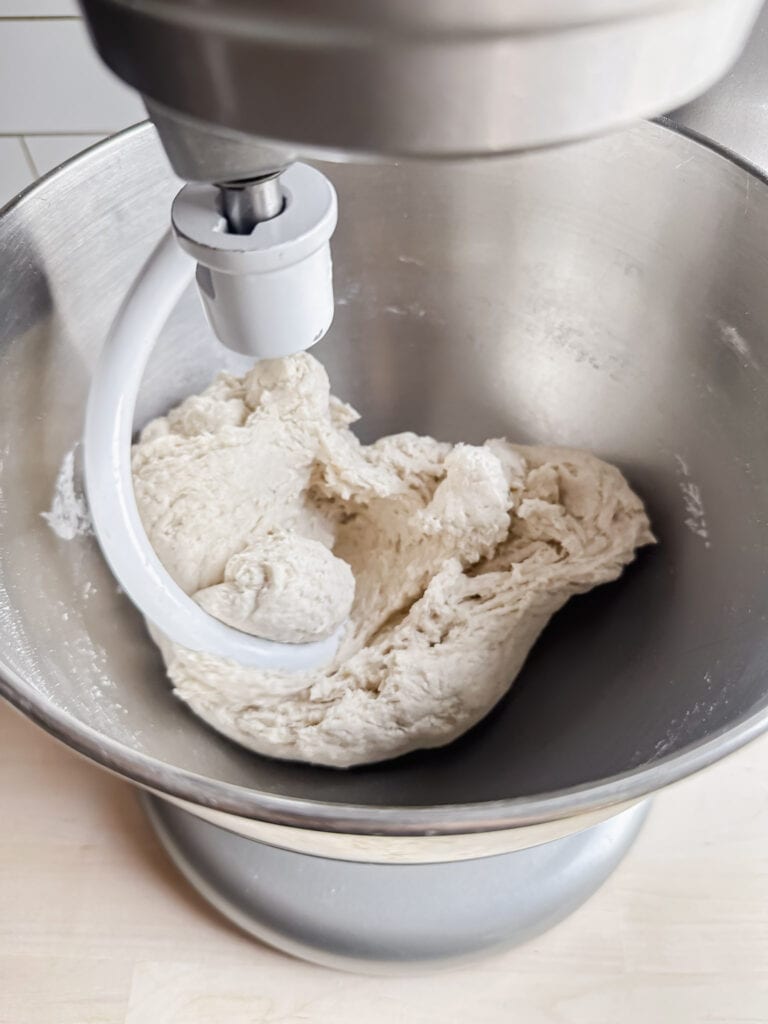
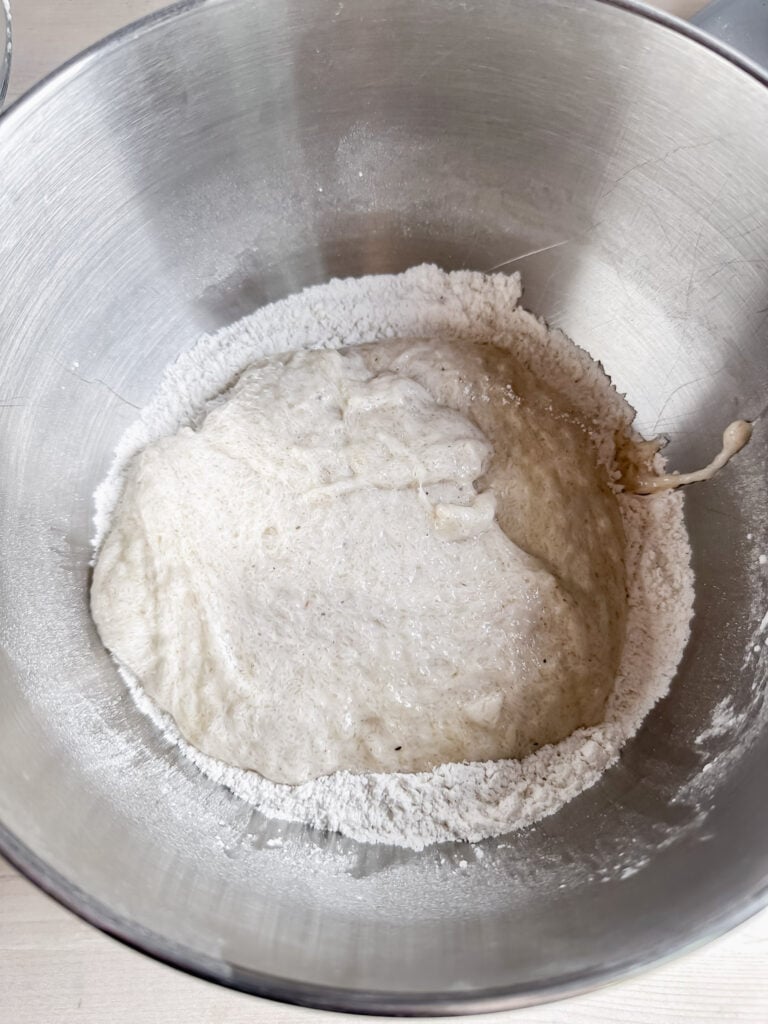
Step 6: Using a stand mixer with a dough hook attachment, mix for 7 minutes on speed 2. The dough should come together and be smooth.
- If it is too sticky to handle, let it sit for 5 more minutes to let the gluten-free flours fully hydrate.
Shaping & Bulk Fermentation Process Proofing the Loaf
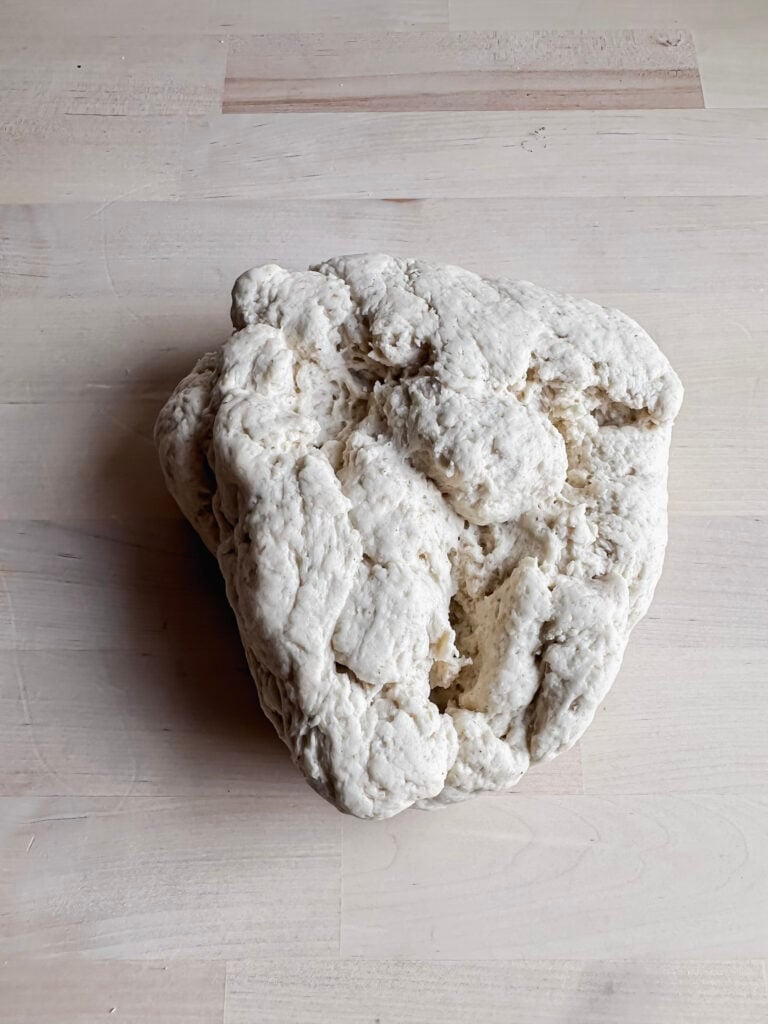
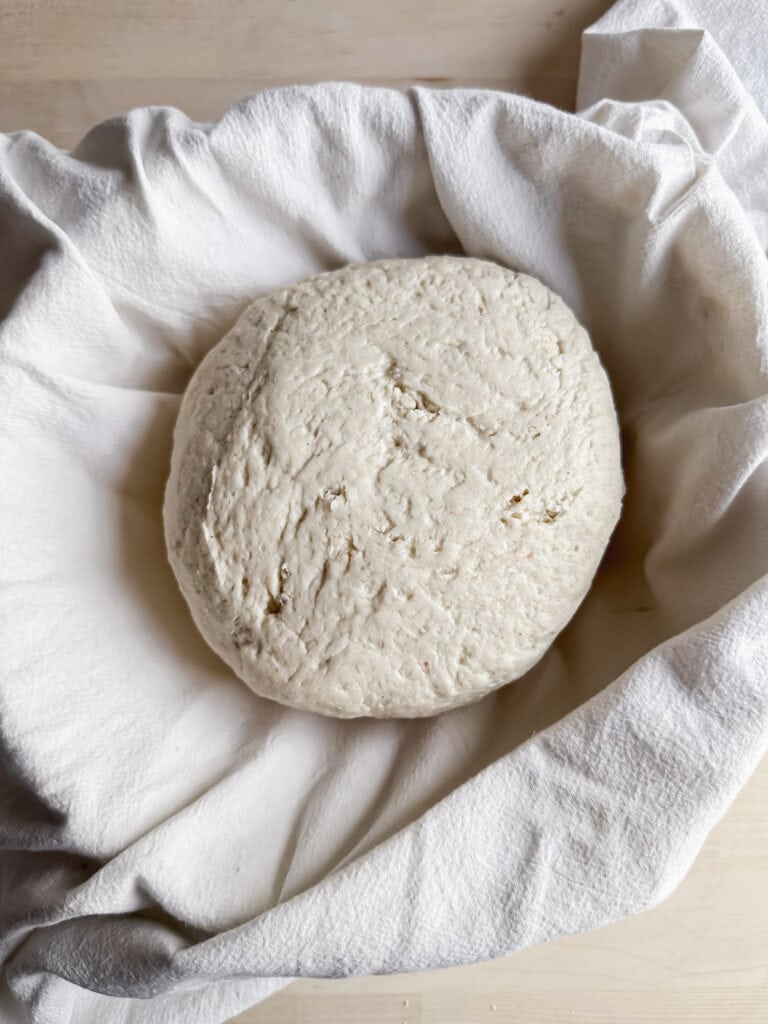
Step 7: Shape the dough by turning the dough out onto a clean surface and lightly dust it with rice flour.
Gently shape the gluten free sourdough artisan bread dough into a round by tucking the edges underneath to create surface tension on the top. To seal the bottom, cup your hands around the sides of the dough and move it in small circles while keeping the base in contact with the counter—this helps close any seams and form a smooth, even loaf.
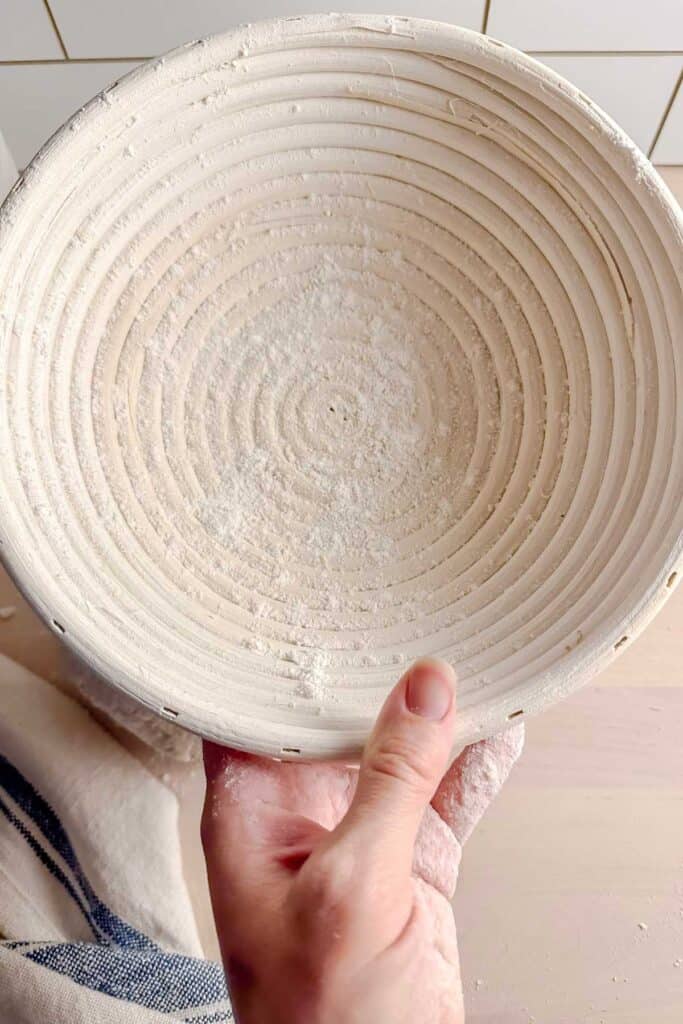
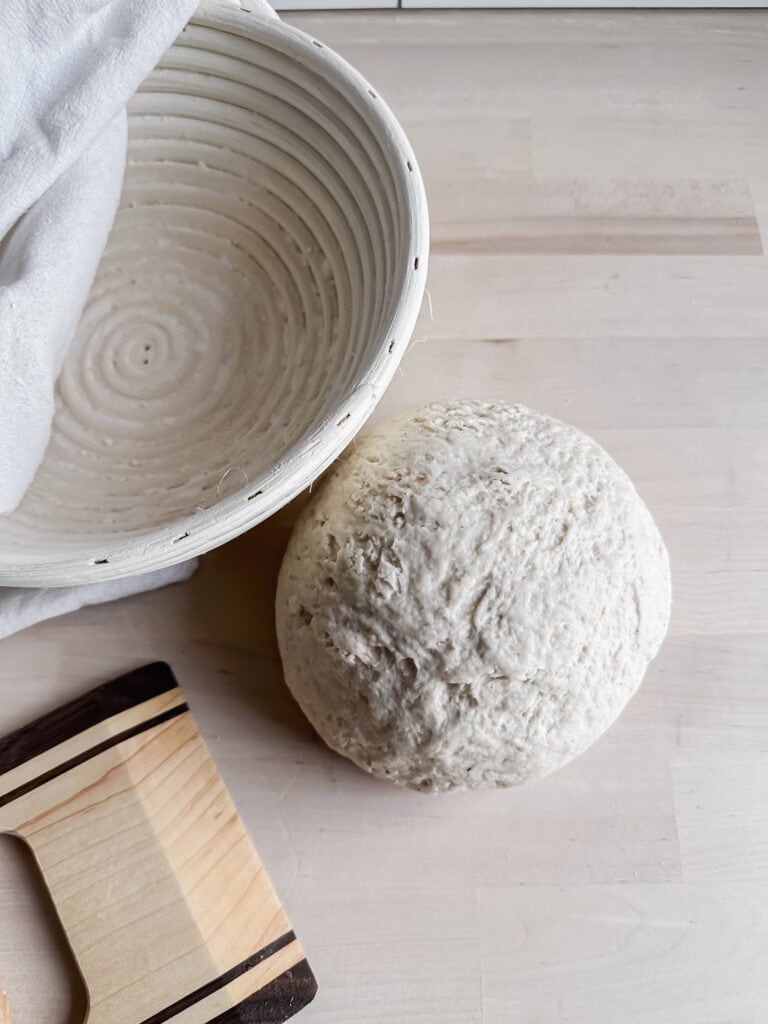
Prepare the banneton basket:
Step 8: Depending on the desired finished look of the loaf choose either:
Dust a banneton generously with gluten-free flour (like rice or millet), OR
Line the basket with a clean tea towel to avoid the spiral lines.
Place the dough in the basket seam-side up (upside down), cover with plastic wrap, then lay a tea towel on top to help hold in moisture.
Proof the dough: Set the basket on the counter at about 75°F to rise for 4–6 hours.
Proofing Tips for gluten-free sourdough bread
If your house is warm (especially in summer), use a shorter proofing time or refrigerate the dough overnight to slow fermentation.
If your house is cool (especially in winter), set the basket on top of the fridge or above the dishwasher after a cycle. It may take longer to fully proof.
Signs of overproofing to watch for:
Dough rises and then collapses or sinks.
Wet or overly sticky surface.
Large bubbles around the edges.
Strong alcohol smell.
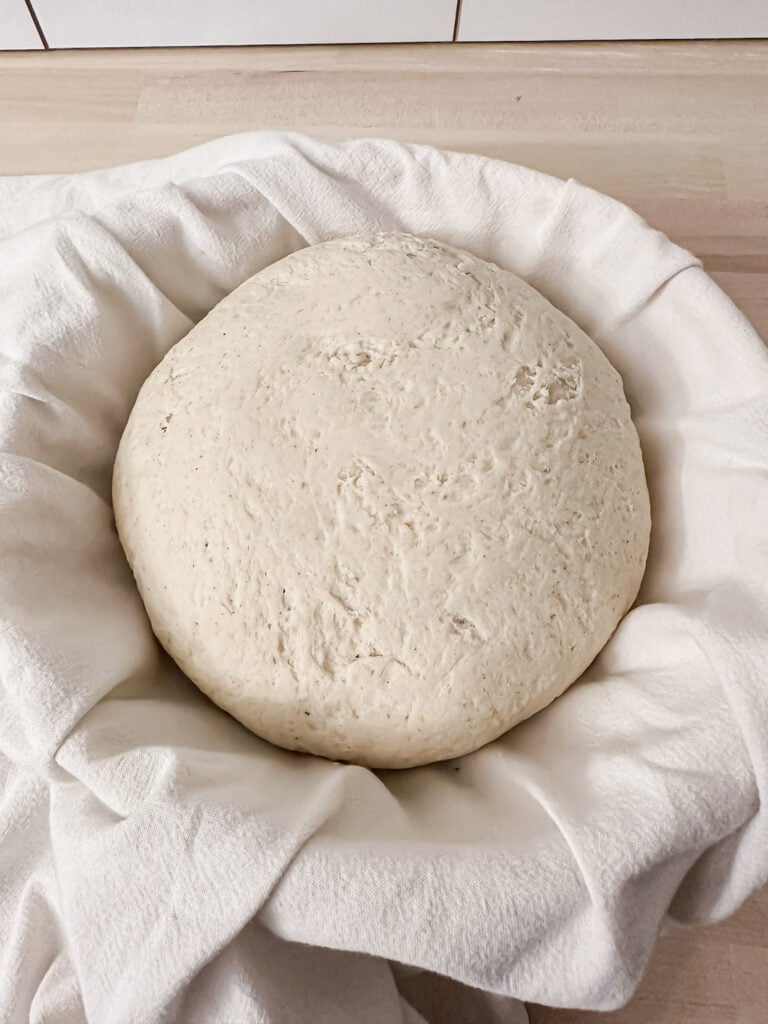
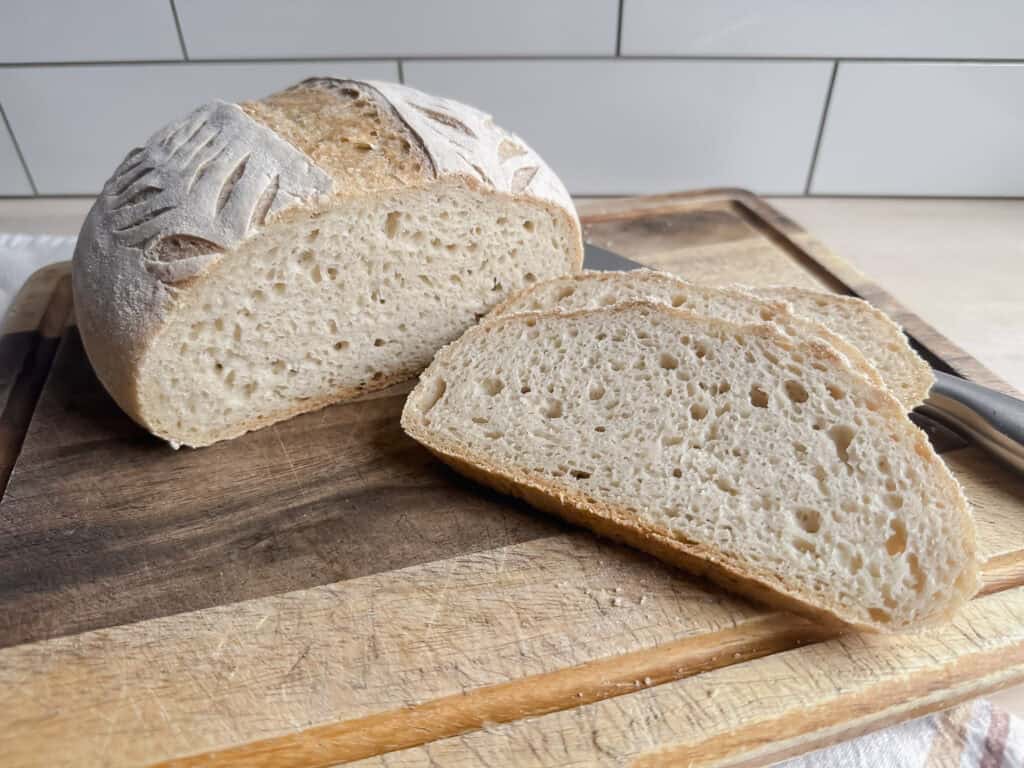
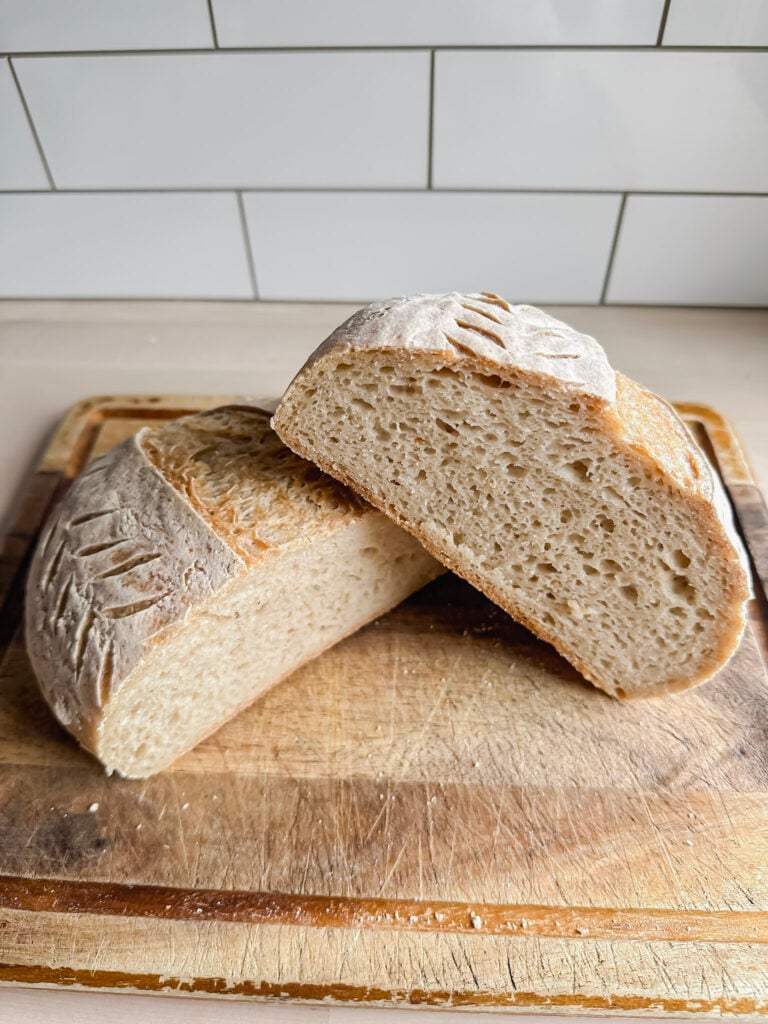
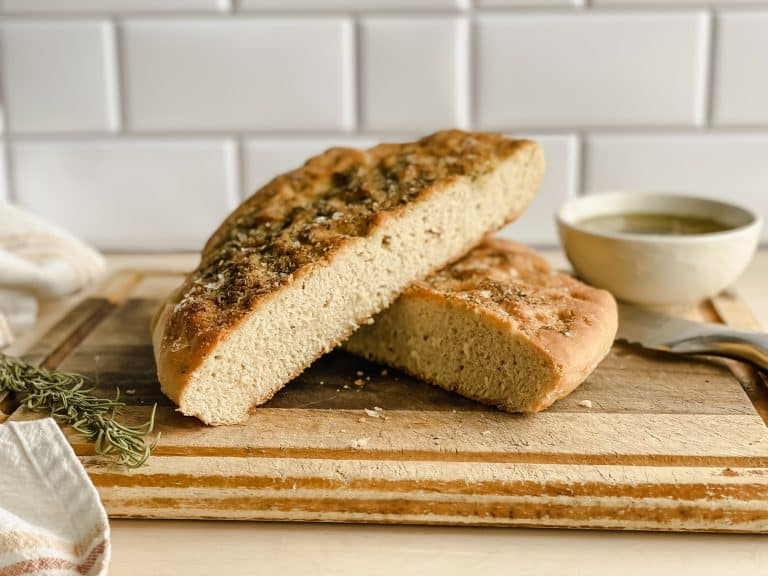
The above images are fully proofed gluten free sourdough boules. (Round loaves.)
Baking the Loaf
Step 9: Preheat: Place your Dutch oven on the center rack and preheat the oven to 425°F for 45 minutes.
Tip: If you often get a tough bottom crust, place a baking sheet on the rack below the Dutch oven to diffuse heat.
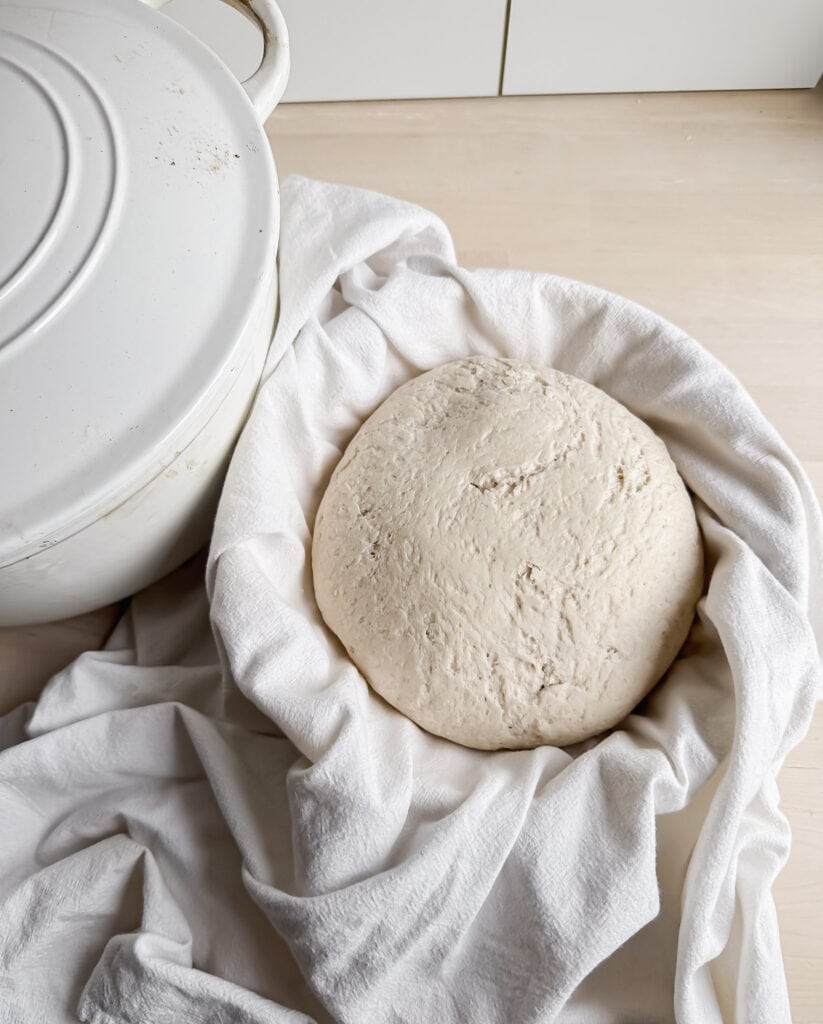
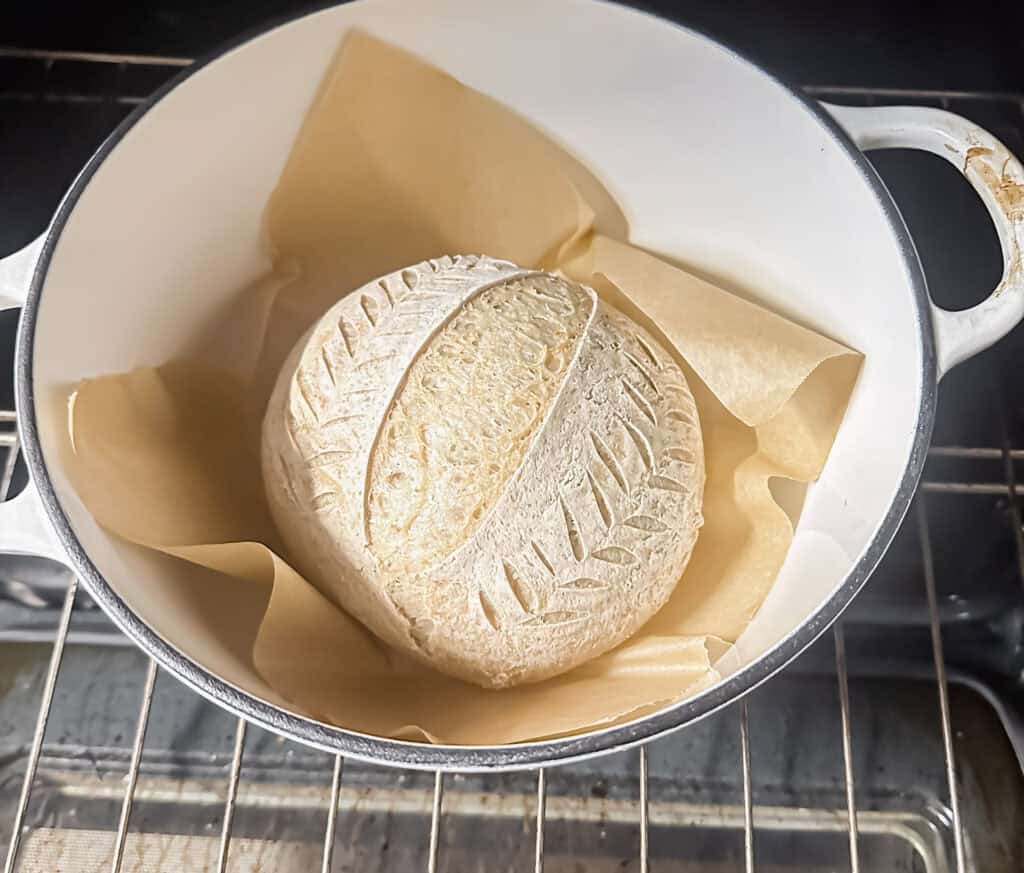
Step 10: Transfer the dough: Once the oven is preheated, gently turn the dough out onto a piece of parchment paper. Handle with care to avoid deflating it.
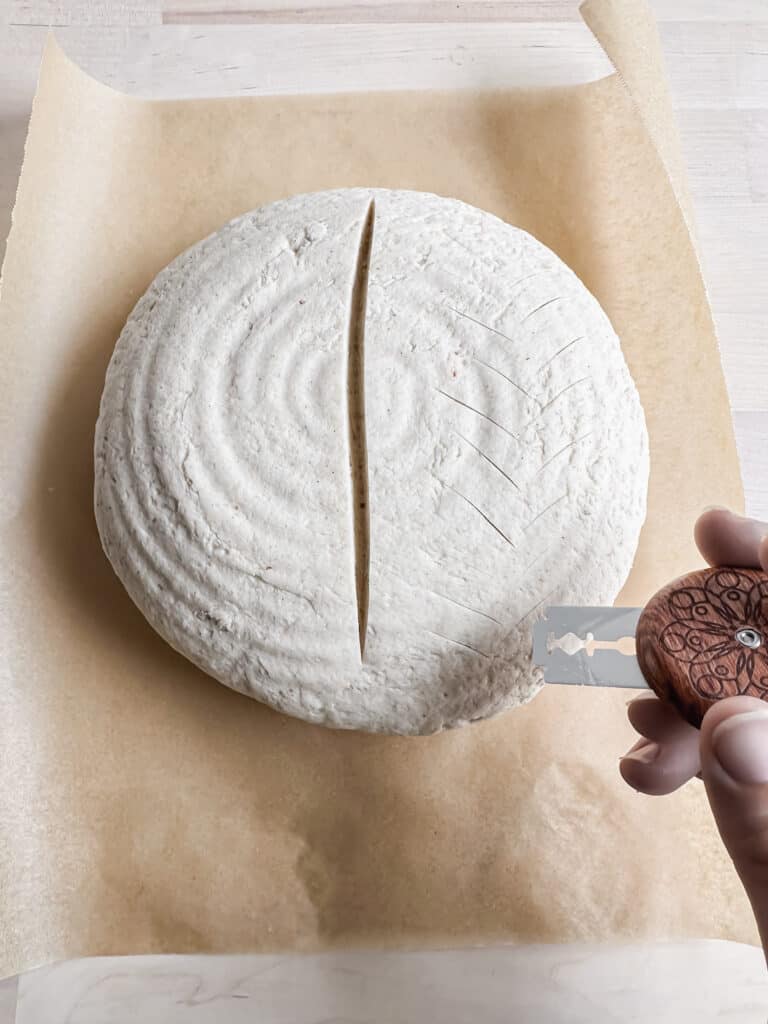
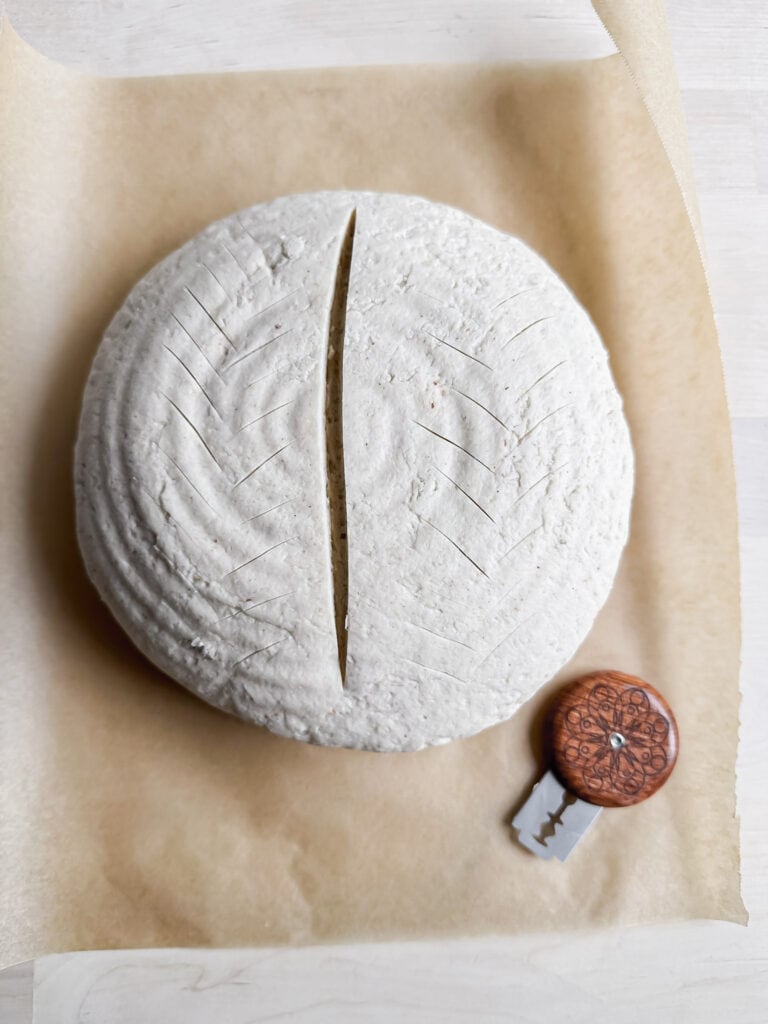
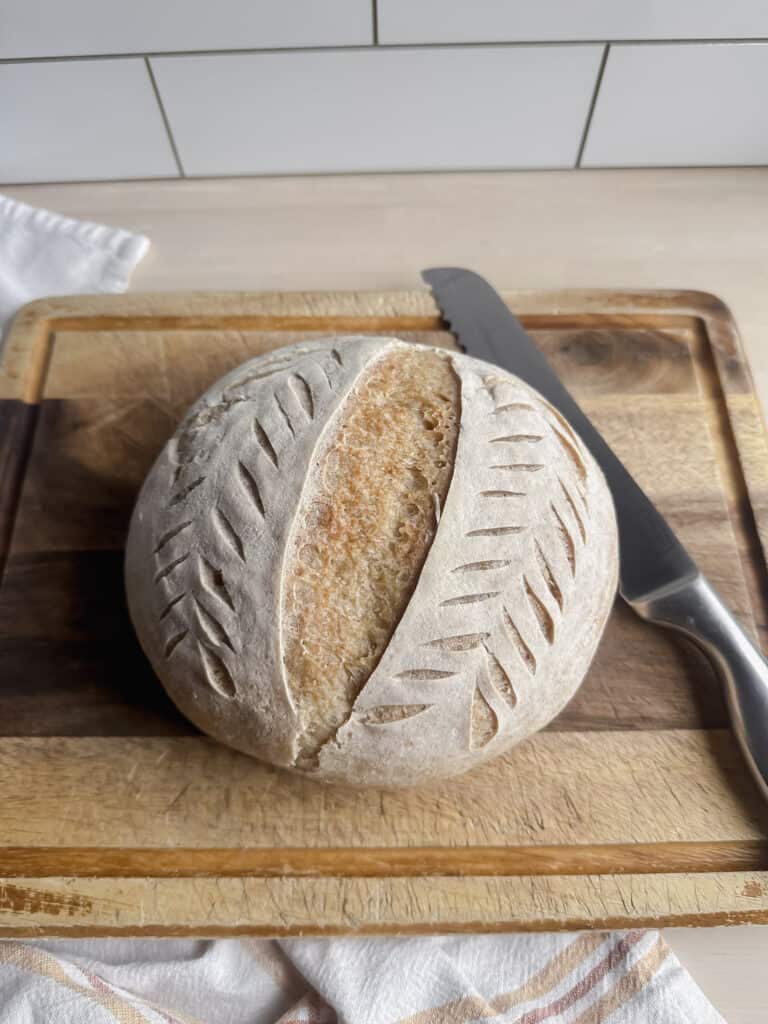
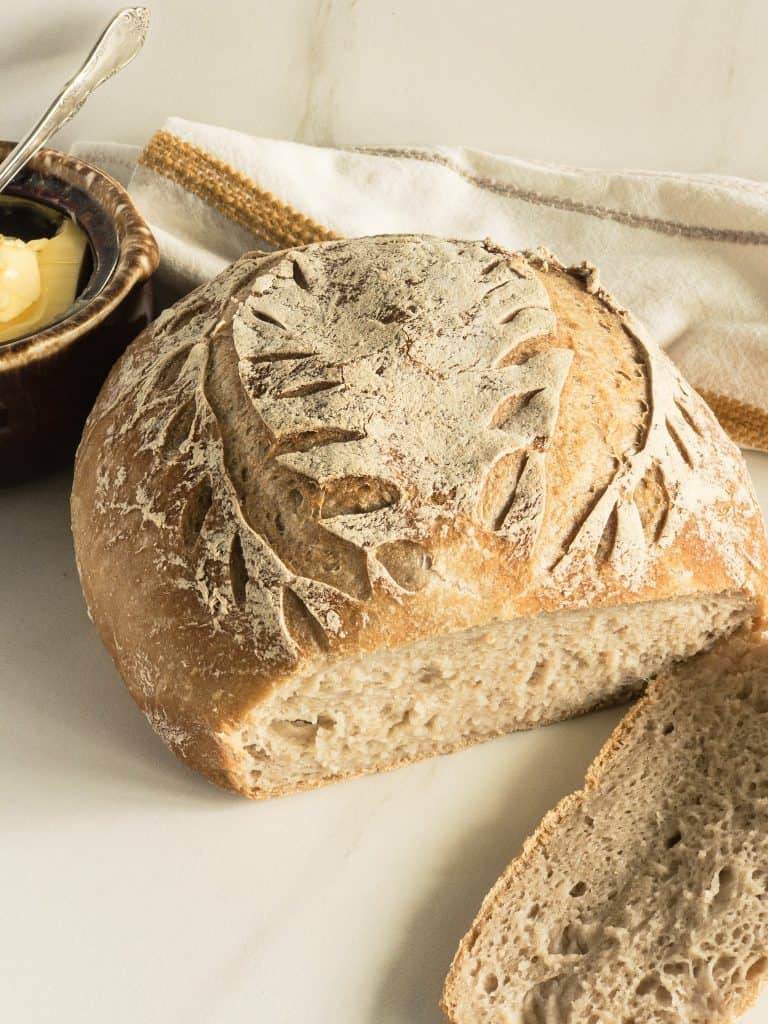
Step 11: Score the loaf: Use a sharp knife or bread lame to make a shallow (1/4 inch) slash across the top of the loaf.
For a better “ear” and controlled rise, make a second pass at a 45° angle along the same cut. Scoring allows steam to escape in a specific area, preventing the crust from cracking unpredictably.
If you’d like to add a decorative touch, this is the time—lightly dust the top of the loaf with brown rice flour to make your scoring design stand out beautifully.
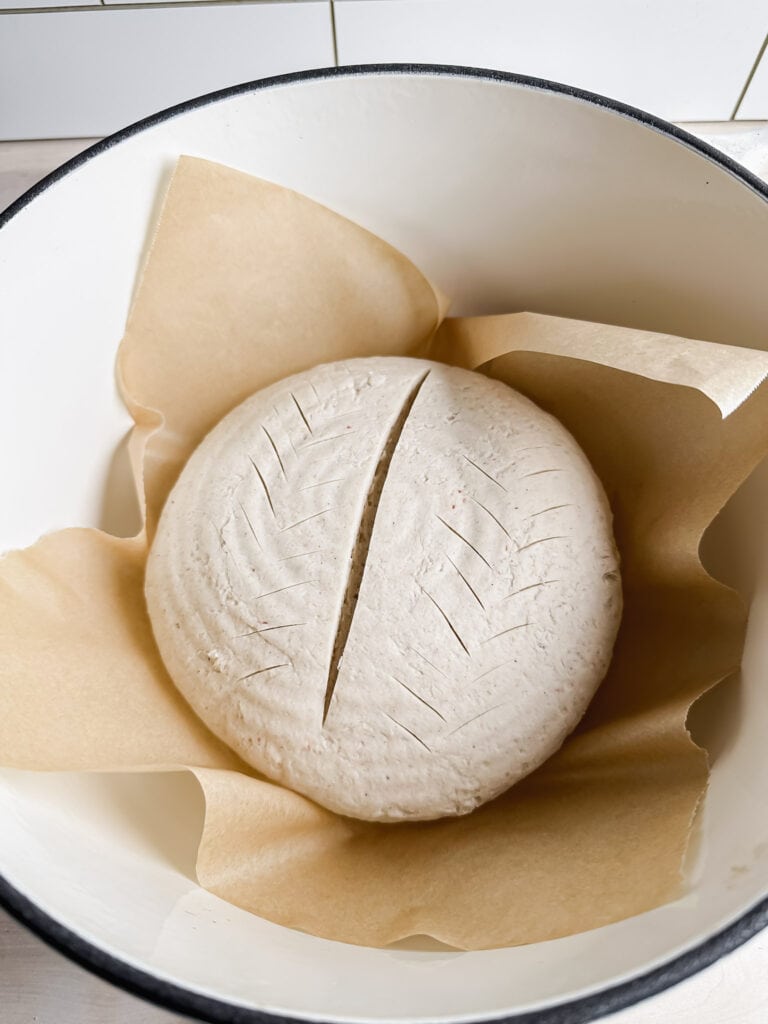
Step 12: Bake covered: Carefully lower the dough (on parchment paper) into the hot Dutch oven. (You can also use a silicone sling for this step if desired.) Cover with a lid and bake for 50 minutes.
Step 13: Finish uncovered: Remove the lid and continue baking uncovered for 10 more minutes. This allows the crust to darken and crisp.
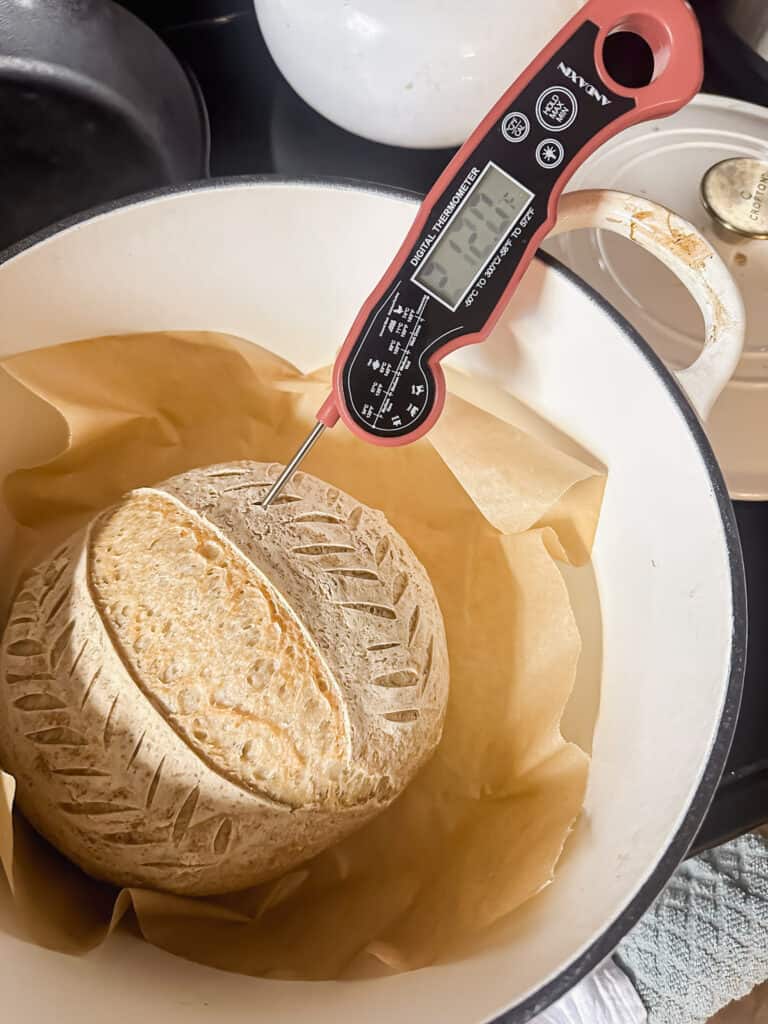
Step 14: Check internal temp: Use a thermometer to make sure the center of the loaf reaches at least 210°F (99°C). This ensures it’s fully baked and not gummy.
The bottom of the loaf should sound hollow when tapped—it’s a good sign the bread is fully baked.
- If internal temperature is not 210 degrees Fahrenheit, bake for 5 minutes more and check again. Repeat until thermometer reads 210 degrees F.
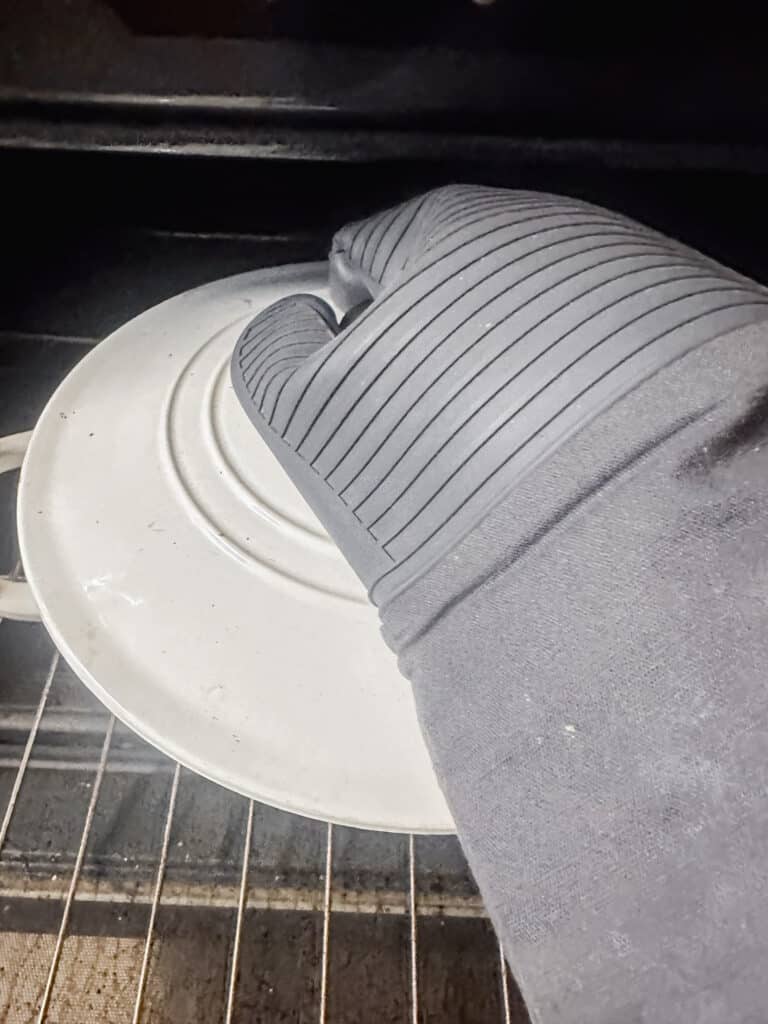
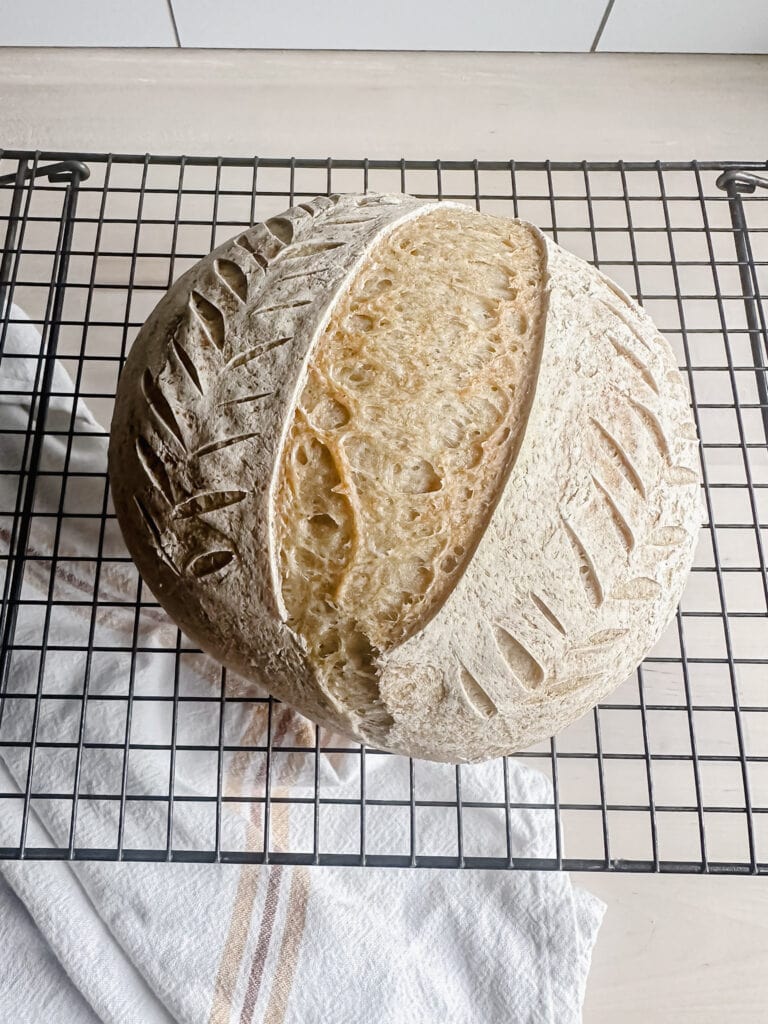
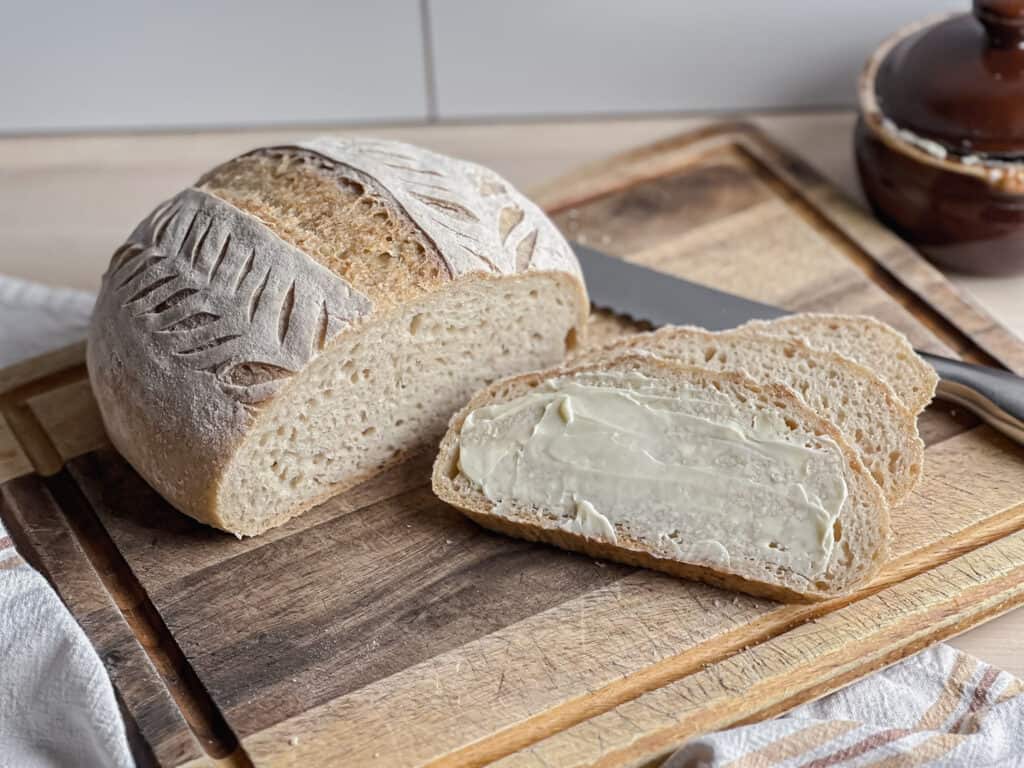
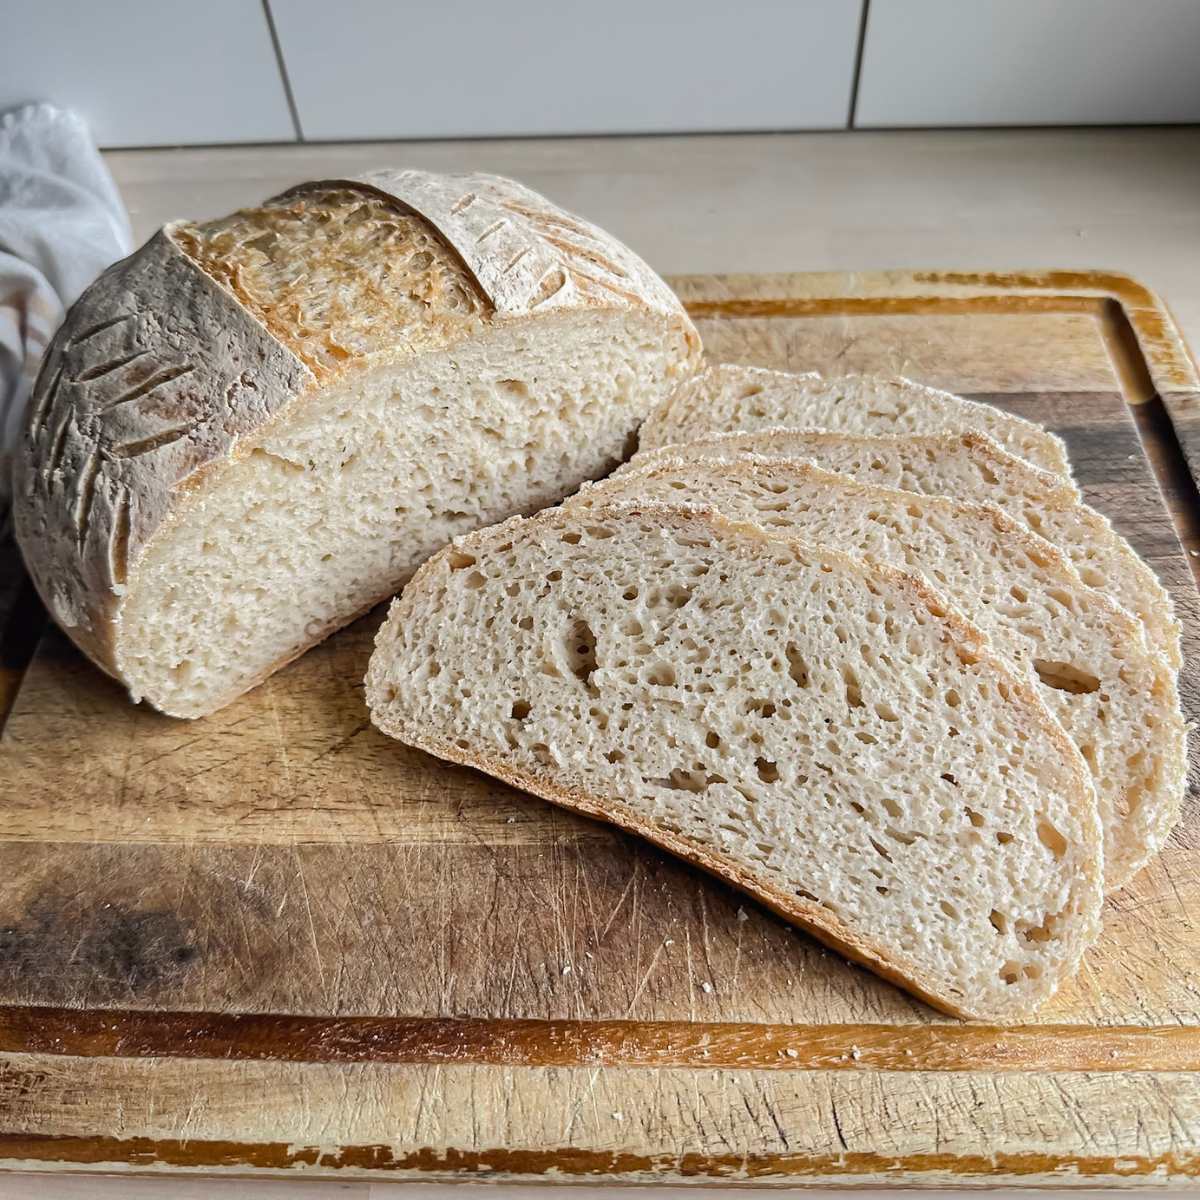
Step 15: Remove the gluten free sourdough artisan bread from the Dutch oven and place on a cooling rack.
Let it cool completely (at least 3–4 hours) before slicing. Gluten-free bread needs this time to set properly.
Cutting too early can cause a gummy or underdeveloped center. Patience is worth it for that perfect slice!
Additional Tips & Tricks for Success
1. Use a Kitchen Scale
Accurate measurements are crucial in gluten-free baking. A digital scale ensures your ratios stay consistent.
2. Don’t Expect a Smooth, Elastic Dough
Unlike wheat-based dough, gluten-free sourdough will feel wetter and stickier. That’s totally normal! Psyllium husk helps give it structure, but it won’t behave like traditional dough.
3. Practice in Your Environment
Your first loaf might not be perfect, and that’s okay! Every starter and environment is a little different. Keep notes on rise times, temperature, and flour combinations to fine-tune your process specifically for your kitchen.
Trouble Shooting: Why Is My Loaf Gummy?
A gummy center is one of the most common challenges in gluten-free sourdough. Here are the most likely causes—and how to fix them:
1. It wasn’t baked long enough.
This is the #1 reason for gummy bread. Even if the crust looks done, the inside may still need time to fully set.
Fix: Keep baking until the internal temperature reaches at least 210°F (99°C). You can also lower the oven temperature slightly and extend the bake time to help the inside dry out without burning the crust.
2. The dough had too much water.
Gluten-free flours absorb water differently, and even a small excess can throw off texture.
Fix: Next time, reduce the water slightly (start with 10–20g less) and take note of your dough’s consistency.
3. You sliced too soon.
Gluten-free bread needs time to cool and finish setting internally.
Fix: Let your loaf cool completely—at least 2–3 hours—before slicing. Cutting early traps steam inside and causes gumminess.
4. You accidentally deflated the loaf.
Rough handling (like dropping it into the Dutch oven) can collapse air pockets and lead to dense, underbaked spots.
Fix: Be gentle when transferring! Use parchment to lower it in smoothly, and avoid bumping or shaking the dough.
Storage and Reheating
Room Temperature (1-2 Days): Once the loaf has fully cooled, store it at room temperature in an airtight container or plastic bag. It will stay fresh for 1-2 days this way. Be sure to keep it sealed well, as gluten free bread dries out quickly when exposed to air.
Refrigeration (After Day 2): If you haven’t used up the loaf within the first couple of days, move it to the refrigerator to extend its freshness. Although the crust will soften with this storage option. Store it in an airtight container to help prevent it from drying out. The texture may firm up slightly, but a quick toast or reheat brings it right back. It usually lasts in the fridge for about 7 days.
Freezing: To store for longer, slice the completely cooled loaf and place parchment paper or wax paper between slices. Freeze in a freezer safe bag or container for up to 3 months. This makes it easy to pull out and use just what you need.
Gluten Free Flour Substitutions
One of the best aspects of this recipe is its flexibility—it’s easy to adjust for various dietary needs. As long as you swap flours within the same category (starch, lightweight, or heavyweight), the recipe should still work well. You may need to tweak hydration slightly with certain substitutions, but overall, it’s a very adaptable formula.
Starches: (light, fluffy, tenderness helps with oven-spring)
Note: Each type of starch has it’s own unique properties. That is why I use two different types in my recipe, rather than just doubling one single starch.
- Tapioca Starch (Flour)
- Adds stretch, bounce, and chew; mimics gluten’s elasticity.
- Essential for oven spring.
- Arrowroot Starch
- Very fine texture; helps lighten crumb and improve mouthfeel.
- Mild flavor, good as a tapioca alternative.
- Potato Starch (NOT potato flour)
- Traps steam for great rise and chew.
- Adds moisture without heaviness.
- Cornstarch
- Creates a soft, tender crumb.
- Useful in small amounts to lighten denser blends.
Lightweight Protein Flours: (mild flavor, soft structure, optional color)
- Millet Flour
- Slightly sweet and pale yellow.
- Light texture and soft crumb; good for sandwich-style breads.
- Superfine Brown Rice Flour
- Neutral flavor, soft crumb.
- Finer than standard brown rice flour—reduces grittiness.
- White Rice Flour
- Light and neutral; a common base in many blends.
- Best when finely milled to avoid graininess.
Heavyweight Protein Flours: Add fiber, protein, flavor, and structure.
- Sorghum Flour
- Mildly earthy; builds structure and strength.
- Oat Flour (certified gluten-free)
- Adds softness, nutty flavor, and mild sweetness.
- Absorbs more moisture than rice or millet.
- Buckwheat Flour (light)
- Strong structure and earthy flavor, but less overpowering than dark buckwheat.
- Rich in minerals and slightly nutty.
- White Teff Flour
- Tiny grain with a sweet, nutty flavor.
- High in protein, fiber, and nutrients; adds depth and softness.
- Brown Rice Flour
- Heavier and nuttier than white rice flour.
- Adds texture and depth; best in blends.
- Quinoa Flour
- Earthy, slightly bitter if not toasted.
- Adds protein and helps build structure.
I hope you love this Gluten Free Sourdough Artisan Bread as much as I do. If you try it, let me know in the comments below, I’d love to hear how it turned out for you!
And if you are looking for more ways to use your gluten free sourdough, try out my Gluten Free Sourdough Cinnamon Rolls Recipe!
Gluten Free Sourdough Artisan Bread (Round Loaf)
Ingredients
Equipment
Method
- Your starter should look bubbly and be able to double in size within 4–6 hours. A strong starter is the key to getting a good rise and flavorful loaf. 4 to 12 hours before making your dough, prepare your preferment.
- In a small bowl, combine your bubbly, active gluten-free sourdough starter, brown rice flour, and purified water.
- Stir well until fully mixed and then cover loosely with a clean towel.
- Let sit at room temperature until you're ready to mix the dough. (Anywhere from 4-12 hours.)
- Make the psyllium gel: In a medium bowl, whisk together psyllium husk and warm water. Let it sit for 5 minutes to form a thick gel.20 g Psyllium Husk, 300 g Warm Water
- Measure the dry ingredients: While the psyllium gels, weigh and whisk together all the flours and salt in a large mixing bowl or the bowl of a stand mixer.
- Combine wet ingredients: Add the preferment to the psyllium gel and whisk until smooth.
- Then stir in the oil, maple syrup (or honey), and apple cider vinegar until fully combined.15 g Maple Syrup, 14 g Oil, 2 g Apple Cider Vinegar
- Once you have mixed all the wet ingredients together, then add them to the dry ingredients in the large stand mixing bowl.
- Using a stand mixer with a dough hook attachment, mix for 7 minutes on speed 2. The dough should come together and be smooth.If it is too sticky to handle, let it sit for 5 more minutes to let the gluten-free flours fully hydrate.
- Shape the dough by turning the dough out onto a clean surface and lightly dust it with rice flour.Gently shape it into a round by tucking the edges underneath to create surface tension on the top. To seal the bottom, cup your hands around the sides of the dough and move it in small circles while keeping the base in contact with the counter—this helps close any seams and form a smooth, even loaf.
- Depending on the desired finished look of the loaf choose either:Dust a banneton generously with gluten-free flour (like rice or millet), ORLine the basket with a clean tea towel to avoid the spiral lines.
- Place the dough in the basket seam-side up (upside down), cover with plastic wrap, then lay a tea towel on top to help hold in moisture.
- Proof the dough: Set the basket on the counter for about for 4–6 hours. The ideal proofing temperature is 75 degrees F. See notes for proofing tips.
- Preheat: Place your Dutch oven on the center rack and preheat the oven to 425°F for 45 minutes.Tip: If you often get a tough bottom crust, place a baking sheet on the rack below the Dutch oven to diffuse heat
- Transfer the dough. Once the oven is preheated, gently turn the dough out onto a sheet of parchment paper. Handle with care to avoid deflating it.
- Score the loaf: Use a sharp knife or bread lame to make a shallow (1/4 inch) slash across the top of the loaf.For a better "ear" and controlled rise, make a second pass at a 45° angle along the same cut. Scoring allows steam to escape in a specific area, preventing the crust from cracking unpredictably.
- If you'd like to add a decorative touch, this is the time—lightly dust the top of the loaf with brown rice flour to make your scoring design stand out beautifully.
- Bake covered: Carefully lower the dough (on parchment paper) into the hot Dutch oven. (You can also use a silicone sling for this step if desired.) Cover with a lid and bake for 50 minutes.
- Finish uncovered: Remove the lid and continue baking uncovered for 10 more minutes. This allows the crust to darken and crisp.
- Check internal temp: Use a thermometer to make sure the center of the loaf reaches at least 210°F (99°C). This ensures it’s fully baked and not gummy.
- The bottom of the loaf should sound hollow when tapped—it’s a good sign the bread is fully baked.
- If internal temperature is not 210 degrees Fahrenheit, bake for 5 minutes more and check again. Repeat until thermometer reads 210 degrees F.
- Remove the bread from the Dutch oven and place on a cooling rack.
- Let it cool completely (at least 3–4 hours) before slicing. Gluten-free bread needs this time to set the crumb properly.Cutting too early can cause a gummy or underdeveloped center. Patience is worth it for that perfect slice!
Nutrition
Notes
Timing Tips (With Sample Schedule)
Here’s how a typical baking timeline might look if you want your fresh gluten-free sourdough bread ready by early afternoon the next day:
- 5:00 PM (Day 1): Feed your gluten-free sourdough starter using a 1:1:1 ratio (equal parts starter, flour, and water).
- 9:00 PM (Day 1): Mix your preferment (also called a levain). Cover and let it rest at room temperature overnight.
- 7:00 AM (Day 2): The next day, follow the rest of the instructions from “mixing the dough”.
- 7:30 AM – 11:30 AM: Bulk ferment the dough at room temperature (about 4 hours, though this may vary depending on your environment).
- 11:30 AM: Begin preheating your oven and Dutch oven to 450°F.
- 12:00 PM: Turn out the dough, score the top, and transfer it to the hot Dutch oven. Bake as directed.
- 12:45 PM: Bread is done! Let it cool on a wire rack for at least 3–4 hours.
- 4:00 PM: The loaf is fully cooled and ready to slice and enjoy.
Preferment Tips:
The preferment builds flavor, helps the dough rise, and creates a more digestible loaf.- Shorter ferment (4–6 hours): Mild flavor.
- Longer ferment (up to 12 hours): More tangy, complex flavor.
Proofing Tips
If your house is warm (especially in summer), use a shorter proofing time or refrigerate the dough overnight to slow fermentation. If your house is cool (especially in winter), set the basket on top of the fridge or above the dishwasher after a cycle. It may take longer to fully proof. Signs of overproofing to watch for:- Dough rises and then collapses or sinks.
- Wet or overly sticky surface after proofing step.
- Large bubbles around the edges.
- Strong alcohol smell.
How Warm Should The Water Be?
Use warm water that feels about the same temperature as a baby’s bath—comfortably warm to your wrist, but not hot or steaming. For those who want to know the exact ideal temperature, use a digital thermometer for 90 degrees Fahrenheit (32 degrees Celsius) which is optimal to gel the psyllium husk. It will then cool a few degrees by the time you add the gluten free sourdough starter which needs an optimal temperature of 75-85 degrees Farhrenheit to bloom. (24 degrees- 29 degrees Celsius)Trouble Shooting: Why Is My Loaf Gummy?
A gummy center is one of the most common challenges in gluten-free sourdough. Here are the most likely causes—and how to fix them: It wasn’t baked long enough.This is the #1 reason for gummy bread. Even if the crust looks done, the inside may still need time to fully set.
Fix: Keep baking until the internal temperature reaches at least 210°F (99°C). You can also lower the oven temperature slightly and extend the bake time to help the inside dry out without burning the crust. The dough had too much water.
Gluten-free flours absorb water differently, and even a small excess can throw off texture.
Fix: Next time, reduce the water slightly (start with 10–20g less) and take note of your dough’s consistency. You sliced too soon.
Gluten-free bread needs time to cool and finish setting internally.
Fix: Let your loaf cool completely—at least 2–3 hours—before slicing. Cutting early traps steam inside and causes gumminess. You accidentally deflated the loaf.
Rough handling (like dropping it into the Dutch oven) can collapse air pockets and lead to dense, underbaked spots.
Fix: Be gentle when transferring! Use parchment to lower it in smoothly, and avoid bumping or shaking the dough.
The Crust Is Too Hard—What Should I Do?
It’s completely normal for the crust to feel hard right after baking, especially with gluten-free sourdough. As the loaf cools, the crust will naturally soften, so don’t worry if it feels tough at first. To check the internal temperature, insert your thermometer into a cut or scored section (where the bread lame sliced), since the crust can be too firm elsewhere. If the crust still feels too hard after cooling:Try adding 1–2 grams more oil to your dough next time. A little extra fat helps soften the crust and improves overall texture.
Storage and Reheating
Room Temperature (1-2 Days): Once the loaf has fully cooled, store it at room temperature in an airtight container or plastic bag. It will stay fresh for 1-2 days this way. Be sure to keep it sealed well, as gluten free bread dries out quickly when exposed to air. Refrigeration (After Day 2): If you haven’t used up the loaf within the first couple of days, move it to the refrigerator to extend its freshness. Although the crust will soften with this storage option. Store it in an airtight container to help prevent it from drying out. The texture may firm up slightly, but a quick toast or reheat brings it right back. It usually lasts in the fridge for about 7 days. Freezing: To store for longer, slice the completely cooled loaf and place parchment paper or wax paper between slices. Freeze in a freezer safe bag or container for up to 3 months. This makes it easy to pull out and use just what you need.Tried this recipe?
Let us know how it was!Be Sure to Always Double Check Ingredient Labels
It is always best practice to double-check your ingredient labels for hidden sources of allergens.
Also, please note the nutrition information is automatically calculated and should only be used as an approximation. It may vary based on ingredient brands, portion sizes, and preparation methods. For specific dietary or medical needs, consult a healthcare professional or registered dietitian.
Pin It for Later

I am so excited to share this recipe with you! I’m going to be experimenting with different flavors and add ins, so I will keep you posted!
The recipe is great! The bread looks and tastes excellent. Mine came out a little gummy. I think that is due to a slight spillage of apple cider vinegar. I’ve read that too much ACV can cause problems. I will certainly make this recipe again!
Hi Cheri, thank you so much for your kind comment. I’m thrilled you enjoyed the recipe! And yes, you’re absolutely right: extra apple cider vinegar (or any added liquid) can raise the hydration and lead to a slightly gummy texture. Gluten-free sourdough is super sensitive to microclimates, and everything from starter hydration to humidity levels can make a difference. Try increasing the total flour just a bit (but avoid adding more tapioca, as it can worsen gumminess) to better balance it for your kitchen. I’m so glad you’ll be making it again!
I’d like to try your recipe however my starter (now 17 days old) rises a maximum of only about 50% in about four hours. I started with the Cultures for Health starter (within expiration date) and now use a 1:1:1 ratio with 100 grams of brown rice flour (not superfine). I have adjusted the purified water to 90 grams with 100 grams of starter. In the last three days I’ve added a teaspoon of honey. I’m concerned that the starter has not doubled and possibly not strong enough for bread baking. Currently I’m feeding every 12 hours. What are your thoughts?
Hi Elizabeth, gluten-free starters often don’t fully double like wheat-based ones, so a 50% rise can still work just fine. I think it’s definitely worth giving the recipe a try, see how active the preferment gets. If it increases in volume, go ahead with the rest of the recipe. If it doesn’t rise, you can simply scoop it back into your starter jar or use it in a gluten-free discard recipe instead.
As for the honey, it gives the yeast an easy food source, but it can also encourage bacteria you don’t necessarily want, especially while your starter is still establishing its natural balance. I’d recommend skipping the honey for now and letting the wild yeast and beneficial bacteria strengthen on their own.
Thanks for your response. I ended up purchasing Authentic Foods superfine brown rice flour (I was using Bob’s Red Mill) and after two feedings (12 hours apart) my starter doubled and it’s so much smoother. Velvety smooth when stirred down after the rise. I stopped the honey with the change to the superfine. I’m going to try your recipe on Saturday. I will let you know how it goes. I’ve been cooking/baking GF for more than 25 years but I had given up on bread making. This will be interesting.
I’m so glad to hear your starter is doing well! Let me know how the loaf goes on Saturday. 🙂
Your instructions are superb and my boule is beautiful and delicious. I made the recipe EXACTLY as instructed weighing everything. I did use ultra fine brown rice flour and a 7 inch Banneton. (A 9 inch is linked. I had purchased 7 inch Bannetons before settling on this recipe) I also used a clay baking cloche. (Old one from Pampered Chef) I consider my bread a huge success for my very first attempt however, I will make some minor adjustments on my next bake. The crust has great chew but could be a bit crisper. Would you recommend the ice cube under the parchment to increase the steam? The crumb is beautiful but a little wet. (I baked to 210 degrees and we waited 3 hours to slice). I see your recommendation to reduce the liquid in 10-20 gram increments. I’m thinking I will start with a 20 gram reduction. Great job Joanna. Thank you for such thorough instruction. Let me know if you have any other suggestions.
Hi Elizabeth, thank you so much for your thoughtful feedback! I’m thrilled your boule turned out beautiful and delicious on your first try, what a wonderful success!
For a slightly crisper crust, adding an ice cube or two under the parchment can help generate extra steam, which can improve oven spring and crust texture. Your plan to reduce the liquid by 20 grams sounds perfect since the addition of ice will increase a bit of moisture too. And yes, waiting to slice it is very important. I have actually had great success with letting it sit over night on the counter just draped with a tea towel.
You’re doing an amazing job experimenting and adjusting, gluten-free sourdough can be so particular, and your attention to detail will only make it better each bake!
I only have psyllium husk powder, not whole. Can I substitute (using 1/2 the amount of powder) and if so, do I still need to make a paste or can the powder go straight into the other wet ingredients?
Hello Tanisha, I would use 17 grams of psyllium husk powder and still make the psyllium gel so it is hydrated before being mixed together. Happy baking!
Hi Joanna!
How do I maintain my starter if I only need to make loaves monthly? Can I store it in the fridge? How often would I feed it? Thank you!
Hi Sidney! To maintain your gf starter for a longer time period like that, I would suggest to put it in the refrigerator with a closed lid rather than a paper towel and rubber band, if you do that method. This helps prevent your starter from picking up any undesirable microbes that may be in the fridge from leftovers or unwashed produce.
It will still need to be feed weekly though, so don’t forget about it completely. Set a reminder on your phone or calendar to still feed it. And, if it gets too large, make up some discard recipes like my gluten free sourdough waffles or gluten free sourdough pancakes! They are fan favorites. 🙂 Hope this helps!
This is THE best gluten free and vegan sourdough recipe I’ve tried. I think the preferment is key to getting the delightfully strong sourdough tang that I’ve been looking for. I followed the recipe almost exactly, although I did use white rice flour in the dry mix, and I had to cook for an extra 5 min to get to 210 degrees. This is the first loaf I’ve made that doesn’t need any changes. Thank you! I hope to replicate it again soon!
Hi Heather, I am so glad you had success! I have tried so many tweaks over the past several years to really dial this recipe in and I appreciate you letting me know you loved it!