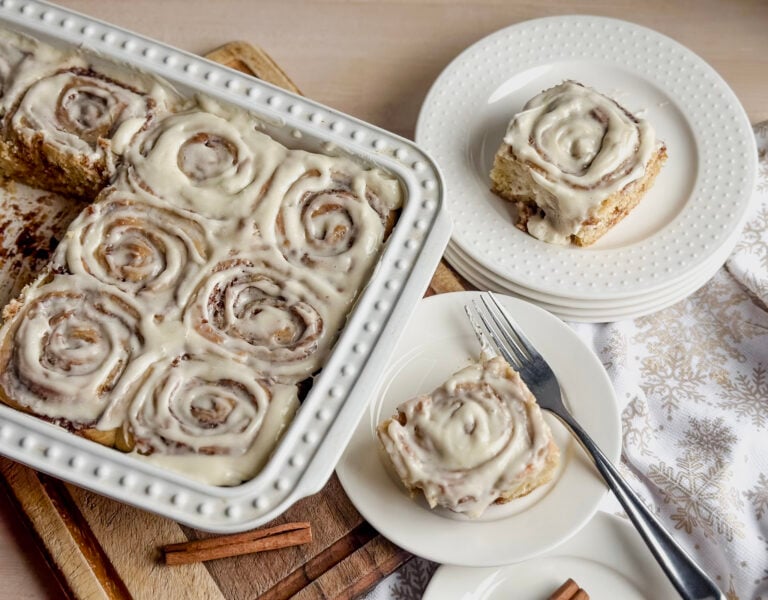
How to maintain a gluten-free sourdough starter doesn’t have to be complicated. If you have started a gluten free sourdough starter, you probably are wondering How do I actually maintain it now? Because maintaining a gluten-free sourdough starter differs from traditional sourdough in some ways.
Because there’s no gluten structure for really powerful rise, and hydration behaves differently when dealing with gluten free flours. Your starter may not behave the way you expect.
And that can be frustrating, but the good news is that maintaining a gluten-free sourdough starter can be simple! It can also be very low-maintenance. Especially if you use the fridge method.
So in this guide, I’ll show you:
- how to feed your gluten-free sourdough starter
- how to store it (counter vs fridge)
- how to know when it’s ready to use
- how to keep it strong and active
This is the exact system I use in my own busy kitchen, and it works in real life. If you’re diving into gluten-free sourdough, these posts will help you every step of the way:
Start with my Gluten Free Sourdough Starter Recipe for Beginners if you’re building your starter from scratch. It also has a free daily tracker printable to help you create a successful starter.
Try my Beginner Gluten-Free Sourdough Bread Recipe for a simple, reliable first loaf.
Or move on to my Artisan Gluten-Free Sourdough Bread if you want more control over texture and ingredients.

Please note that this post may contain affiliate links. As an Amazon Associate, I may earn commissions from qualifying purchases, at no additional cost to you. Thank you for your support!
What is a Gluten-Free Sourdough Starter?
A gluten-free sourdough starter is a simple mixture of gluten-free flour and water that ferments over time. As it sits, naturally occurring wild yeast and beneficial microorganisms begin to grow. This fermentation process creates bubbles, develops flavor, and gives your starter the ability to help bread rise without added yeast.
You’ll often hear it called a “flour-water mixture,” but it’s really a living culture.
That’s why how you feed it and maintain it is important. Unlike traditional sourdough starters made with wheat, a gluten-free sourdough starter doesn’t have gluten to provide structure.
That means:
- It behaves more like a thick batter than dough
- It may not rise or double the same way
- And hydration plays a much bigger role
Instead of building stretch and elasticity, you’re building fermentation strength that replaces yeast.
That’s what allows your gluten-free sourdough bread to rise, and we have to depend on other ingredients to give us structural support. (Hint: whole psyllium husk is my favorite for that, you can read more about it here: Why Use Psyllium Husk in Gluten-Free Baking.)
Starting From Scratch?
If you don’t already have an established starter, you’ll want to begin there first. I walk you through the full process step-by-step in my Gluten Free Sourdough Starter Recipe for Beginners, including:
- The exact feeding process.
- The best gluten-free flour options (like brown rice flour and sorghum).
- What to expect day-by-day.
- And a free printable tracker to help you stay consistent and track your gluten-free sourdough starter’s progress.
Once your starter is active and established, you can come back here to learn how to maintain it long-term.
Why This Gluten-Free Sourdough Starter Method Works
How to maintain a Gluten-free sourdough starter can feel overwhelming at first, especially when most advice is written for wheat-based starters. This method keeps things simple and realistic.
Once you understand the rhythm of feeding and storing your stater, it becomes second nature.
What You Need to Maintain a Gluten Free Sourdough Starter
You don’t need anything fancy to maintain a gluten-free sourdough starter. Just a few simple tools and ingredients will keep your starter active and healthy.
Tools Needed
Glass Jars
I prefer wide-mouth glass jars so you can easily stir your starter and clearly see what’s happening inside. Watching the bubbles and rise helps you know when your starter is active and ready to use.
I like to keep two of the same jar on hand so I can easily transfer my starter to a clean jar during the feeding process. This helps keep the inside of the jar clean and reduces the risk of mold forming on dried starter along the sides.
Kitchen Scale (Highly Recommended)
Measuring in grams keeps your feeding ratio consistent and predictable, which makes a big difference in how your gluten-free sourdough starter behaves.
It helps you easily follow a 1:1:1 ratio (equal parts starter, flour, and water) and adjust based on the weight of your starter.
A Lid
If you’re storing your starter at room temperature, cover it with a breathable lid like a paper towel or coffee filter secured with a rubber band. This allows gases to escape during fermentation while still protecting your starter.
If you’re storing your starter in the refrigerator, switch to a solid lid (like a mason jar lid). This helps prevent contamination from other foods in the fridge.
Spatula or Spoon
You’ll use this to stir your starter during feeding and scrape down the sides of the jar. Keeping the jar clean makes it easier to monitor your starter and keeps things sanitary.
Rubber Band (Optional, but Helpful)
Place a rubber band around your jar at the level of your starter right after feeding. This gives you a visual marker so you can track the rise and expansion of the starter as it ferments.
Ingredients to Maintain a Gluten Free Sourdough Starter
Gluten-Free Flour
Use a consistent gluten-free flour for feeding your starter. Brown rice flour and sorghum flour both work really well and are reliable choices for building a strong, active starter.
You can use a gluten-free flour blend, and I’ve had success doing that, but some bakers prefer to avoid blends with added gums or extra ingredients since they can affect the fermentation process.
Water (Room Temperature)
Use room temperature water when feeding your starter. I recommend purified water to avoid chlorine or other contaminants that can slow down or interfere with the wild yeast and microorganisms.
If you’re using tap water, letting it sit out for a bit can help reduce chlorine.
How to Feed a Gluten-Free Sourdough Starter
Feeding your starter is how you keep it active, balanced, and ready for baking.
This is what fuels the wild yeast and microorganisms so your gluten-free sourdough starter can rise, develop flavor, and perform well in your recipes.
The 1:1:1 Feeding Ratio Explained
A simple way to feed your starter is using a 1:1:1 ratio.
That means equal parts:
- starter
- gluten-free flour
- water
All measured by weight.
For example:
- 50 grams of starter (You remove everything from your jar except for 50 grams)
- 50 grams gluten-free flour
- 50 grams water
You then stir everything until well combined and that is a feeding ratio that keeps your starter balanced and predictable.
How to Feed Your Gluten Free Sourdough Starter: Step By Step Instructions
Here’s exactly how to maintain a gluten free sourdough starter by feeding it with a 1:1:1 ratio. See the photos for more visual clues of what a healthy gluten free sourdough starter looks like.
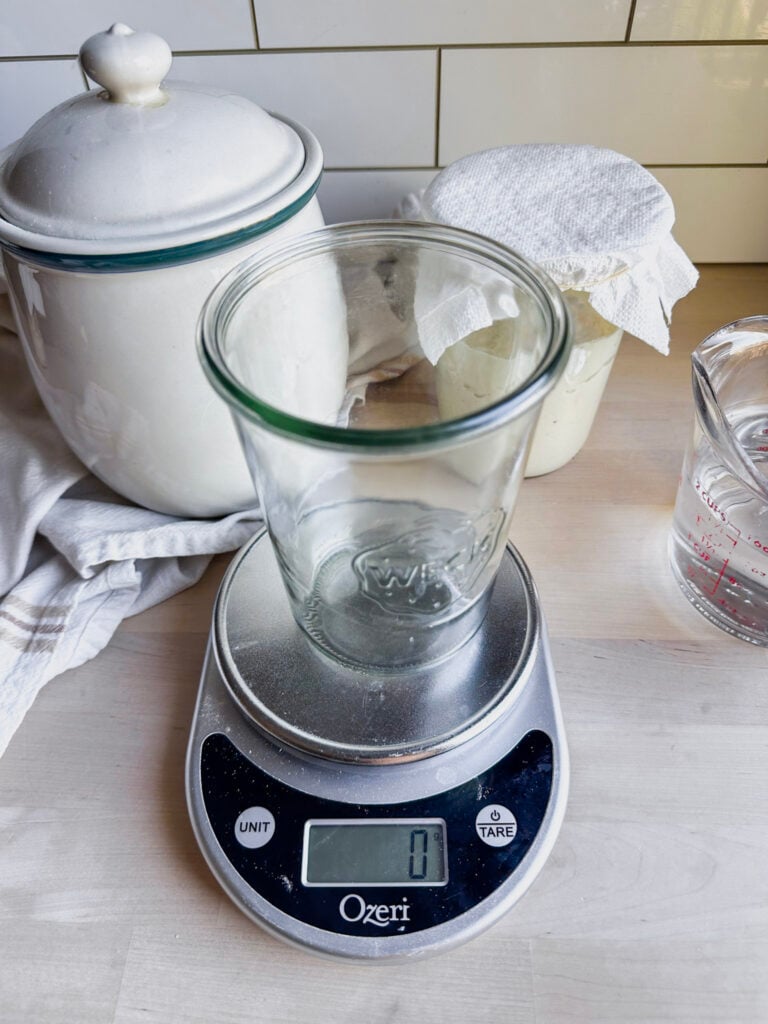
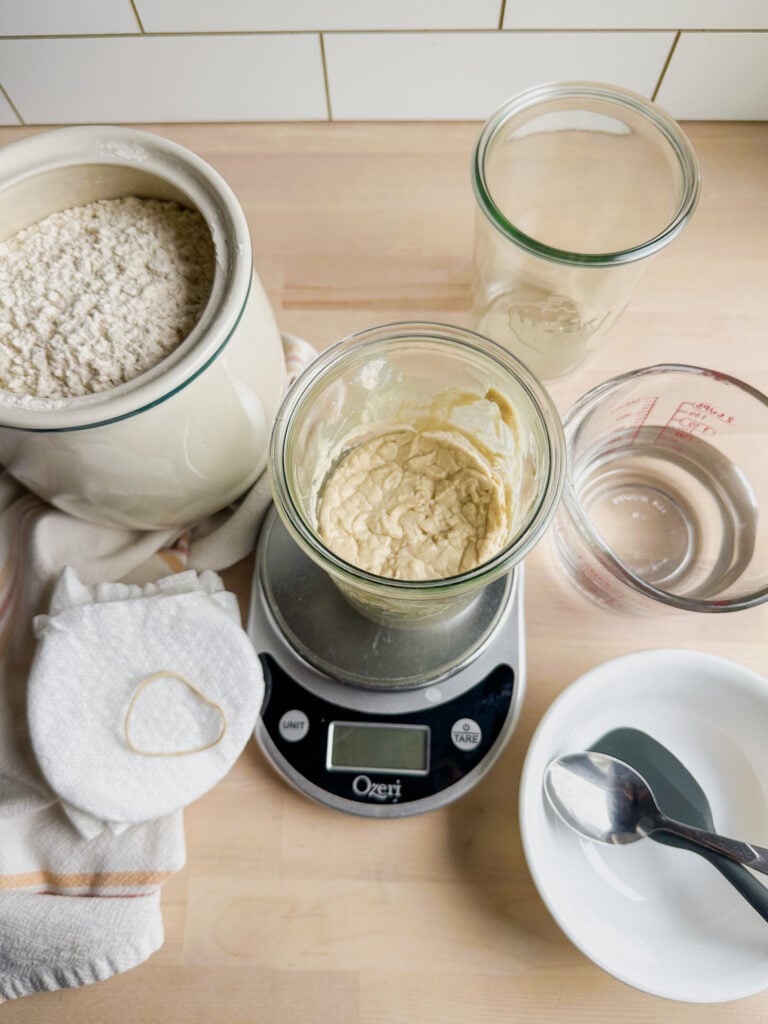
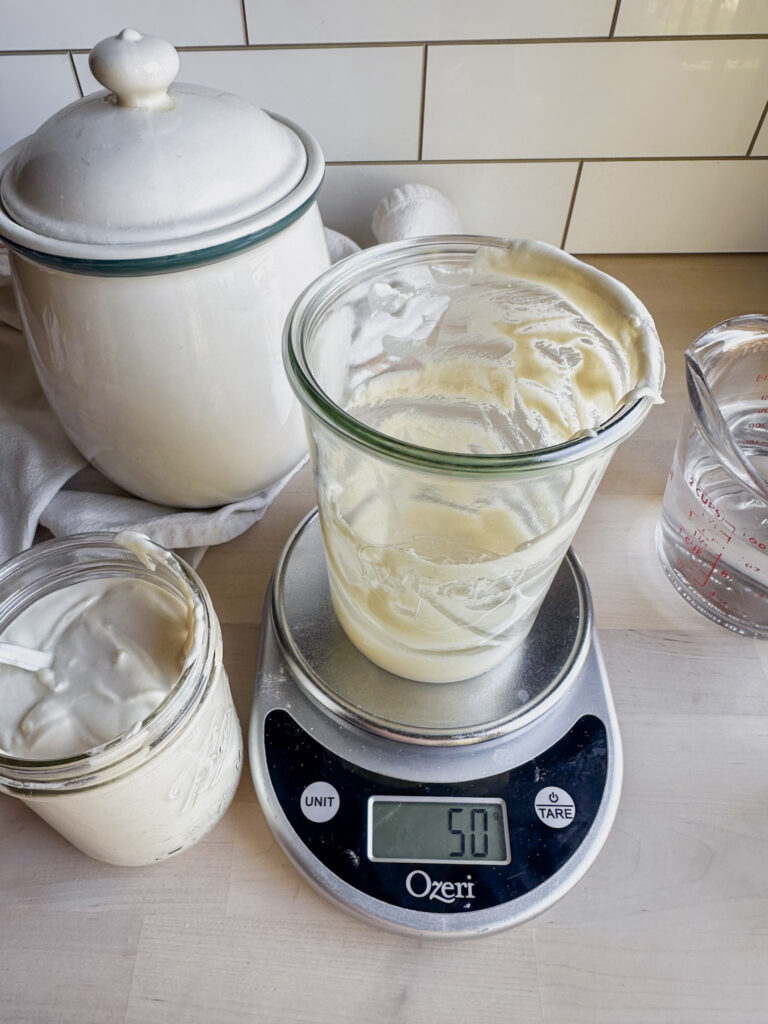
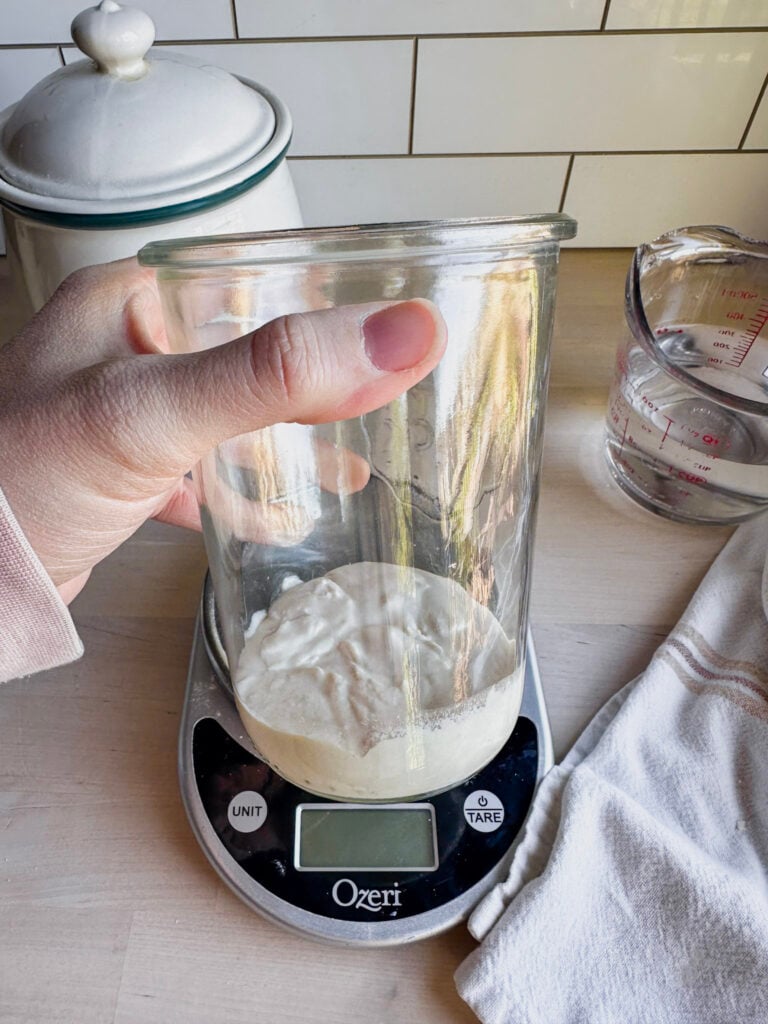
1. Weigh your empty jar
- Place an empty glass jar on your kitchen scale and tare it to zero.
- This removes the weight of the jar so you can accurately measure your starter.
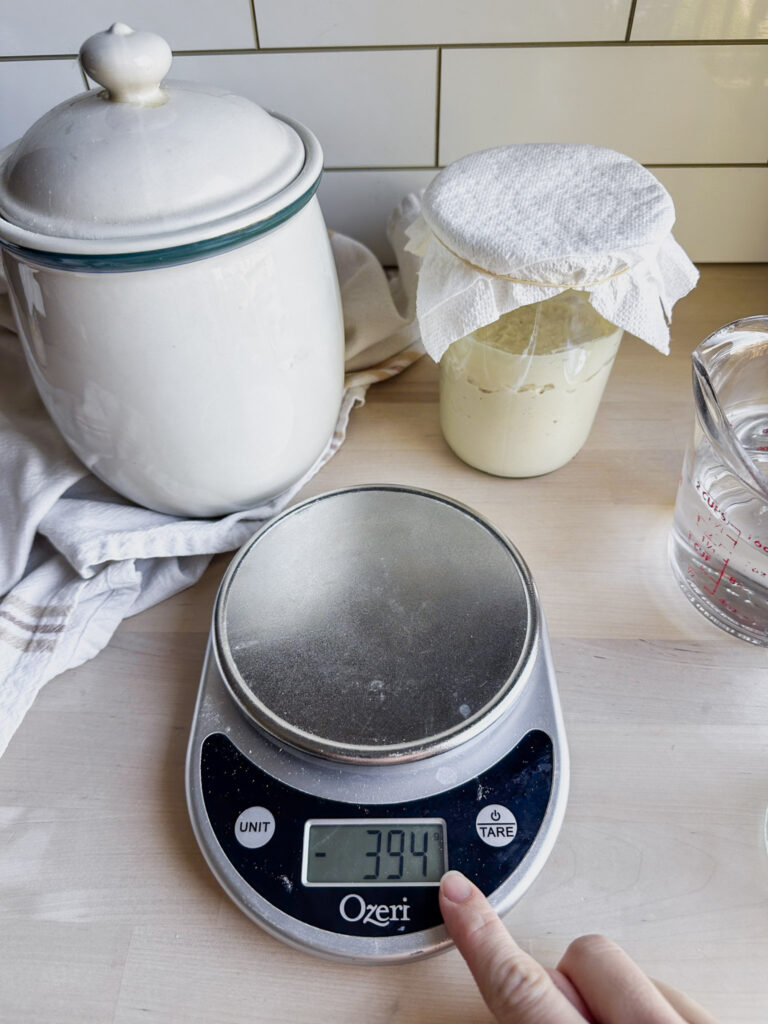
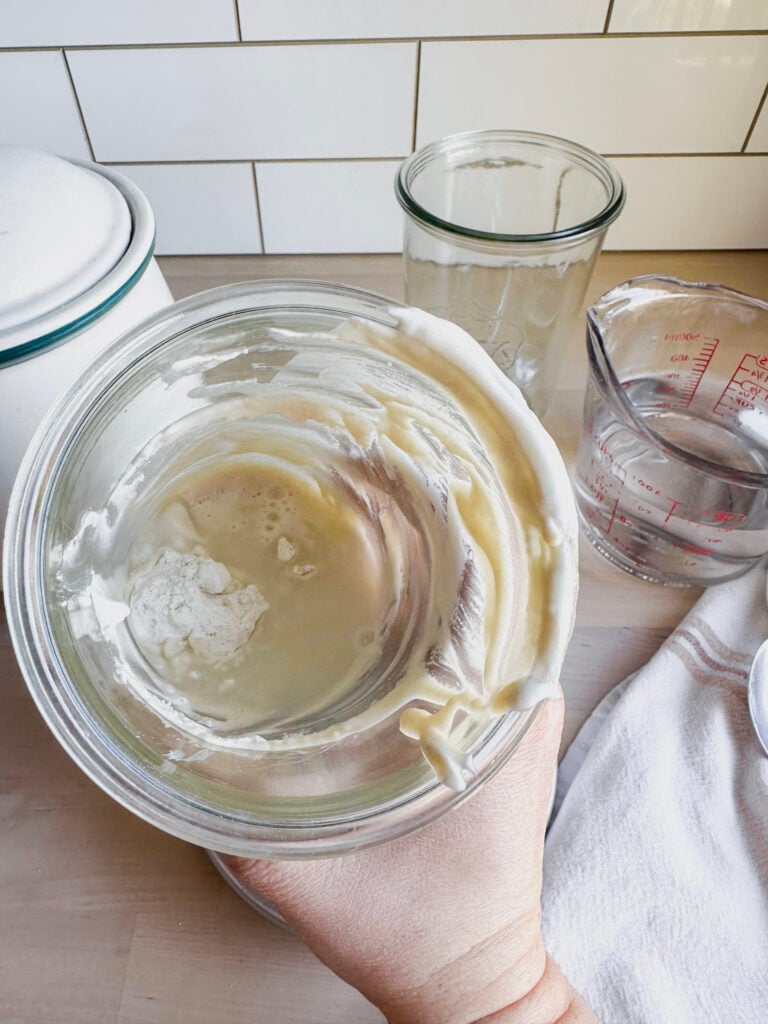
2. Weigh your starter
- Now place the jar that holds your starter onto the scale.
- This shows you the actual weight of your starter only, without guessing.
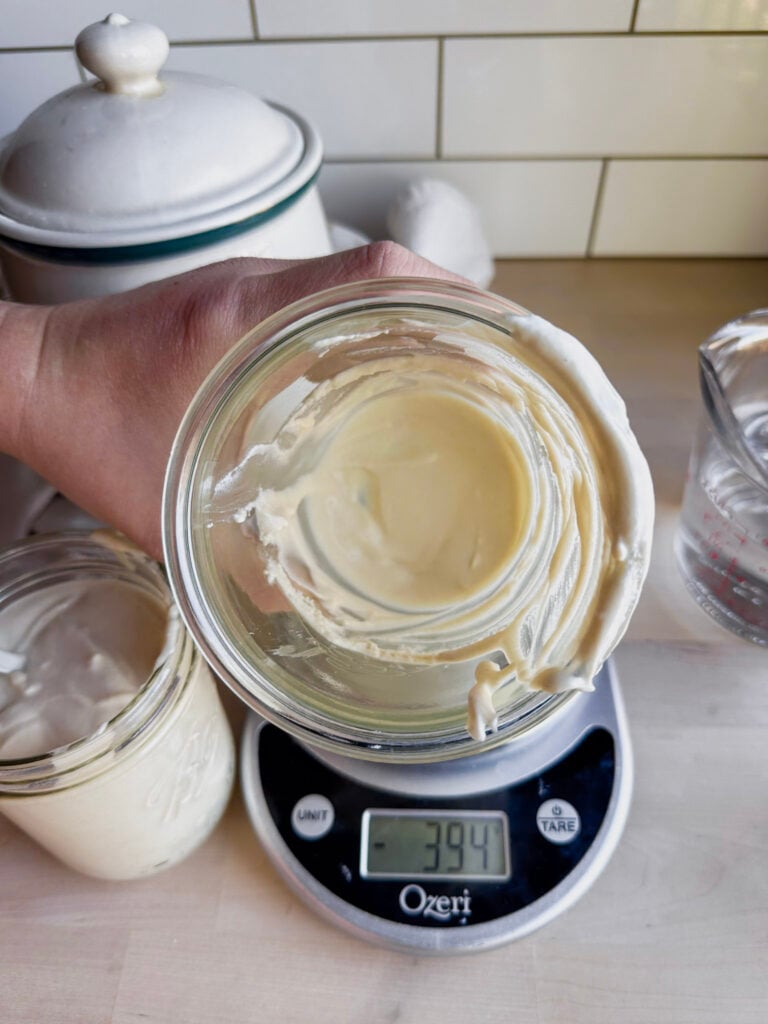
3. Discard the excess
- Decide how much starter you want to keep (I usually keep about 50 grams for a maintenance feed).
- Stir the starter and then remove the additional portion that is more than 50 grams, and place it in another container to use as discard for recipes like pancakes or waffles.
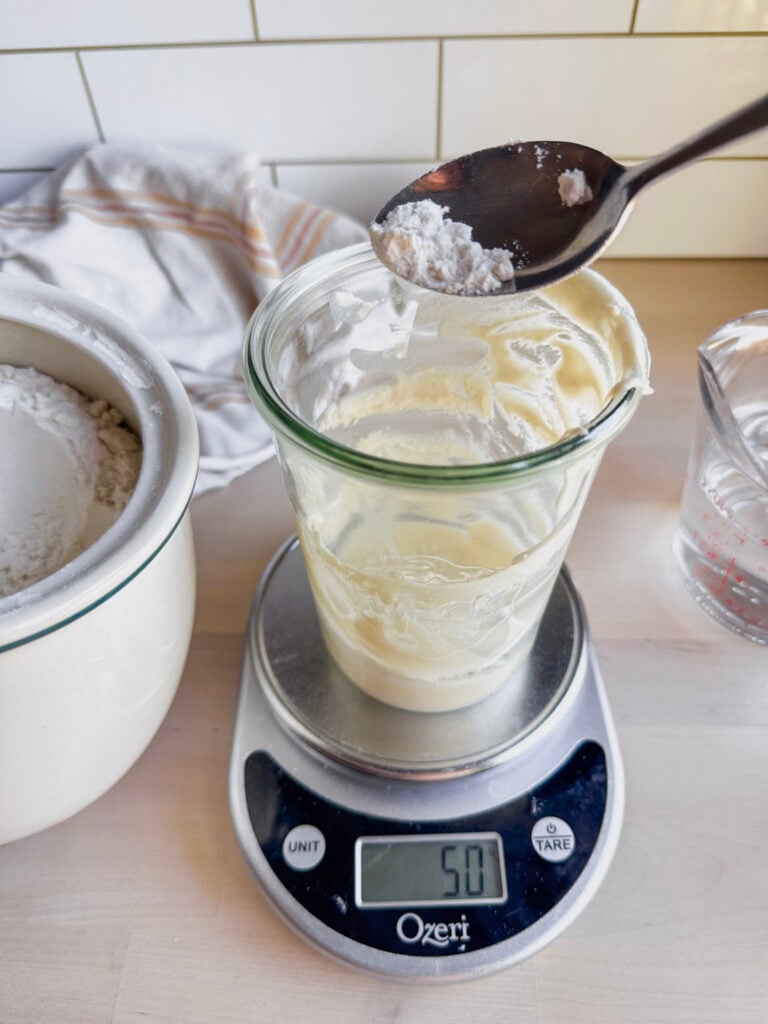
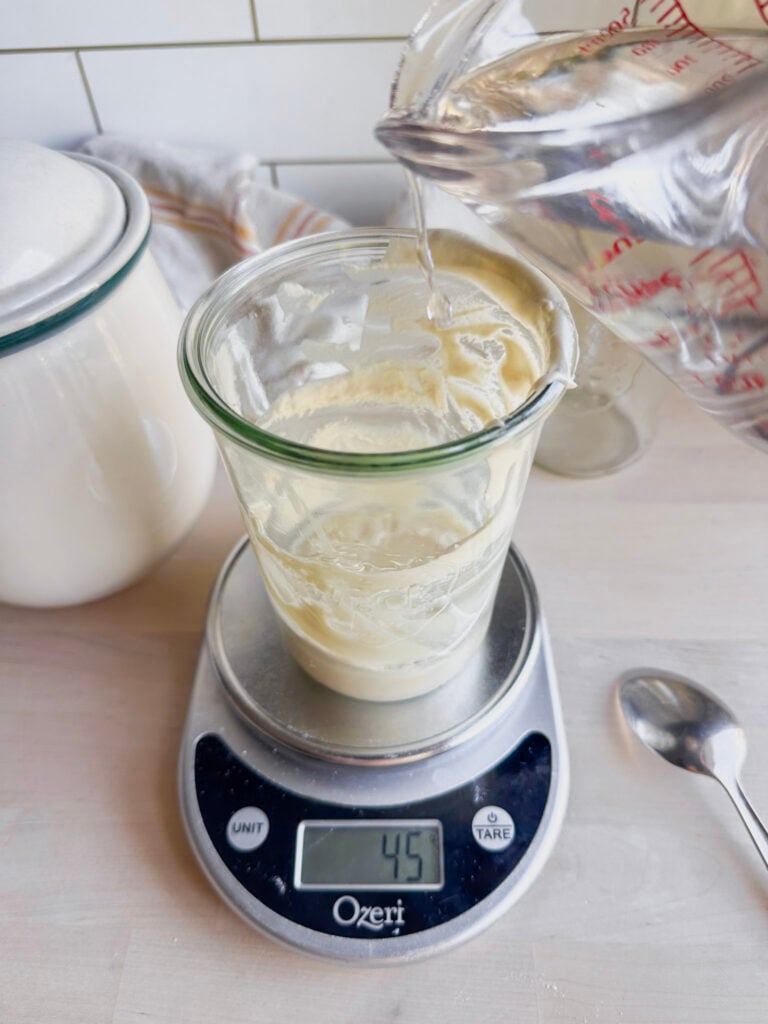
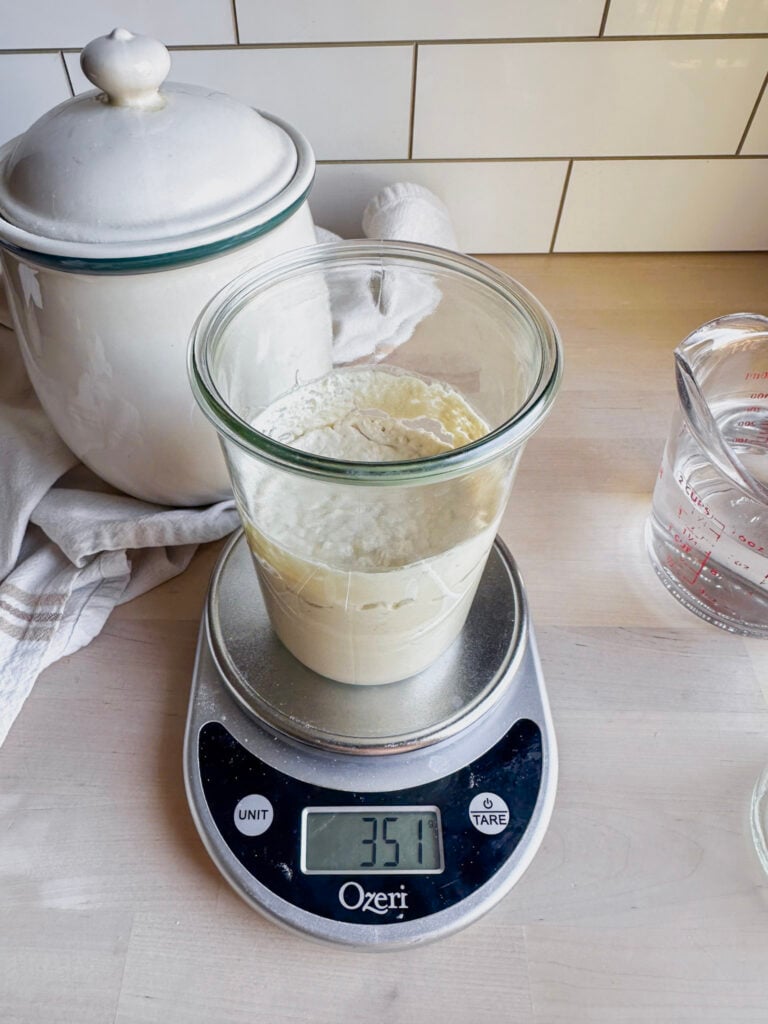
4. Add fresh flour and water
- Feed your starter using a 1:1:1 ratio.
For example:
- 50 grams starter
- 50 grams gluten-free flour
- 50 grams of room-temperature water
Brown rice flour works especially well here.
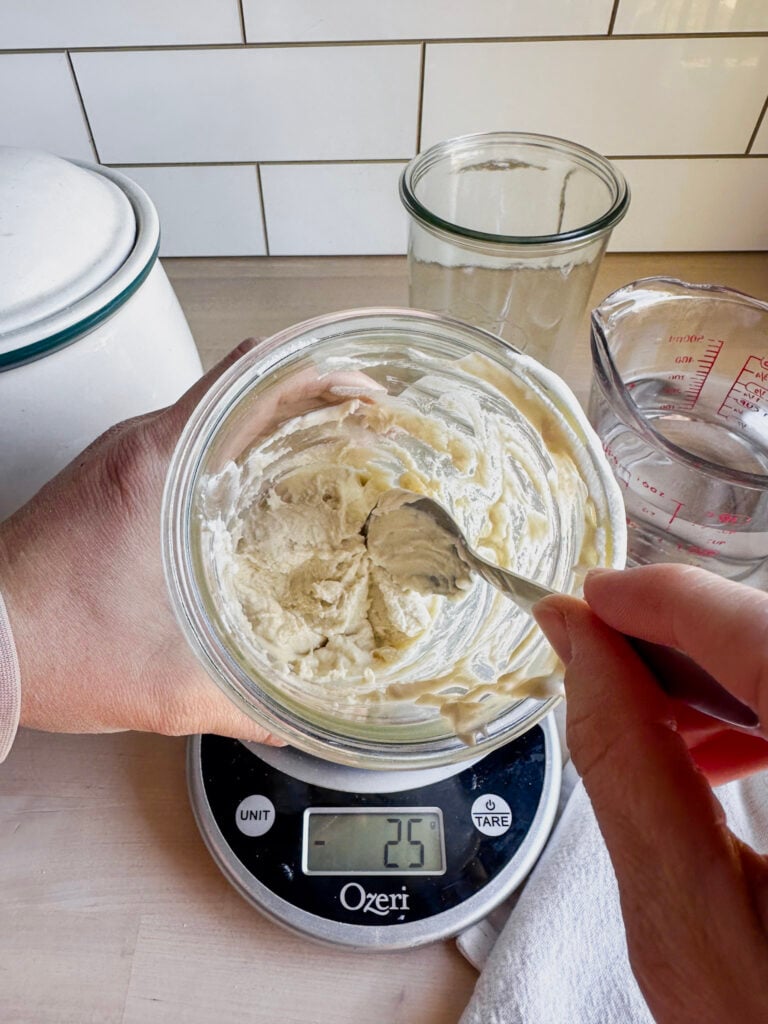
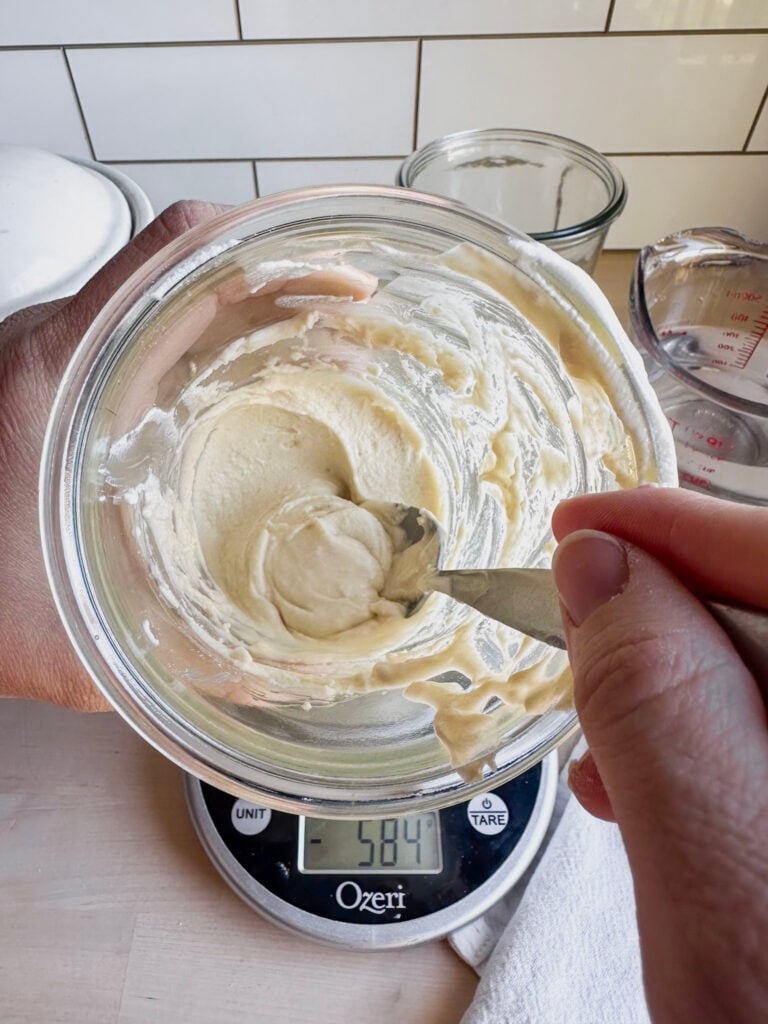
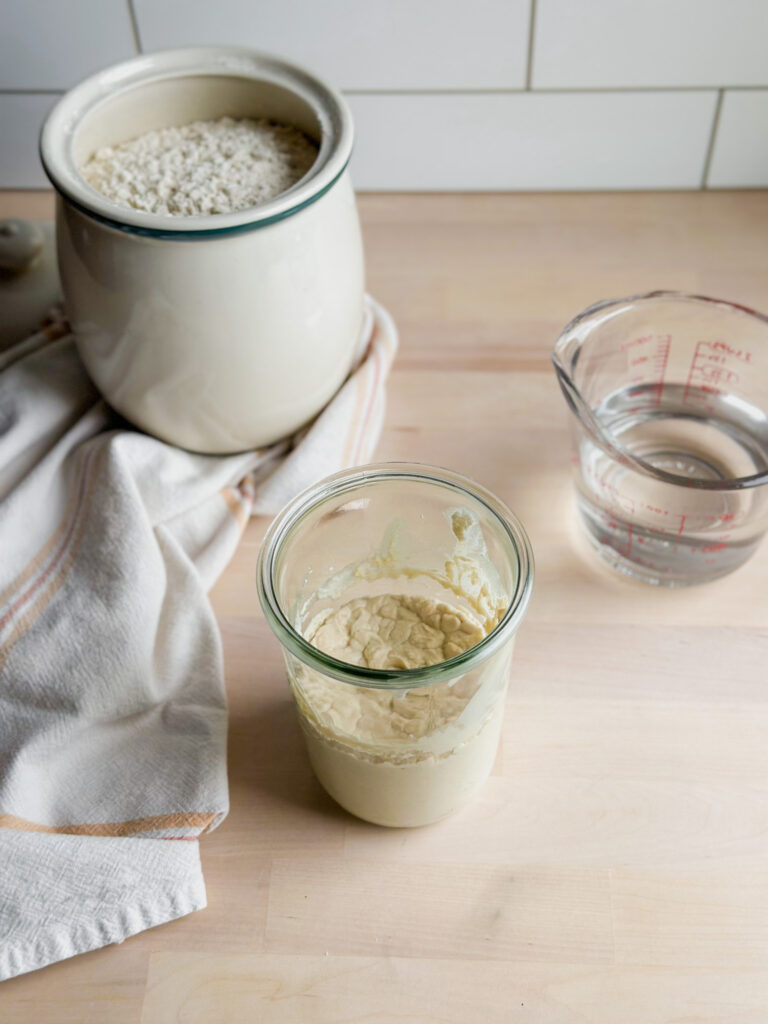
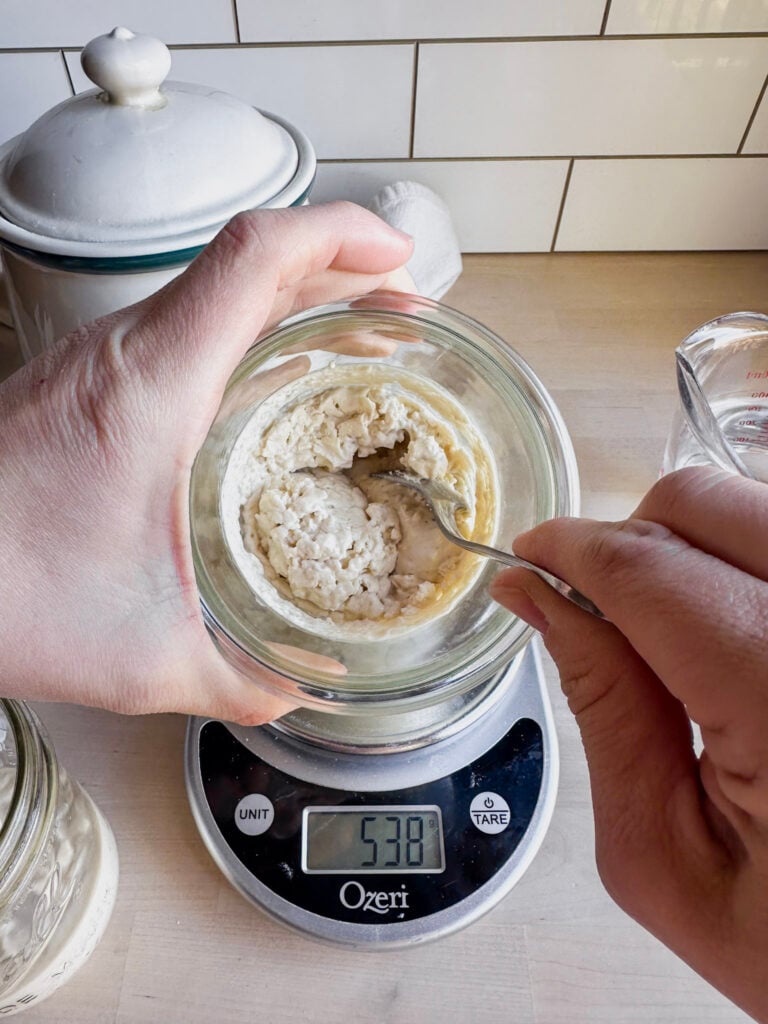
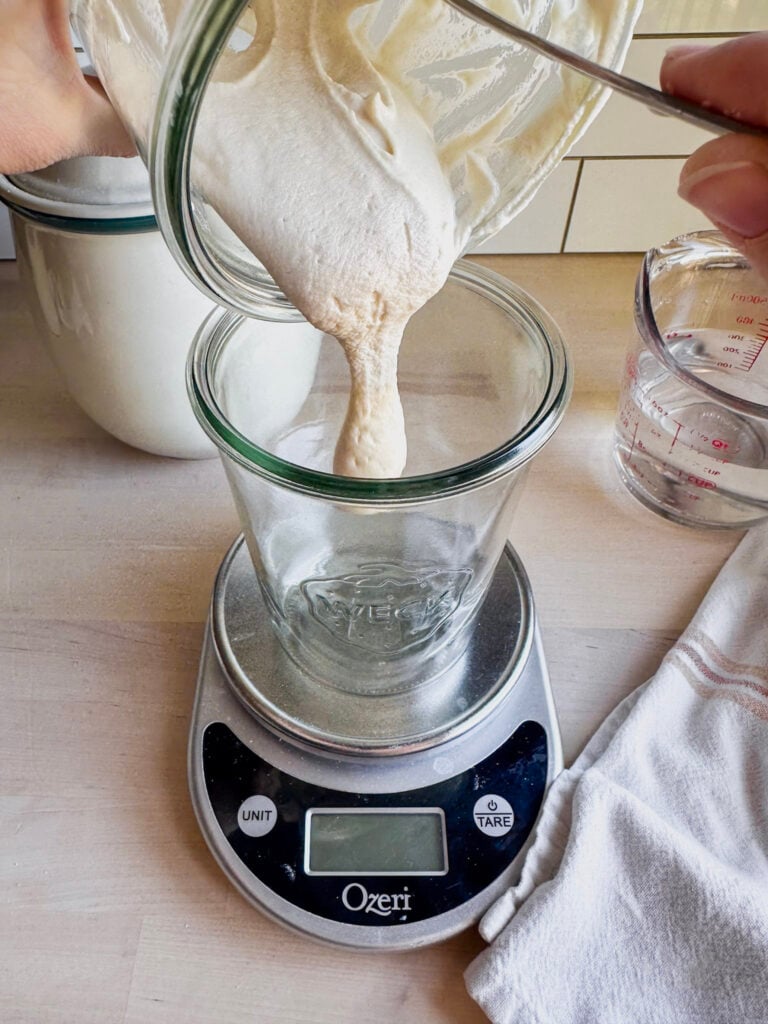
5. Stir until smooth
- Stir well until there are no dry pockets of flour.
- Your starter should look like a thick batter and be smooth and easy to mix.
- If it feels too thick (especially with brown rice flour), add a small splash of water until it loosens up.
It should slowly flow off a spoon, not be too stiff or dry.

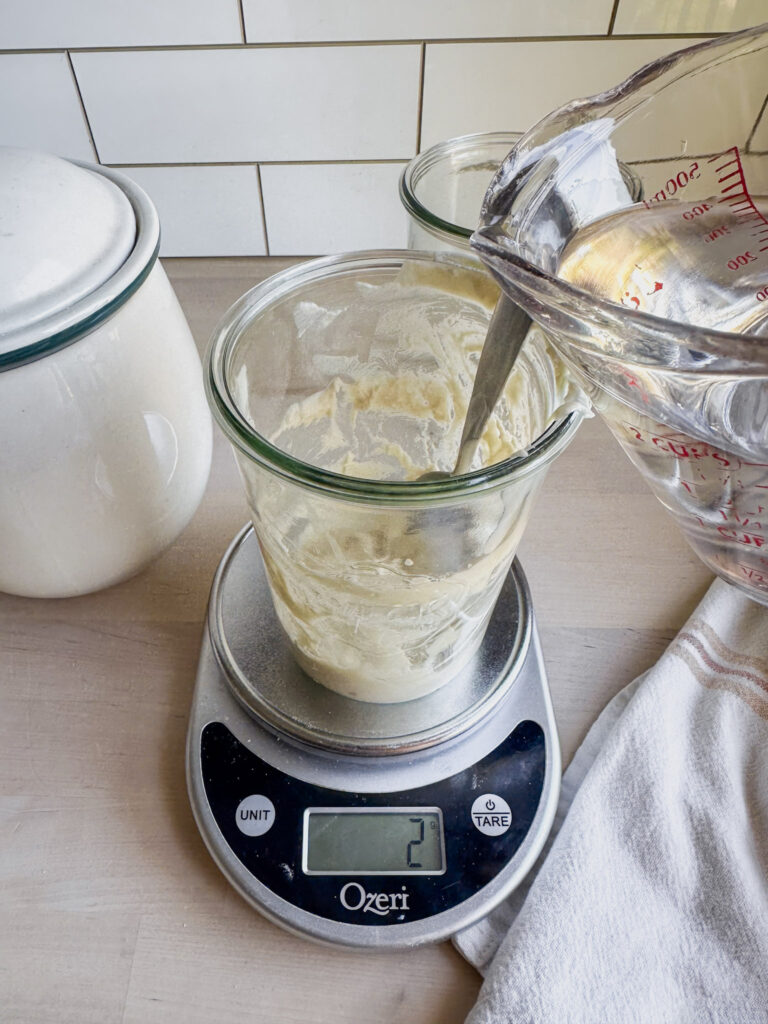
6. Transfer to a clean jar
- Pour your freshly fed starter into a clean jar.
- Try to keep the inside of the jar clean and free from streaks of starter.
This helps prevent dried buildup, which can lead to mold.
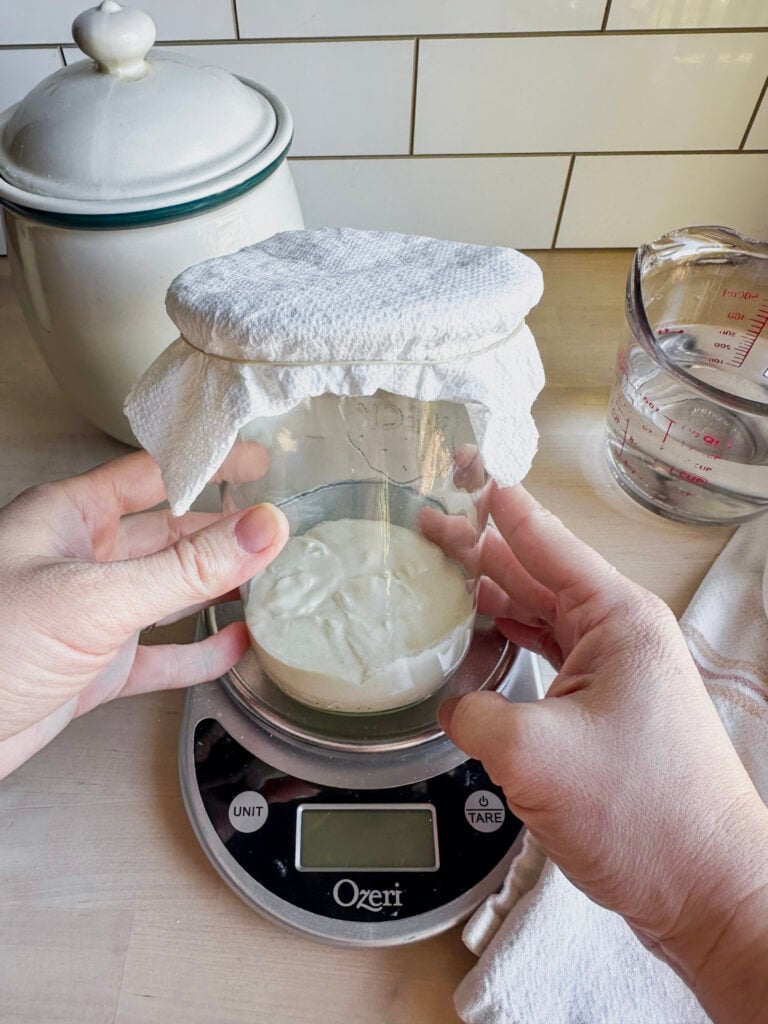
7. Loosely cover
- If storing on the counter, cover with a breathable lid.
- A folded paper towel or coffee filter secured with a rubber band works well.
This allows gases to escape during fermentation while keeping your starter protected.
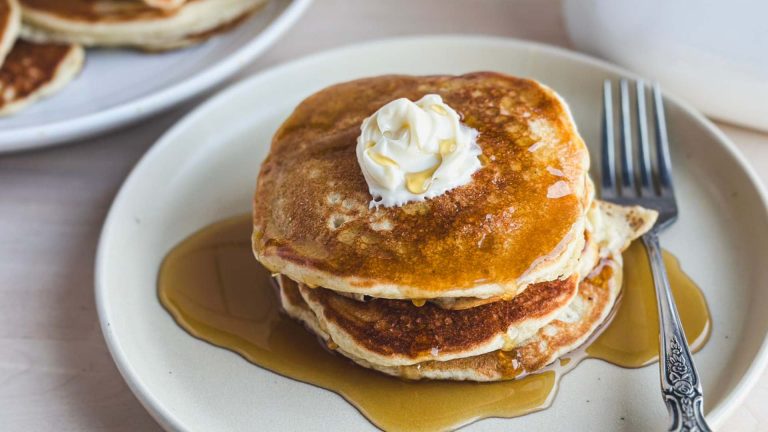
What to Do with Gluten-Free Sourdough Discard
As you feed your gluten-free sourdough starter, you’ll often end up with extra starter, this is called discard. But even though it’s called discard, you don’t have to throw it away.
How to Use Gluten-Free Sourdough Discard
Discard works especially well in recipes where you don’t need a strong rise.
Some easy ways to use it:
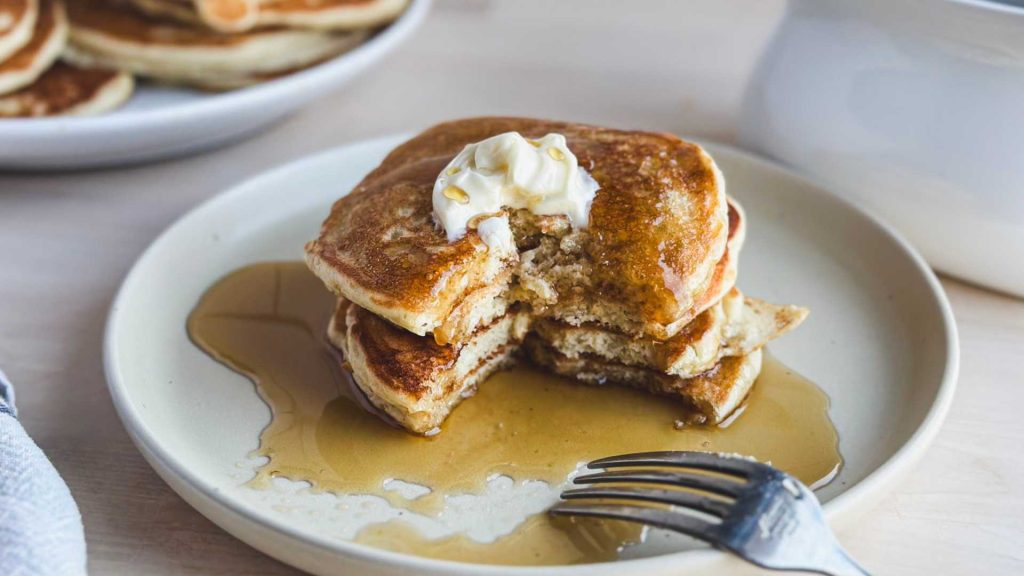
- Gluten Free Sourdough Discard Pancakes
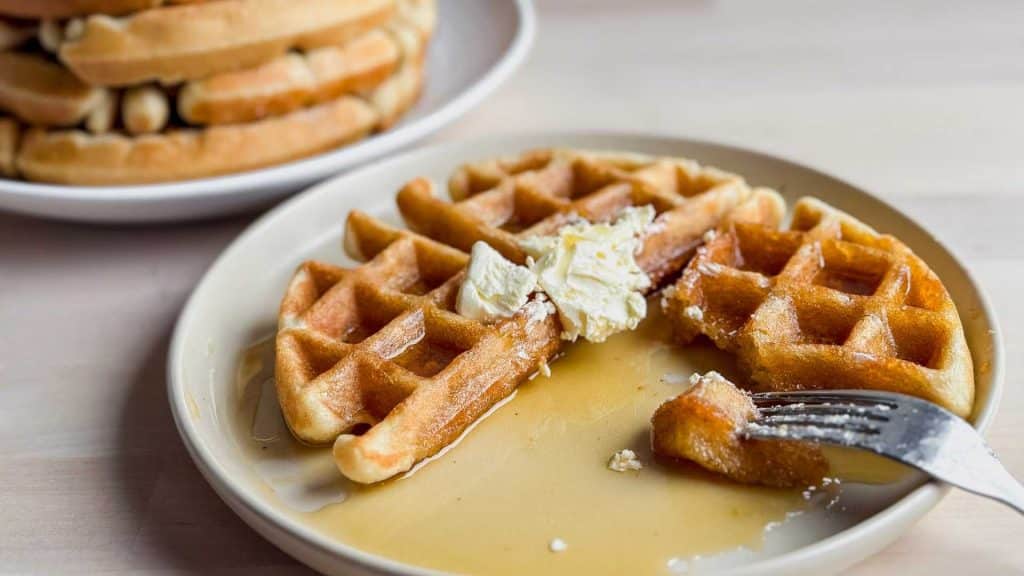
- Gluten Free Sourdough Discard Waffles
- Gluten free Sourdough Skillet
- Quick breads
- Muffins
- Crackers
These recipes use baking powder or baking soda for lift, so your discard adds flavor without needing to be at peak activity.
How to Store Discard
You can store your discard in the fridge until you’re ready to use it.
- Keep it in a sealed container.
- Add to it over time as you feed your starter.
- Use the discard within about 2 weeks or feed it to keep it happy.
I usually keep a dedicated jar in my fridge and continually add to it. Just give it a good stir before using in a discard recipe.
How to Turn Almost Any Recipe Into a Discard Recipe
You can often use gluten-free sourdough discard in place of some of the flour and liquid in a recipe. This works best in recipes that don’t rely on yeast for rising. Discard is not a direct swap in yeast breads or recipes that rely on precise structure, those types of recipes require more testing and adjustments.
The Basic Idea
Sourdough discard is made up of:
- flour
- water
So when you add discard to a recipe, you’re adding both.
To keep the recipe balanced, you’ll need to reduce some of the flour and liquid. Start small when you first start experimenting with swapping discard in recipes.
Simple Rule to Follow
For every 100 grams of discard you want to add, reduce:
- 50 grams of flour
- 50 grams of liquid
from the original recipe, then add the discard to the recipe.
Does Gluten-Free Starter Need More Water?
Yes, gluten-free flours absorb more water than wheat flour.
Because gluten-free sourdough doesn’t have gluten to create structure, hydration plays a much bigger role in how your starter behaves.
Gluten-free flours (especially brown rice flour) absorb more water. If you’ve ever cooked rice, you know it takes quite a bit of water to fully hydrate. Your starter works the same way.
Your starter should look like:
- a thick batter
- smooth and easy to stir
- able to slowly flow off a spoon
If your starter is too thick, it can slow down the fermentation process and limit bubble formation.
- You may find that you need to add a small splash of extra water, especially when using flours like brown rice flour, which tend to absorb more liquid.
If it’s too thin, and watery, it may not hold structure well or show clear signs of activity.
- If you over hydrated the gluten free starter, you will notice a layer of water rising to the top of your starter soon after mixing in the feeding.
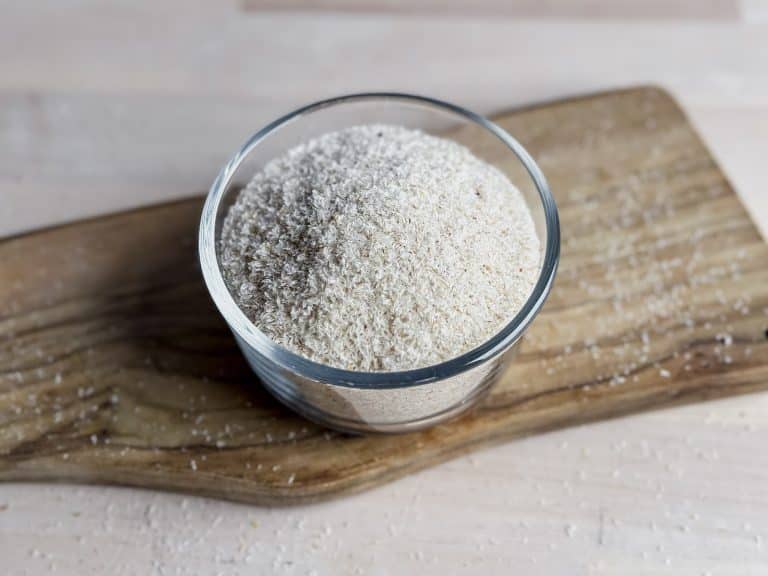
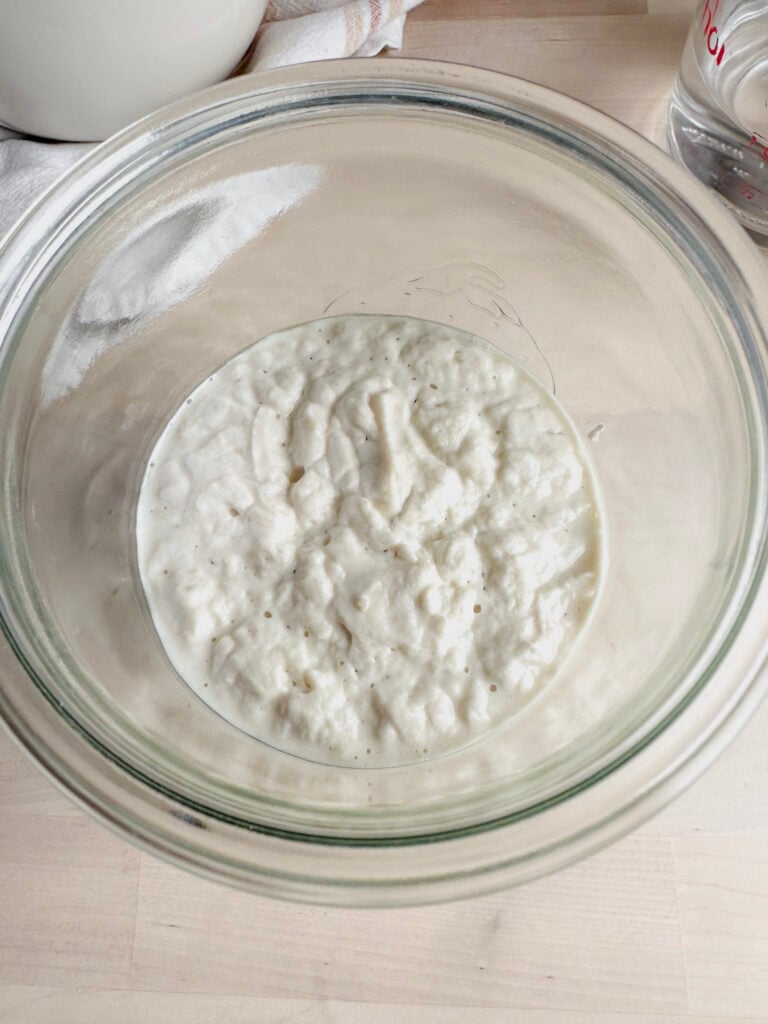
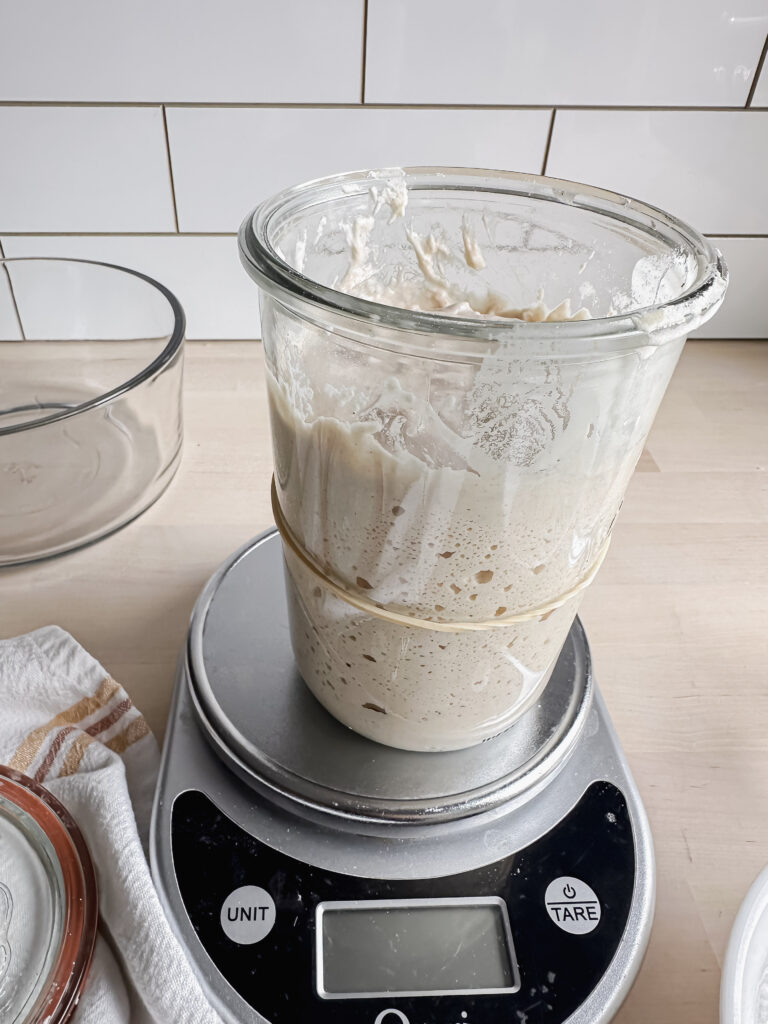
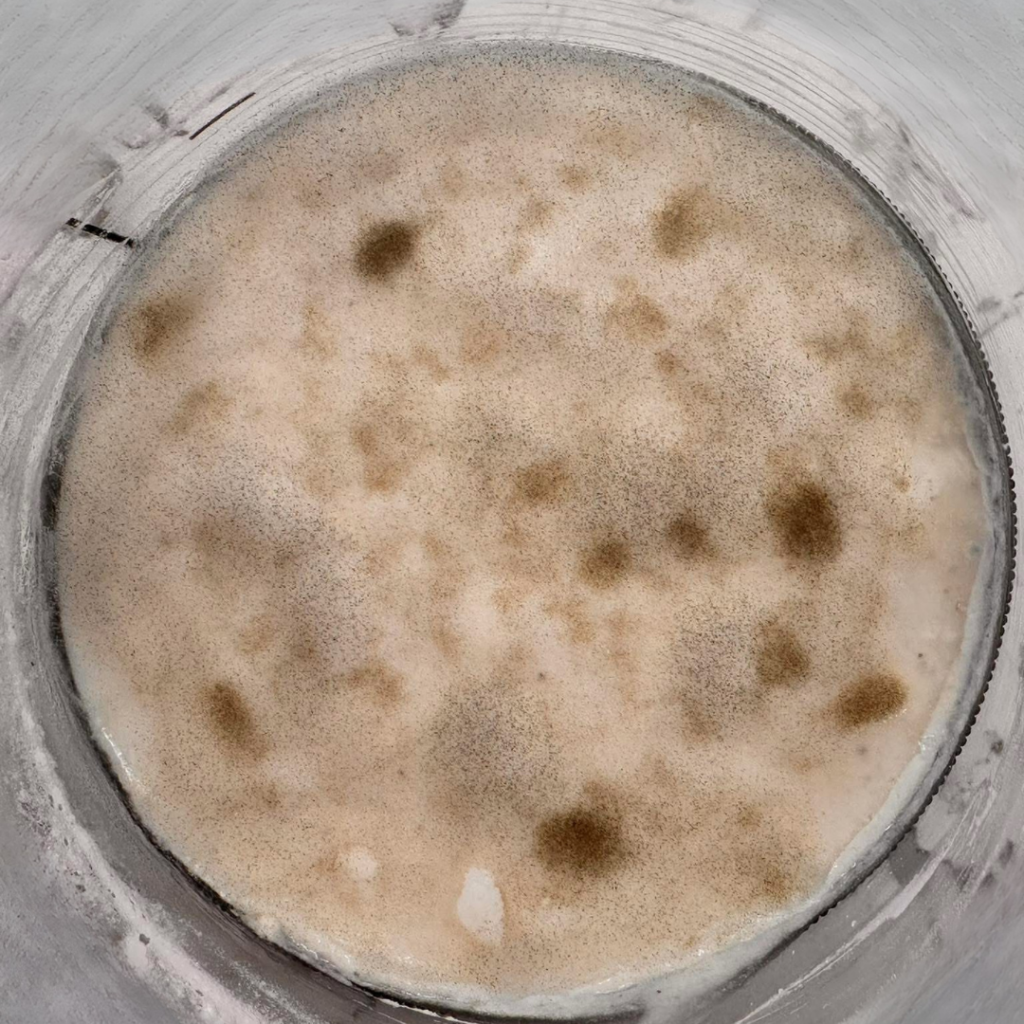
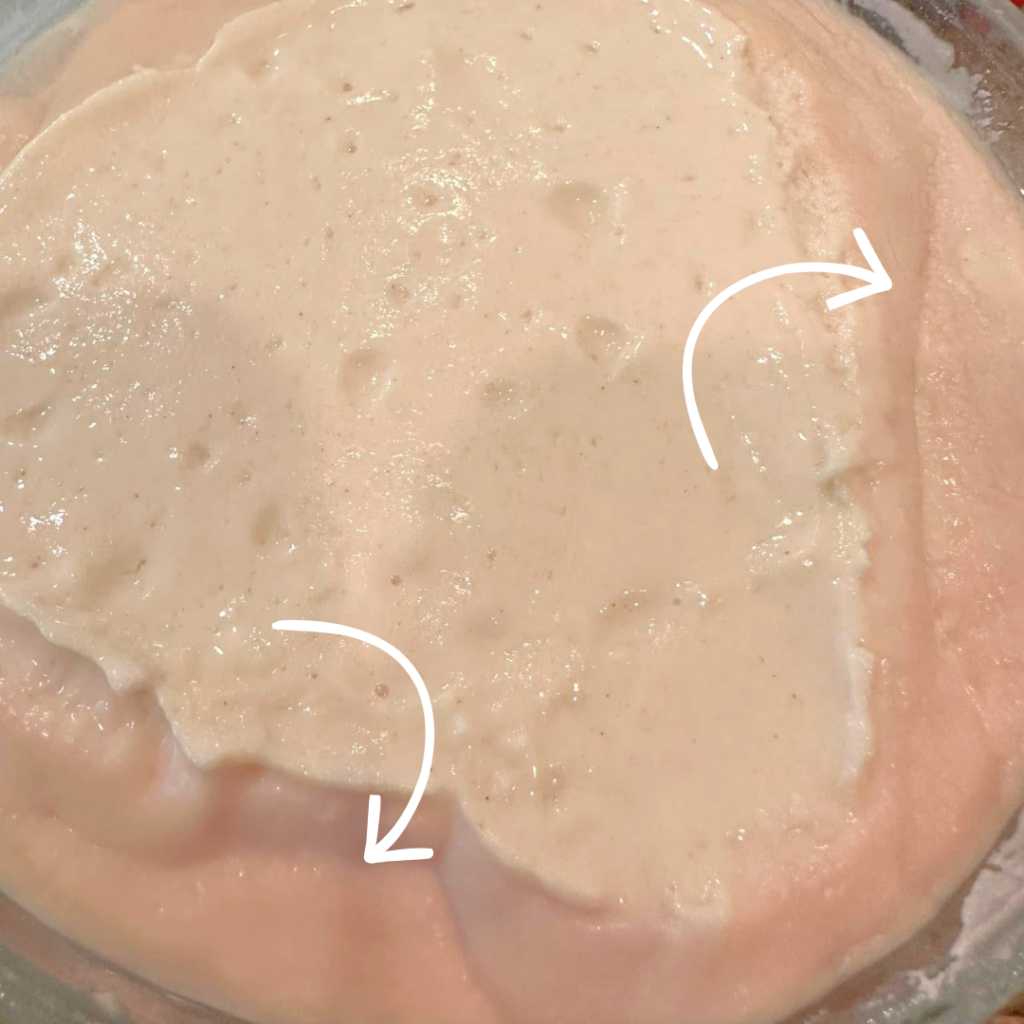
How Should My Gluten-Free Sourdough Starter Look When It’s Healthy?
A healthy gluten-free sourdough starter won’t behave exactly like a wheat-based starter, but there are still clear signs to look for.
After feeding, your starter should:
- develop bubbles throughout the mixture
- rise slightly (it may not double like traditional sourdough)
- look airy or lightly expanded
- have a smooth, thick batter-like consistency
- smell mildly tangy, yeasty, not harsh or unpleasant
You may also notice a slight dome forming on top as it reaches its peak activity.
What Happens Over Time
As your starter goes through the fermentation process, you’ll notice changes:
- Right after feeding: smooth, thick, and quiet.
- A few hours later: bubbles begin to form.
- At peak: slightly risen, airy, and active.
- Later on: it may fall back down and become more liquid.
This cycle is completely normal and helps you learn when your starter is ready to use in baking.
What If My Gluten Free Starter Doesn’t Look Like This?
If your starter:
- has very few bubbles
- isn’t rising at all
- looks overly thick or dry
It may need:
- more water
- more consistent feeding
- or a warmer place to sit
Once you know what a healthy starter should look like, the next step is understanding how often to feed it based on your schedule and whether you store it on the counter or in the fridge.
Joanna’s Top Tip
If your starter feels too thick, add a small splash of water. Gluten-free starters usually perform better when they’re slightly looser to ensure the gluten free flours fully hydrate while fermenting.
How To Store Your Gluten Free Sourdough Starter
Should You Keep Your Starter on the Counter or in the Fridge? Both methods work well, it just depends on how often you bake and what fits your routine. Let’s break down each method:
Keeping Your Gluten Free Sourdough Starter on the Counter
If you keep your gluten-free sourdough starter at room temperature (on the counter), you’ll need to feed it once every 24 hours.
This method keeps your starter very active and ready to use at any time.
It works best if:
- you’re baking frequently or want to have discard on hand for recipes.
- you want your starter ready to go daily.
- you don’t mind keeping up with regular feedings.
You’ll typically see more bubbles and activity since the fermentation process is happening continuously at room temperature.
Storing Your Gluten Free Sourdough Starter in the Fridge
If you’re not baking every day, storing your starter in the refrigerator is a much more practical option. You don’t have to worry about missing a feeding for several days.
With an established gluten-free sourdough starter, you only need to feed it about once per week.
The colder temperature slows down the fermentation process, so it doesn’t require daily feeding.
This method works well if:
- you bake occasionally
- you want a lower-maintenance routine
- you prefer a more flexible schedule
How Long Can a Gluten-Free Starter Stay in the Fridge?
A gluten-free sourdough starter can stay in the fridge for quite a while, but regular feeding keeps it healthier and more reliable.
- About 1 week is ideal between feedings.
- Up to 2 weeks is usually still okay for an established starter. (An established starter is at least 30 days old- 3 months old.)
After that, your starter may become sluggish, develop more liquid on top,( called hooch), or take longer to become active again.
What to Expect After Sitting in the Fridge
When your starter has been in the refrigerator for a while, you may notice:
- a layer of liquid on top, called hooch (this is normal)
- fewer bubbles
- a stronger smell
This just means it’s hungry.
A simple feeding or two will usually bring it right back to life.
How to Feed and Use a Gluten Free Sourdough Starter from the Fridge
When you’re ready to bake with your gluten-free sourdough starter from the fridge, here’s exactly what to do:
- Remove your starter from the fridge
Take it out and remove the lid. - Stir your starter
Give it a quick stir to redistribute the mixture, especially if any liquid has separated. - Discard some of the starter
Keep the amount you want to feed (for example, 50 grams) and remove the rest. - Feed your starter
Add equal parts gluten-free flour and water using your usual 1:1:1 ratio. - Let it sit at room temperature
Allow your starter to become bubbly, active, and slightly risen.
Once your starter reaches its peak activity, it’s ready to use in your gluten-free sourdough recipes.
Do You Have to Feed It First?
In most cases, yes, especially if your starter has been in the fridge for a few days.
Feeding it helps reactivate the wild yeast and ensures you get the best rise and texture in your baking.
Quick Summary
Counter: feed daily, more active, best for frequent baking.
Fridge: feed weekly, lower maintenance, best for most home bakers that bake once a week or less.
What to Do If You See Mold in Your Gluten-Free Sourdough Starter
If you see mold in your starter, it’s best to discard it and start over.
Mold can appear as:
- Fuzzy spots.
- Green, black, pink, or orange patches.
- Unusual growth on the surface or sides of the jar.
The motto, “when in doubt, throw it out,” is safest in these instances, although I understand the amount of time it takes to make a healthy starter, so I feel for you if you find yourself in this situation!
Can You Save a Moldy Gluten-Free Starter?
No. If mold is present, the starter is no longer safe to use.
Even if it seems only on the surface, it can spread throughout the starter.
What About Pink or Orange “Mold”?
Pink growth is often not mold, but bacteria.
It’s commonly found in damp areas like bathrooms and can spread easily.
Because it’s bacteria, it cannot be scraped off or saved, you’ll need to discard your starter and start fresh.
What to Do if Your Gluten Free Starter Has Mold
- Throw away the entire starter.
- Wash your jar and tools thoroughly with hot, soapy water.
- Start again with clean equipment.
If You Keep Having Mold Issues
If mold keeps coming back, check these areas:
- Clean tools
Make sure utensils are fully clean. Avoid wooden tools with cracks where bacteria can hide. - Clean jars
Scrape down the inside of the jar after feeding. Dried starter on the sides can mold over time.
Switching to a clean jar regularly helps prevent buildup. - Flour quality
Your flour could be the source. Try a fresh bag or a different brand. - Environment
Persistent mold may point to humidity or mold in your home. - Location
Keep your starter away from vents, bathrooms, or damp areas where bacteria and mold are more likely to spread.
How to Increase (Bulk Feed) Your Gluten-Free Sourdough Starter
If you don’t have enough starter for a recipe, you can quickly build it up by feeding a larger amount. This is often called a “bulk feed.”
Important:
Bulk feeding works best with a mature, established starter that has been consistently fed for at least a few weeks. If your starter is still new, feeding it too much at once can dilute the wild yeast and microorganisms, making it weaker instead of stronger.
How to Bulk Feed Your Starter
Measure how much starter you currently have and decide how much you need, keeping in mind you’ll want some leftover to continue feeding your starter.
For example, if you have 50 grams of gluten-free sourdough starter and your recipe calls for 200 grams, aim to make about 250 grams total so you don’t use it all up.
You can do this with a larger feeding using a 1:2:2 ratio (starter : flour : water):
- 50 grams starter
- 100 grams gluten-free flour
- 100 grams water
This gives you enough starter for your recipe plus extra to keep your starter going. Because this is a larger feeding than the usual 1:1:1, so it may take a little longer to become bubbly and reach its peak. But it usually also has a longer window of being at peak.
How to Make Your Gluten-Free Starter More Active
If your gluten-free sourdough starter seems sluggish or isn’t forming many bubbles, here’s how to strengthen it:
- Feed consistently
Stick to a regular feeding schedule using a 1:1:1 ratio. - Keep it warm (but stable)
A warm place helps fermentation, but avoid direct sunlight and cool drafts. - Use a good flour
Brown rice flour or sorghum flour support strong fermentation. - Give it time
Starters get stronger as they mature, which can take anywhere from 30 day- 3 months of daily feedings.
If you use the oven-with-the-light-on trick, be extra careful to remove your starter before preheating the oven.
Can You Change the Flour in a Gluten-Free Sourdough Starter?
Yes you can switch the type of gluten free flours you use to feed your starter, but I always suggest to do it gradually. Because a sudden change can throw off the balance of the microorganisms and slow down activity.
How to Transition Slowly
Start by mixing a small amount of the new flour into your regular feedings.
For example:
- Day 1–2: mostly your original flour + a small amount of the new flour.
- Day 3–4: half original flour + half new flour.
- Day 5+: fully switch to the new flour.
This gives your starter time to adjust and stay active.
What to Watch For
As you transition, you may notice:
- Changes in thickness or hydration.
- Differences in how quickly it becomes bubbly.
- A slightly different smell.
This is normal. Different gluten-free flours absorb water differently, so you may need to adjust hydration slightly. If your starter slows down during the transition, go back to a higher percentage of your original flour for a few feedings, then try again more gradually.
Frequently Asked Questions for Gluten Free Sourdough Maintenance
Troubleshooting Gluten-Free Sourdough Starter: If your gluten-free sourdough starter isn’t behaving as expected, here are some common problems and how to fix them:
Your starter may need more consistent feeding or a warmer place. Try feeding it daily and keep it in a warm, draft-free spot.
If the smell is occurring around the time of feeding, it is indicating that it is very hungry. You can increase the feeding ratio to 1:2:2 or even 1:3:3 to help feed the hungry microbes.
The temperature and humidity of your home also play a part in how your starter will act, and the warmer the home, the more active the starter will be, causing it to be hungry more quickly.
Gluten free flours absorb a lot of water and each type of gluten free flour behaves differently.
Add a small splash of purified water to help loosen up the thick paste and make it more of a thick pancake batter consistency.
If your starter is too runny, add a little more flour at the next feeding.It should be thick enough to hold some structure while still flowing slowly.
This can happen if your starter is cold or hasn’t been fed regularly. Feed it consistently and keep it warm to help it become more active.
Gluten free sourdough starters lack the gluten structure network that traditional sourdough has to capture a lot of air and get that strong rise. Doubling is not indicative of a gluten free sourdough starter being ready to bake with.
Watch your starter for several days in a row to see how long it takes to before slowly falling again, and then plan to bake in that timeframe when your starter is most active and before it falls.

I hope this guide for how to maintain a gluten free sourdough starter was helpful to you! What was the most suprising thing you learned? I’d love to hear about it in the comments.

How to Feed a Gluten Free Sourdough Starter for Maintenance
Ingredients
Equipment
Method
- This method assumes you have your gluten-free sourdough starter in one glass jar and a second identical empty jar ready to use.
- Weigh your starter: Place the empty jar on a kitchen scale and tare it to 0 grams. Then place the jar with your starter on the scale to see the actual weight of your starter.
- Discard excess starter: Decide how much starter you want to keep. Remove the rest and save it as discard for later use.For this example, keep 50 grams of starter.Gluten Free Sourdough Starter
- Add flour: Tare the scale again, then add 50 grams of gluten-free flour (such as brown rice flour).Gluten Free Flour
- Add water: Add 50 grams of water.Filtered Water
- Stir until smooth: Stir well until there are no dry pockets of flour.
- Your starter should look like a thick batter and be easy to stir. If it feels too thick, add a few drops of water until it loosens slightly.
- The right consistency of a well hydrated starter is a thick, slow flow from the back of a spoon.
- Transfer to a clean jar: Pour your freshly fed starter into the clean jar.Try to keep the inside of the jar clean and free from streaks of starter to help prevent mold.
- Transferring your gluten free starter to a new jar after every feeding is best practice to help prevent mold growth.
- Cover and rest: Cover with a breathable lid, such as a paper towel or coffee filter secured with a rubber band.Place on the counter in a spot away from drafts and direct sunlight.
- Repeat daily: Feed your starter again in about 24 hours if keeping it at room temperature.
- Your starter is ready to use when it is bubbly, sligthly risen (don't expect it always to double in size) and at it's peak activity before it drops.
Notes
Refrigerator storage:
If storing your starter in the fridge, use a closed lid to prevent contamination. Feed it about once per week to keep it healthy. This works well if you bake less often or live in a warmer climate, where starters become more active and need more frequent feeding.Hydration tip for gluten-free starters:
Gluten-free flours absorb more water, so it’s important to go by the look and feel of your starter rather than strict ratios.Even when using a 1:1:1 feeding, you may need to add a little extra water. Your starter should be a thick, smooth batter that slowly flows off a spoon.
The exact amount can vary depending on the flour you use, as well as the temperature and humidity in your home.
Tried this recipe?
Let us know how it was!Be Sure to Always Double Check Ingredient Labels
It is always best practice to double-check your ingredient labels for hidden sources of allergens.
Also, please note the nutrition information is automatically calculated and should only be used as an approximation. It may vary based on ingredient brands, portion sizes, and preparation methods. For specific dietary or medical needs, consult a healthcare professional or registered dietitian.